> ## Documentation Index
> Fetch the complete documentation index at: https://help.proculy.com/llms.txt
> Use this file to discover all available pages before exploring further.
# How to get Started with Proculy
> A quick guide to get your procurement workflow up and running with Proculy
## Registering
To get started with Proculy, please reach out to our team.We'll assist in creating
a super admin account for your
organization. Once set up, the designated super admin will receive an invitation email with login credentials to
begin using Proculy.
Upon receiving the email, the super admin user should follow these steps:
1. **Open the Invitation Email:** Look for an email from Proculy containing your login credentials and a link to the login page.
2. **Access the Login Page:** Click on the provided link to navigate to the Proculy login page.
3. **First-Time Login:** Enter the credentials provided in the email to log in for the first time.
4. **Change Password:** You will be prompted to change your password upon initial login. Choose a secure password and save it.
5. **Complete Profile Setup:** This step involves setting up the account for your organization by creating roles, adding users, setting up your organization's inventory, and configuring financial master data. Fill in any additional required information to complete your profile setup. This comprehensive setup ensures your organization’s procurement process runs smoothly and efficiently.
Once these steps are completed, the super admin user can dive into Proculy, leveraging its capabilities to save
costs and streamline procurement processes effectively.
***
## Onboarding
**Proculy's onboarding process is thoughtfully designed for ease and user-friendliness, ensuring efficient account management.** It's intuitive and straightforward, complemented by tooltips and simple instructions to ensure a seamless onboarding journey.
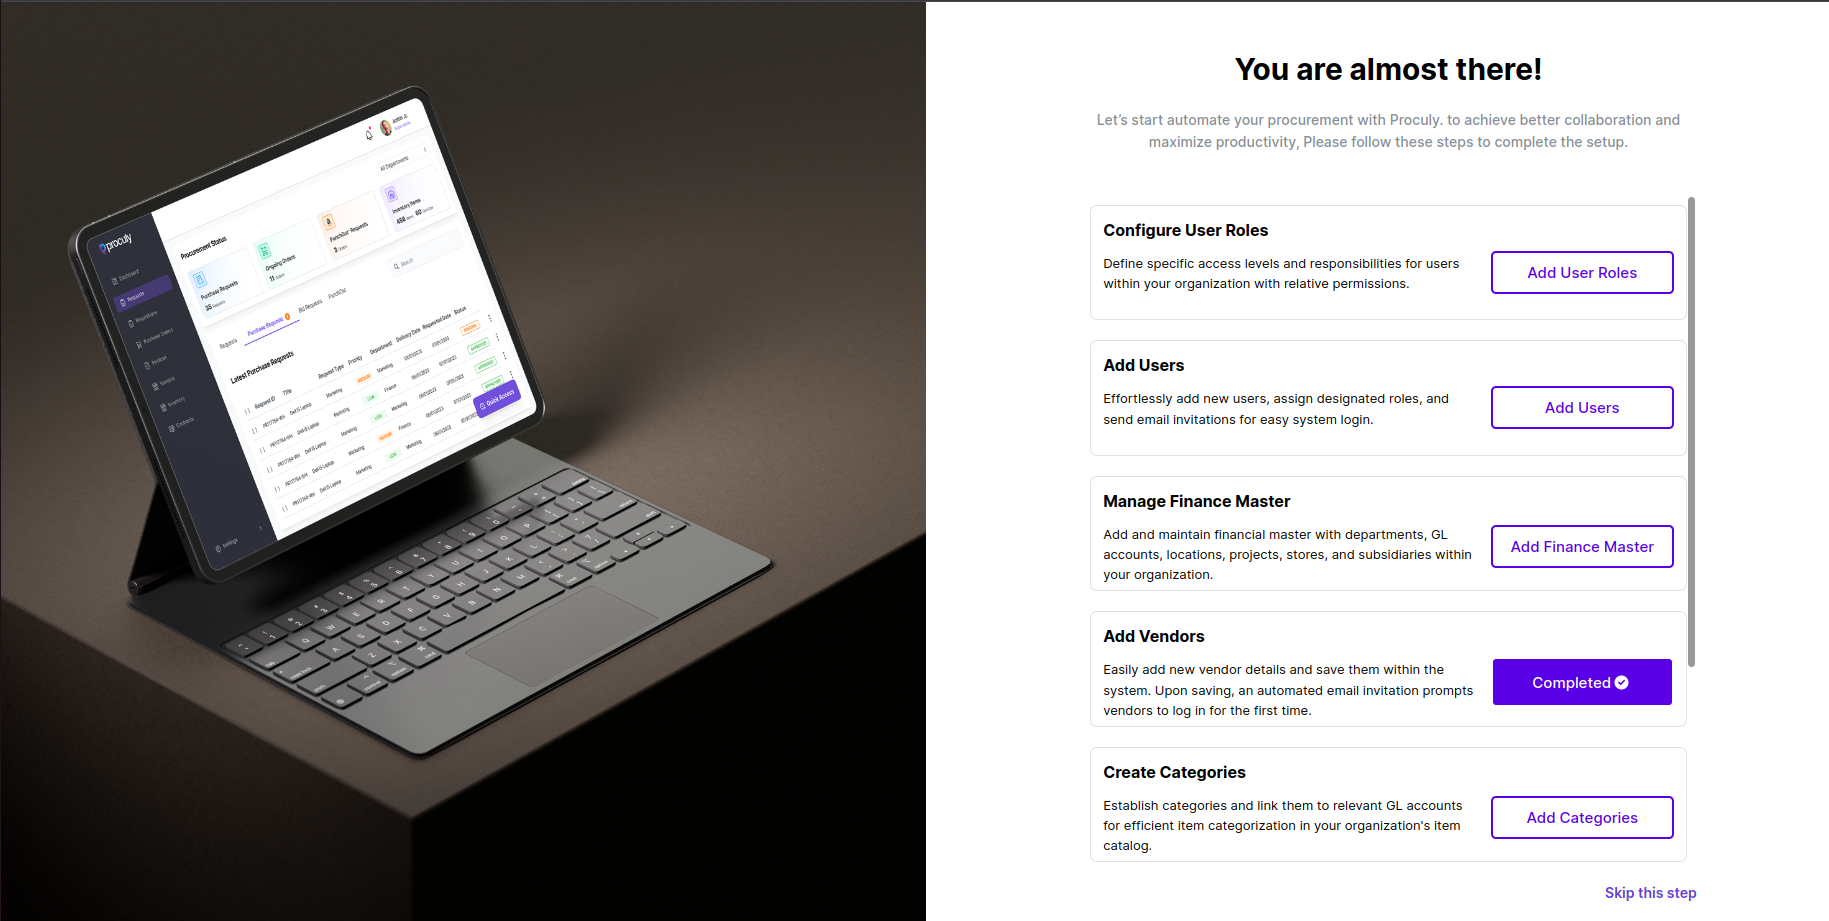
As a first-time user during the onboarding, you'll receive an overview of the steps needed to set up your organization's account, such as configuring user roles, adding users, managing financial master data, adding vendors, and creating categories. This guide will show you how the screens work and how to add new records, with helpful tooltips along the way.
A step is marked as completed when you add the first record (e.g., a user or role), indicating you have successfully followed the guide. However, to fully utilize the platform, you will need to add more records. Completing all these steps at this point is optional, and you have the flexibility to skip them if you prefer. However, you need to do these configurations to kick-start your account and fully utilize its capabilities. If you skip the step here, you can complete the configurations via the Main Menu.
As a first-time user, the onboarding process simplifies user setup immediately after creating an account. You can configure user roles, add users, manage financial master data, add vendors, and create categories by following the guided steps. On the dashboard, you will see an onboarding card that remains visible until all steps on the onboarding page are completed. Clicking on "Complete Setup" will take you back to the onboarding page. Steps in the onboarding process are marked as Completed when the first new record of the organization is created in each step. This indicates that the user has successfully navigated the screens and added a record. Once you have completed all the steps and they are marked as Completed, the onboarding card will be removed from your dashboard, signifying that your initial setup is finished.
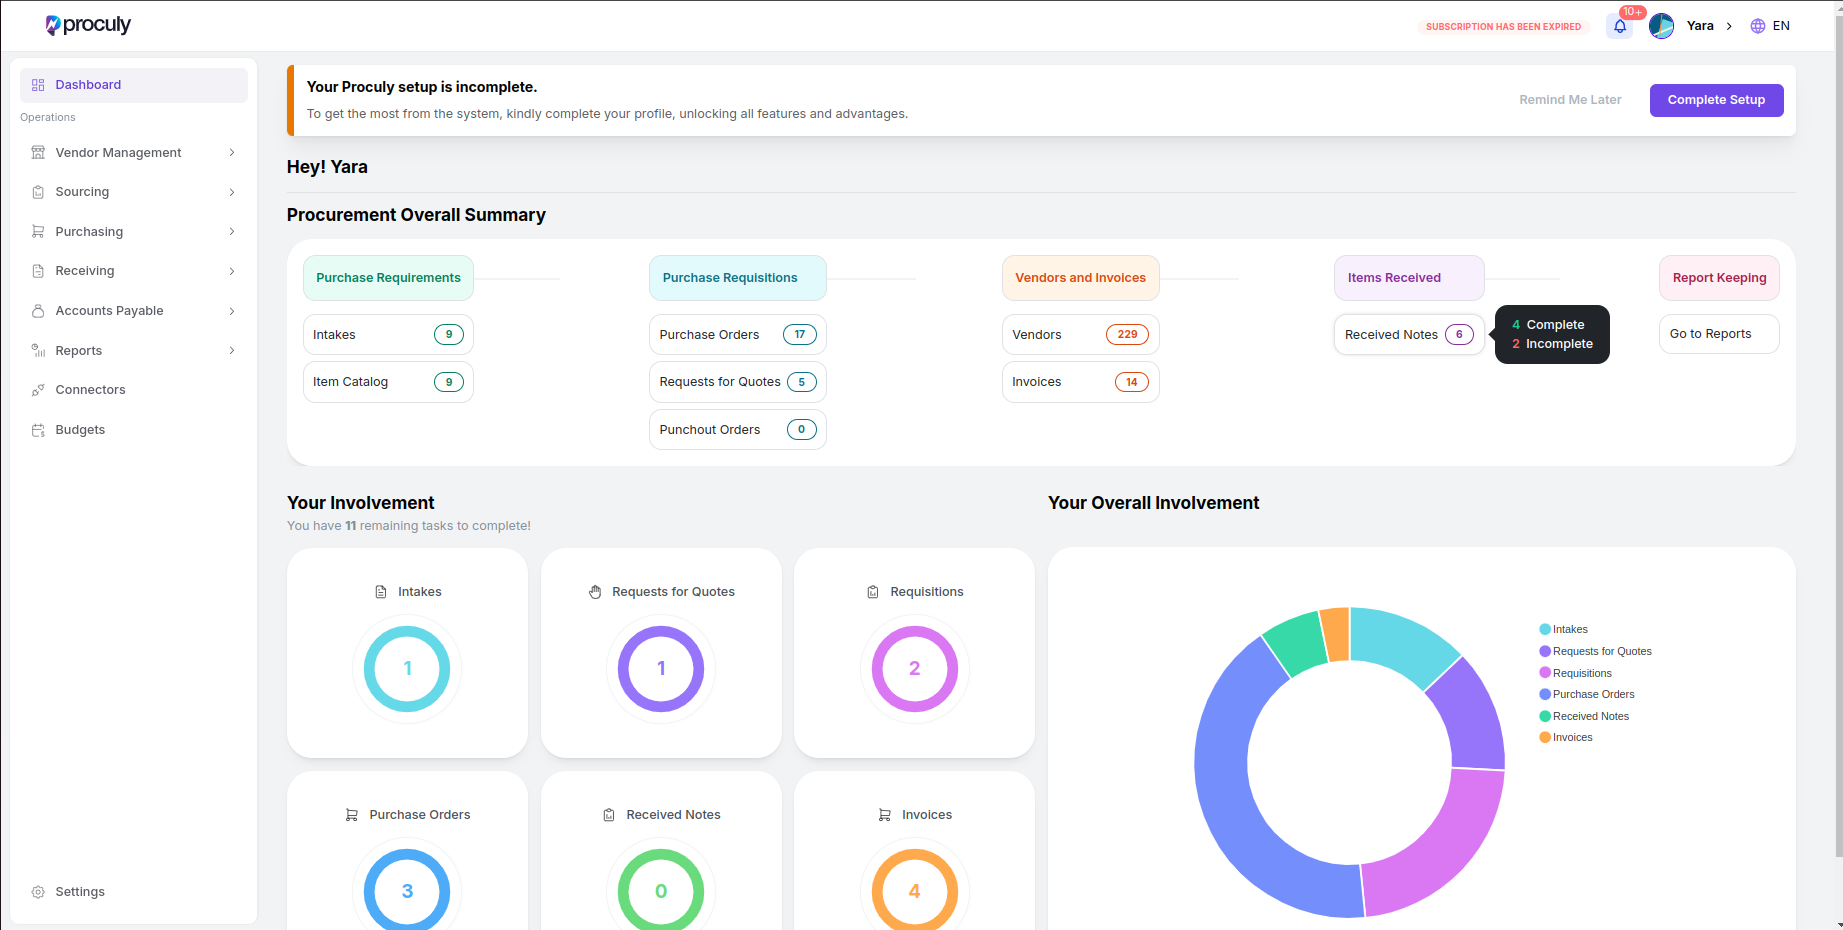
 After clicking ****‘Skip this step,’**** you'll be directed to your dashboard. This is your client dashboard,
your
control center where you can efficiently manage all aspects of purchase orders, vendors, requisitions, invoices,
and catalogs.
After clicking ****‘Skip this step,’**** you'll be directed to your dashboard. This is your client dashboard,
your
control center where you can efficiently manage all aspects of purchase orders, vendors, requisitions, invoices,
and catalogs.
 ***
## Setting up your account
After successfully completing the onboarding process, or skipping the step, you can navigate to your dashboard. Within this dashboard, you'll have super admin access, which we'll predominantly focus on for the sake of clarity in this documentation. Nevertheless, it's crucial to understand that you can include sub-users in your account and define their access according to their roles.
If the user skipped the onboarding step, the **"Complete Setup"** card will be visible at the top of the screen. The user can either click on **"Complete Setup"** to return to the onboarding page and see which settings remain to be completed or click on "Remind me later" to remove the card from the screen. A user can always use the Settings page to complete the remaining steps for setting up the organization's account.
Your dashboard will resemble the image above, offering a comprehensive and simplified overview of your account.
***
## Creating and Managing User Roles and Users
Effectively management of a procurement system involves the seamless addition and assignment of user roles. To enjoy the full advantages of Proculy, start by creating user roles.
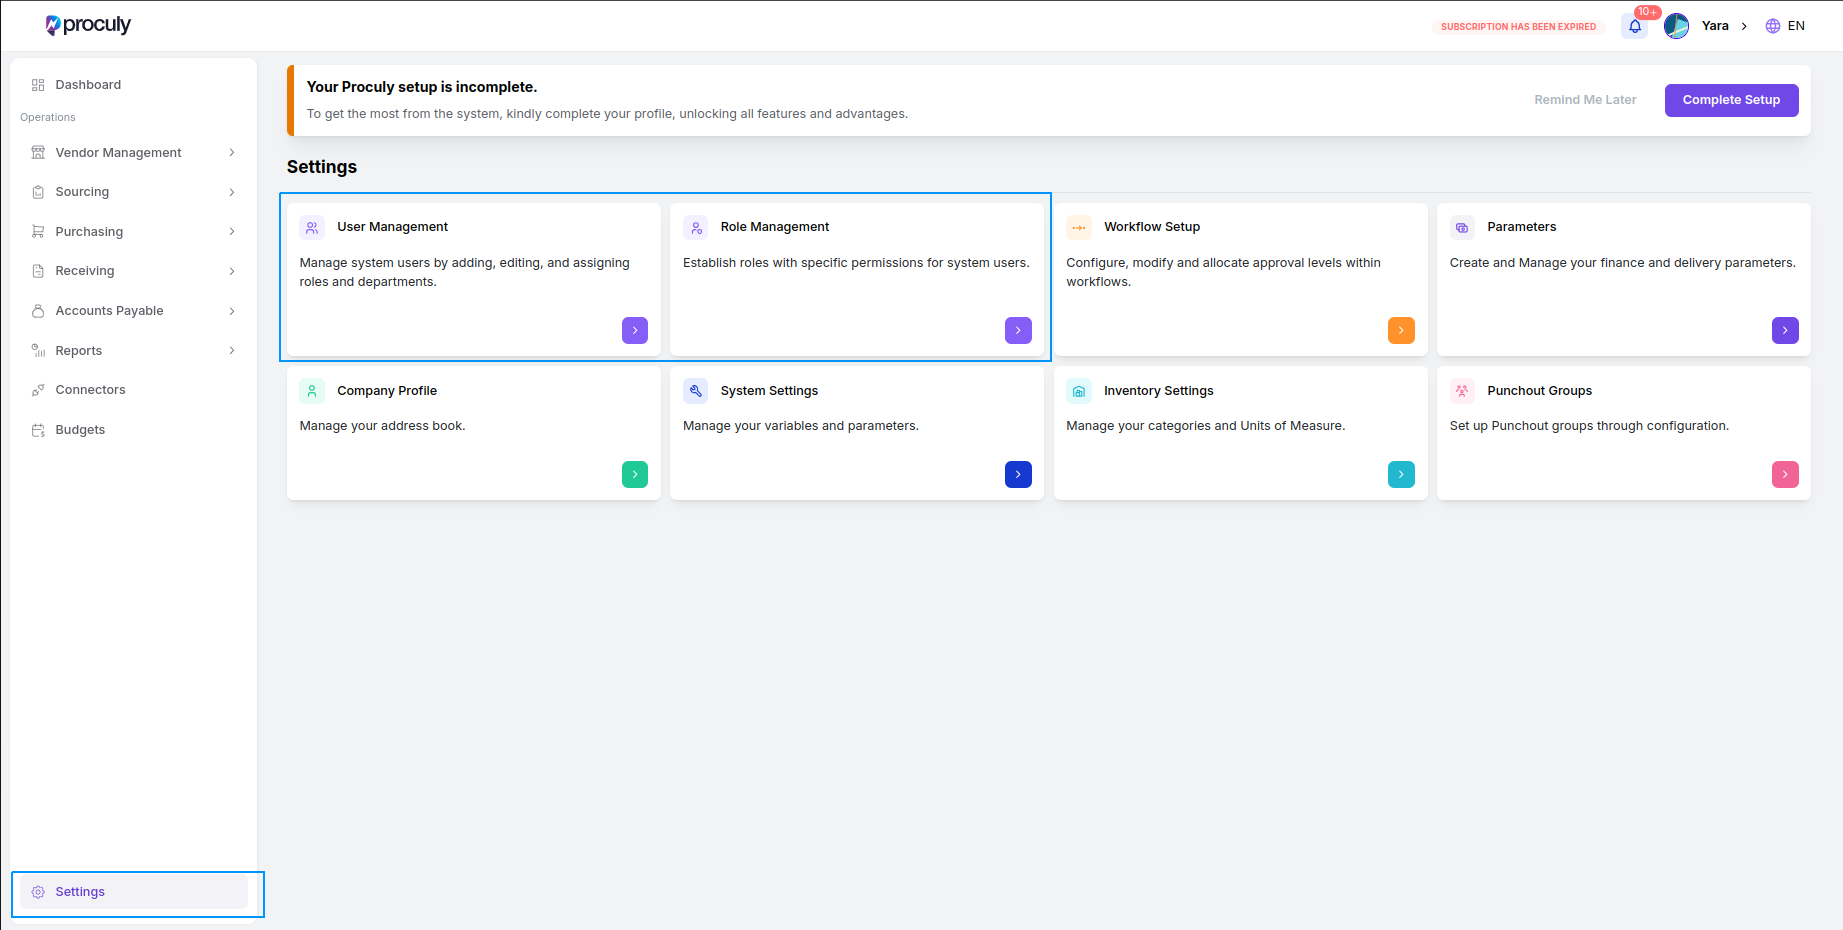
To add new users and manage roles, first navigate to `Settings > Role Management` to create and assign different user roles. In Role Management, you can create new roles with specific permissions tailored to your organization's needs. After defining the roles, go to `Settings > User Management` to add new users. Here, you can assign the appropriate roles to each user, ensuring they have the necessary permissions to perform their duties.
***
## Setting up your account
After successfully completing the onboarding process, or skipping the step, you can navigate to your dashboard. Within this dashboard, you'll have super admin access, which we'll predominantly focus on for the sake of clarity in this documentation. Nevertheless, it's crucial to understand that you can include sub-users in your account and define their access according to their roles.
If the user skipped the onboarding step, the **"Complete Setup"** card will be visible at the top of the screen. The user can either click on **"Complete Setup"** to return to the onboarding page and see which settings remain to be completed or click on "Remind me later" to remove the card from the screen. A user can always use the Settings page to complete the remaining steps for setting up the organization's account.
Your dashboard will resemble the image above, offering a comprehensive and simplified overview of your account.
***
## Creating and Managing User Roles and Users
Effectively management of a procurement system involves the seamless addition and assignment of user roles. To enjoy the full advantages of Proculy, start by creating user roles.
To add new users and manage roles, first navigate to `Settings > Role Management` to create and assign different user roles. In Role Management, you can create new roles with specific permissions tailored to your organization's needs. After defining the roles, go to `Settings > User Management` to add new users. Here, you can assign the appropriate roles to each user, ensuring they have the necessary permissions to perform their duties.
 **Role Management:**
Once you click on **"Role Management"**, you will be directed to a page where you can manage user roles. The Super Admin user role will already be available in the list of roles and cannot be assigned to another user (uneditable and non-assignable). The Super Admin has all the permissions needed for configurations. They can create new roles with specific permissions and assign these roles when adding new users. All roles are fully customizable to meet your organization's requirements, ensuring a tailored and efficient setup.
**Role Management:**
Once you click on **"Role Management"**, you will be directed to a page where you can manage user roles. The Super Admin user role will already be available in the list of roles and cannot be assigned to another user (uneditable and non-assignable). The Super Admin has all the permissions needed for configurations. They can create new roles with specific permissions and assign these roles when adding new users. All roles are fully customizable to meet your organization's requirements, ensuring a tailored and efficient setup.
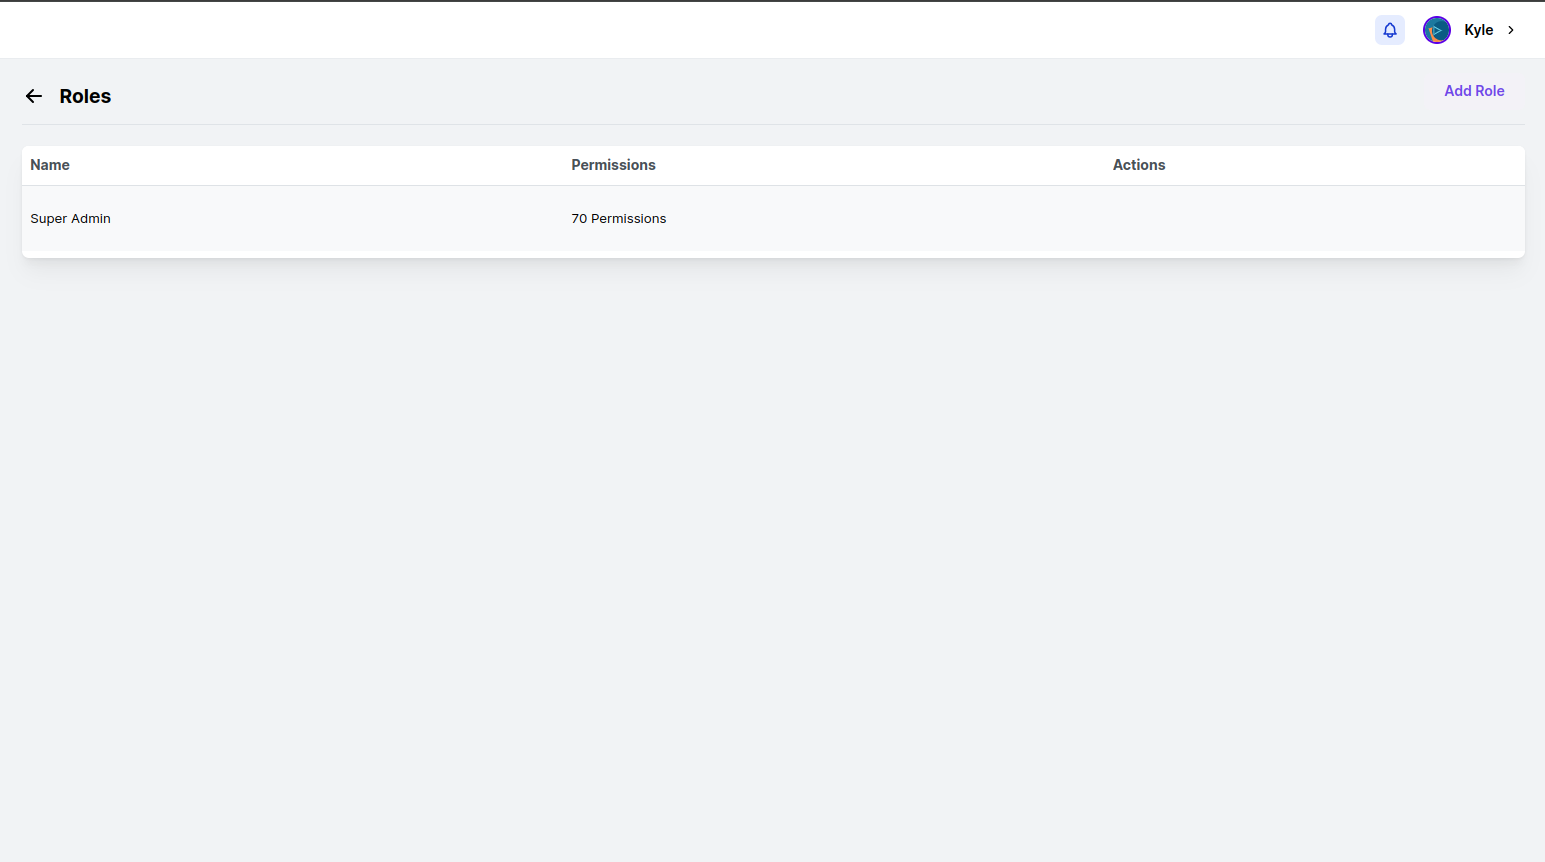 In the Roles page click on "Add Role" and you will be directed to the page for role creation. Provide a name for the new role.
Choose the setting permissions under **"Settings"** and functional permissions under **"Domain"** for the freshly created role. Users with this role get access based on these choices. You can decide if they can create, read, or update specific tasks.
In the Roles page click on "Add Role" and you will be directed to the page for role creation. Provide a name for the new role.
Choose the setting permissions under **"Settings"** and functional permissions under **"Domain"** for the freshly created role. Users with this role get access based on these choices. You can decide if they can create, read, or update specific tasks.
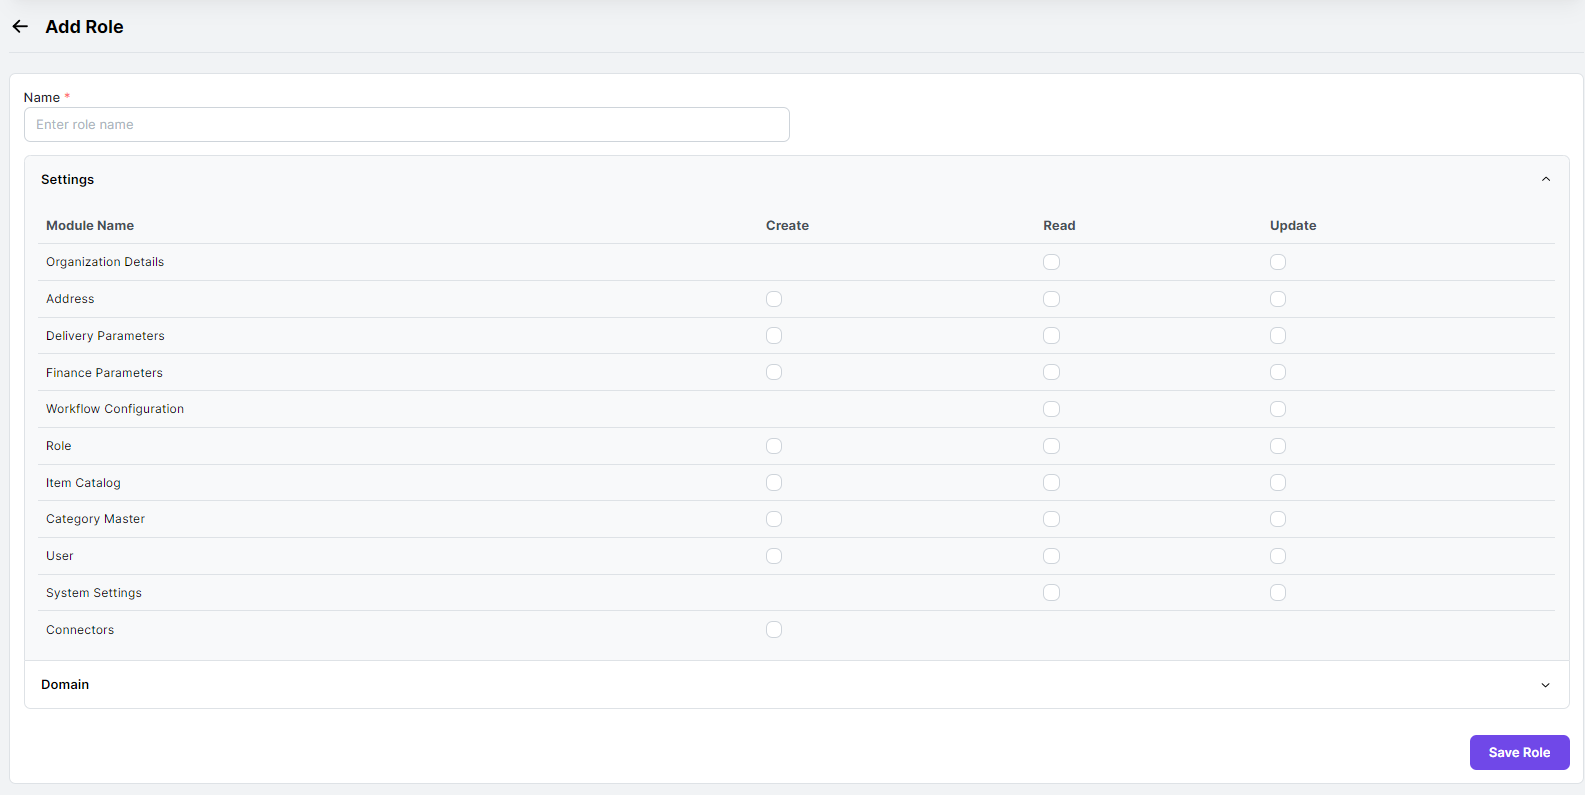 Save to add the **new role** to the list.
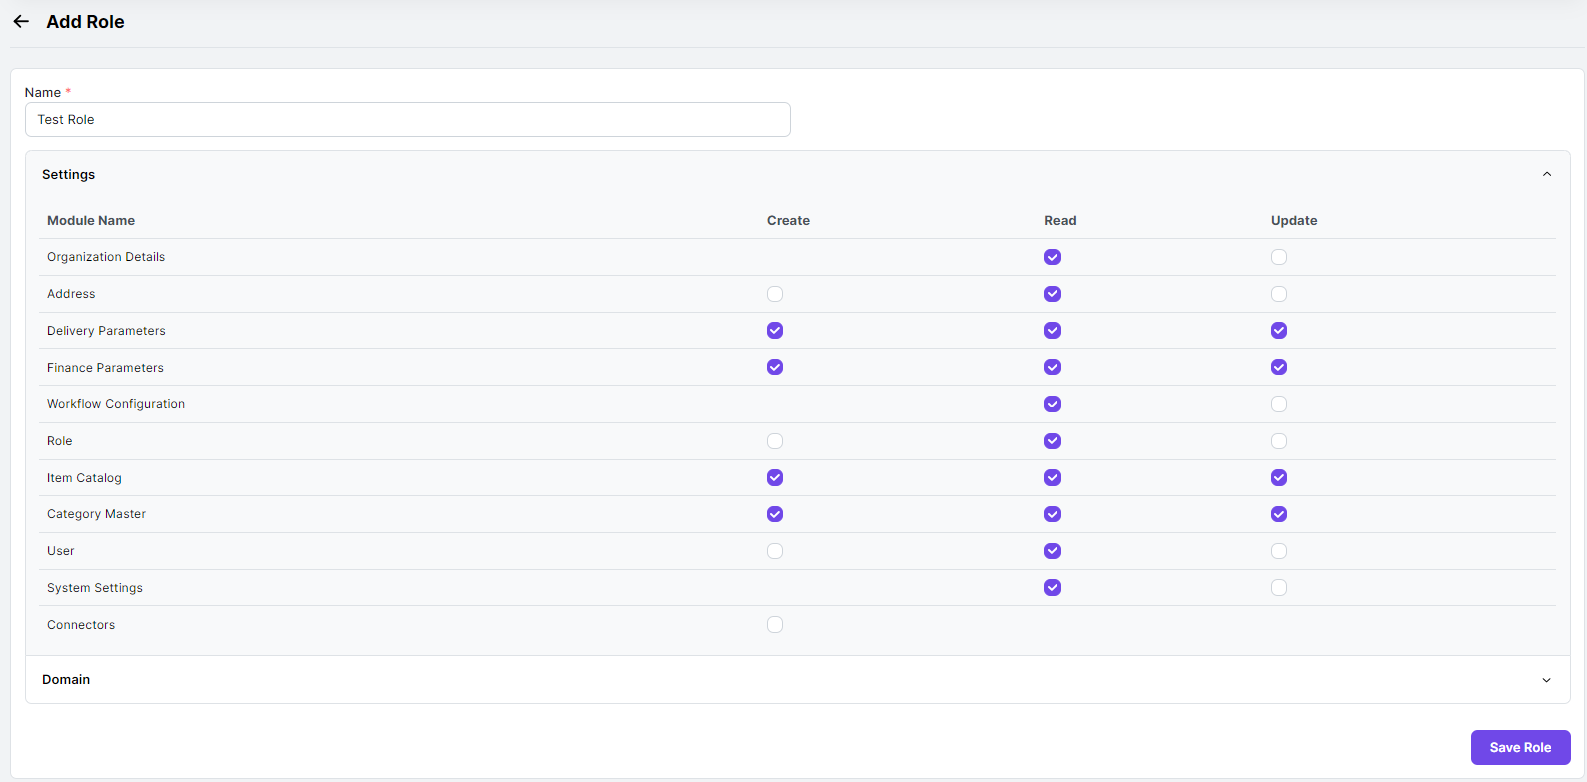
 The new role you created is now visible on the Roles page. You can edit it and adjust user permissions as needed.
Please note that once a role is saved, existing permissions cannot be removed. If you need to reduce permissions,
you will need to create a new role.
**User Management**
Once you click on "User Management", you will be directed to the Users page where you can manage the users in your company. Here, all your added users will be listed.
The new role you created is now visible on the Roles page. You can edit it and adjust user permissions as needed.
Please note that once a role is saved, existing permissions cannot be removed. If you need to reduce permissions,
you will need to create a new role.
**User Management**
Once you click on "User Management", you will be directed to the Users page where you can manage the users in your company. Here, all your added users will be listed.
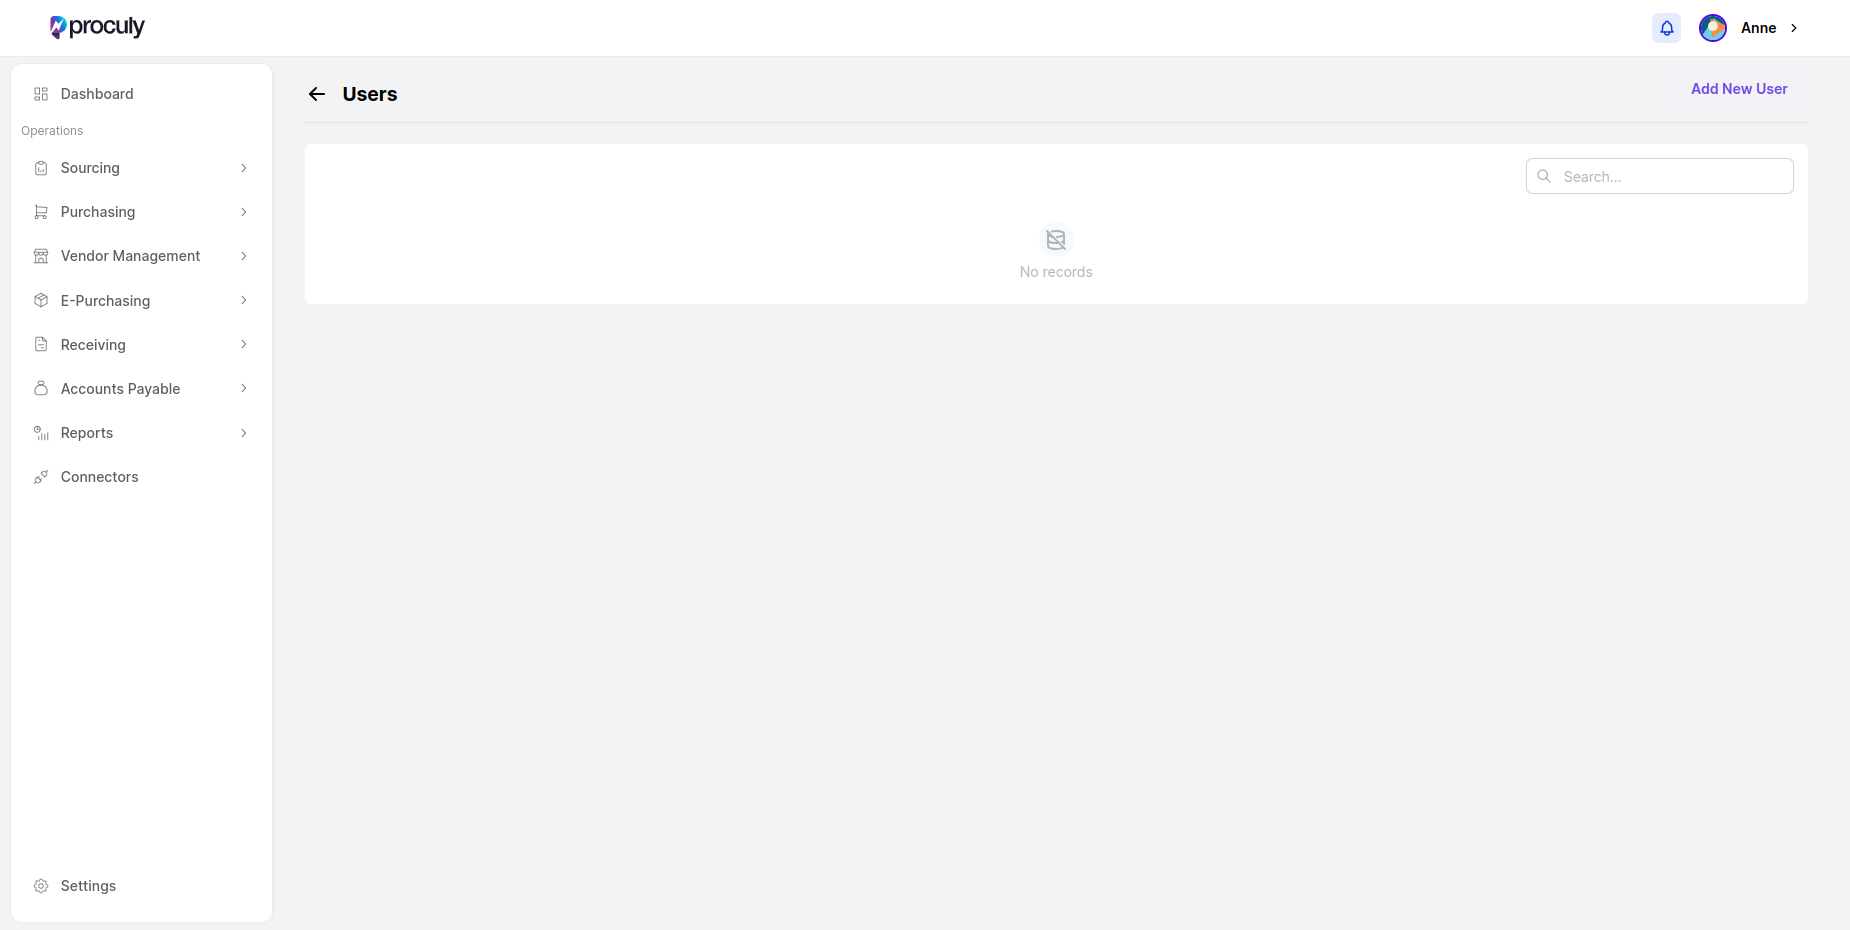 Click on "Add
New
User" and you will see the Add User page where you can fill all mandatory details of a user.
Click on "Add
New
User" and you will see the Add User page where you can fill all mandatory details of a user.
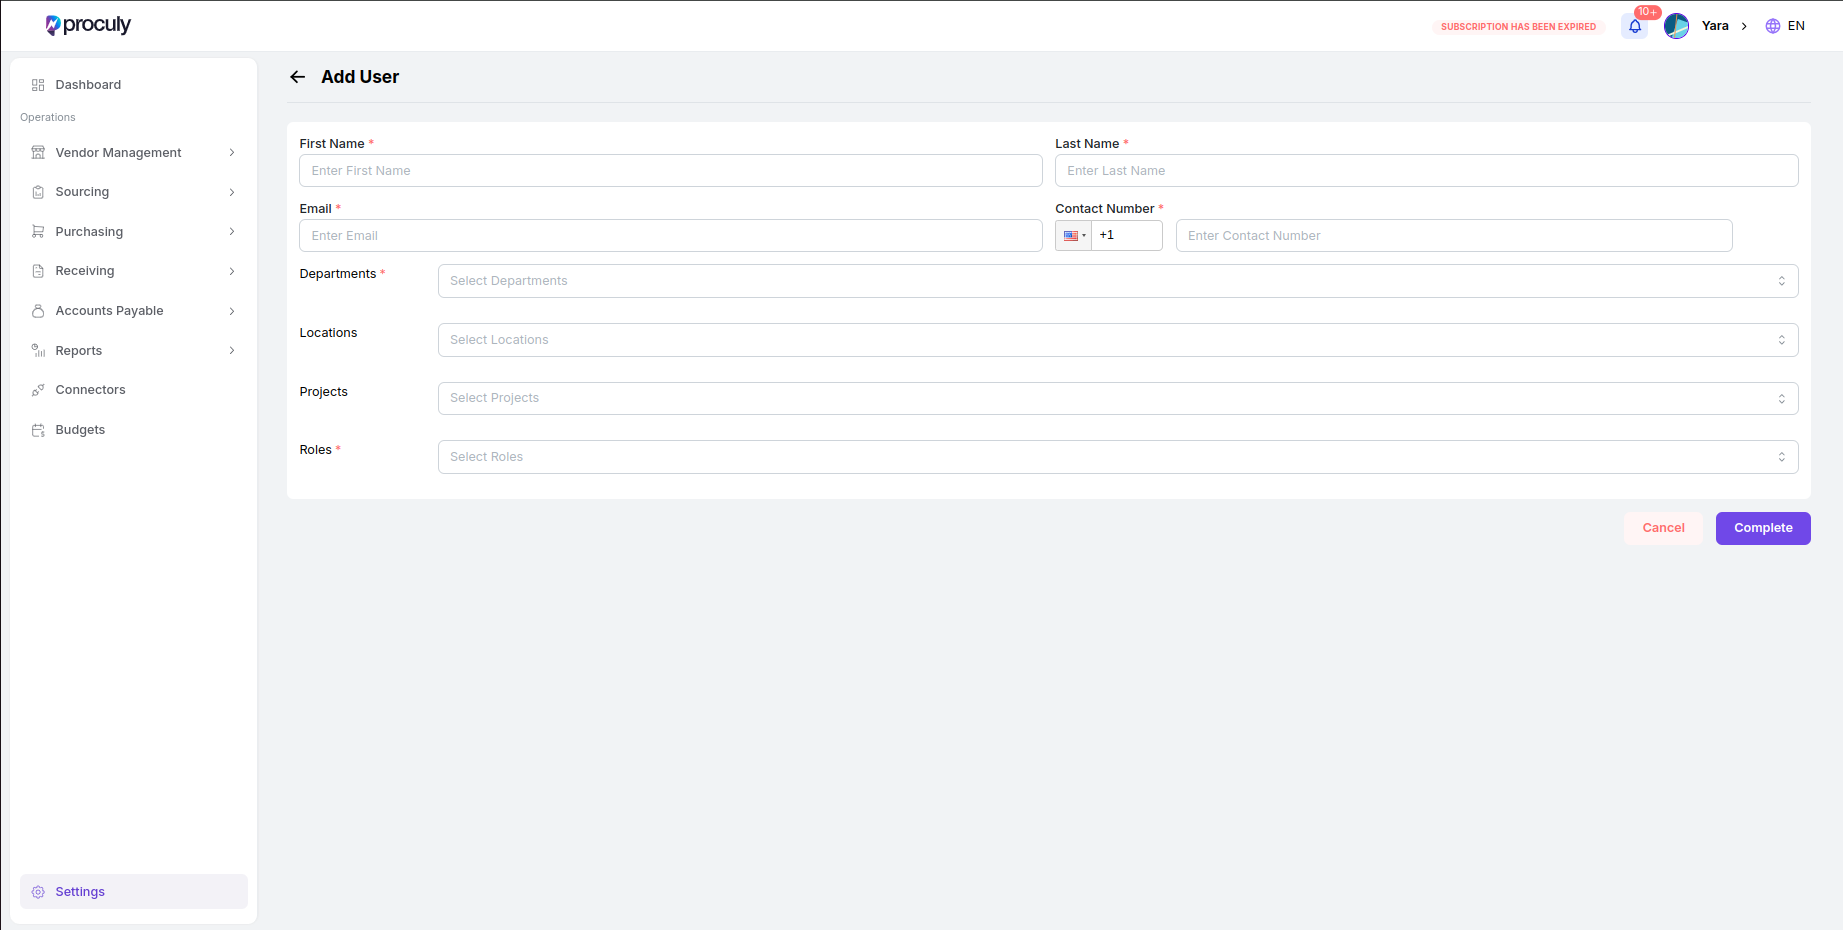 Make sure you have added the correct email and linked all departments and the user roles appropriately for the user
before clicking “Complete”.
Make sure you have added the correct email and linked all departments and the user roles appropriately for the user
before clicking “Complete”.
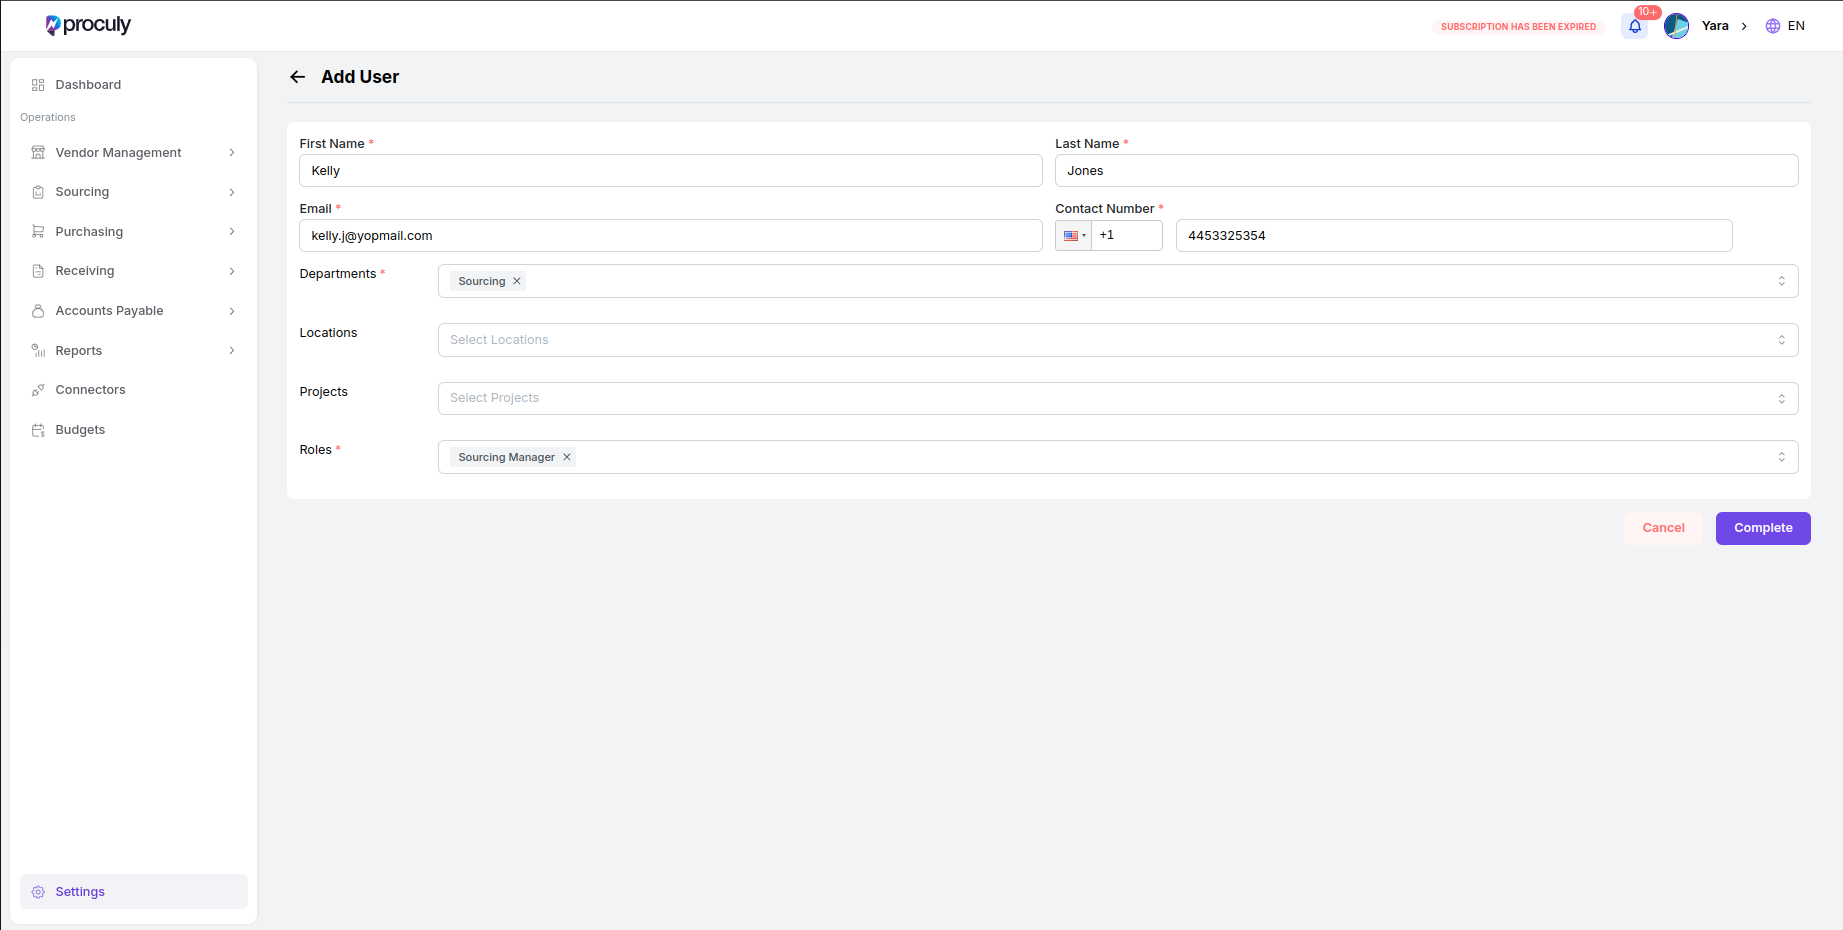 When clicked on **“Complete”** after filling required information, the user will be saved to the users list. An invitation email will be sent to the added user with their initial login credentials. The status of the user will be shown as **“Pending Invitation”**.
When the user logs in using the credentials sent via the invitation email and log into the system after setting up their new password, the status of the user will be updated as **“Active”**.
When clicked on **“Complete”** after filling required information, the user will be saved to the users list. An invitation email will be sent to the added user with their initial login credentials. The status of the user will be shown as **“Pending Invitation”**.
When the user logs in using the credentials sent via the invitation email and log into the system after setting up their new password, the status of the user will be updated as **“Active”**.
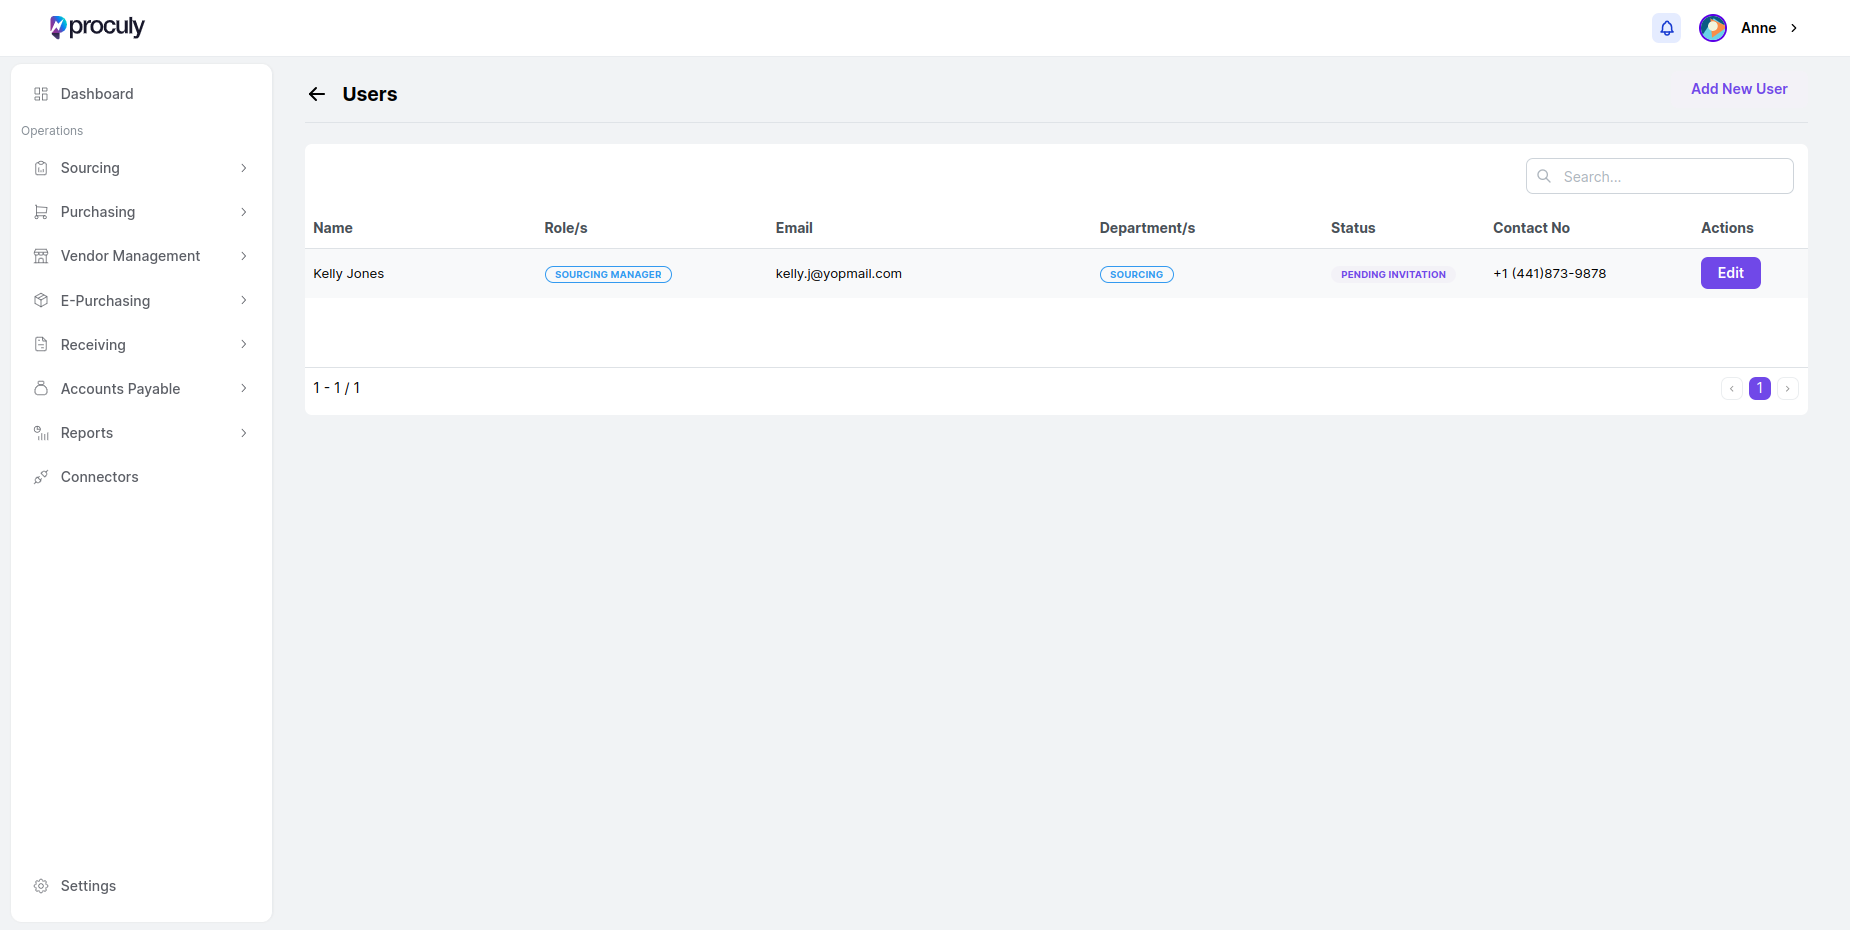 An added user can be edited by clicking the **“Edit”** button for the specific user, but note that the email address cannot be changed after saving.
To remove a user from the system, you can change their status to **"Inactive"**. Inactive users will no longer have access to the system.
However, if the user is part of any approval flow, you must first remove them from those flows. You can view the approval flows they are part of at the bottom of the Edit User page.
***
## Categorizing Procurement
**Category Master Overview**
In Proculy, users can manage a list of categories to organize items in the item catalog. These categories help in linking items to GL accounts, providing a structured approach to inventory management.
**Accessing the Category Master**
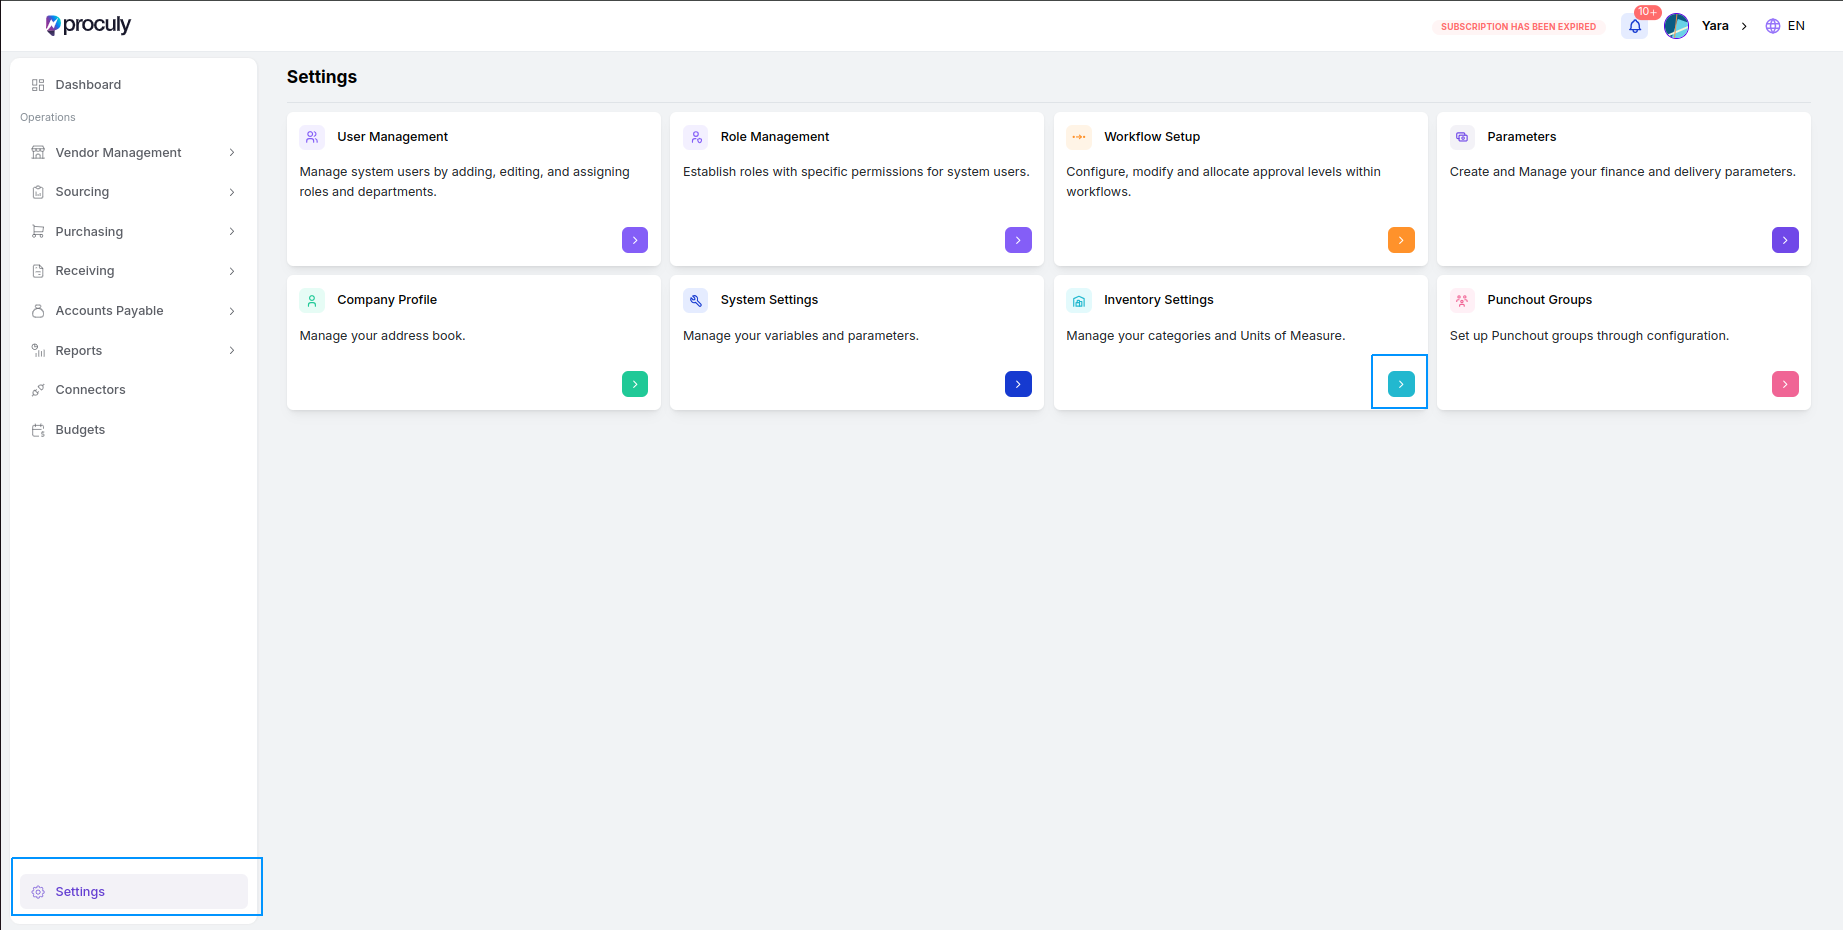
To access the Category Master page, navigate through the main menu: `Settings > Inventory Settings > Category Master`.
An added user can be edited by clicking the **“Edit”** button for the specific user, but note that the email address cannot be changed after saving.
To remove a user from the system, you can change their status to **"Inactive"**. Inactive users will no longer have access to the system.
However, if the user is part of any approval flow, you must first remove them from those flows. You can view the approval flows they are part of at the bottom of the Edit User page.
***
## Categorizing Procurement
**Category Master Overview**
In Proculy, users can manage a list of categories to organize items in the item catalog. These categories help in linking items to GL accounts, providing a structured approach to inventory management.
**Accessing the Category Master**
To access the Category Master page, navigate through the main menu: `Settings > Inventory Settings > Category Master`.
 On this page, all added categories are listed, and users can add, edit, or delete categories as needed.
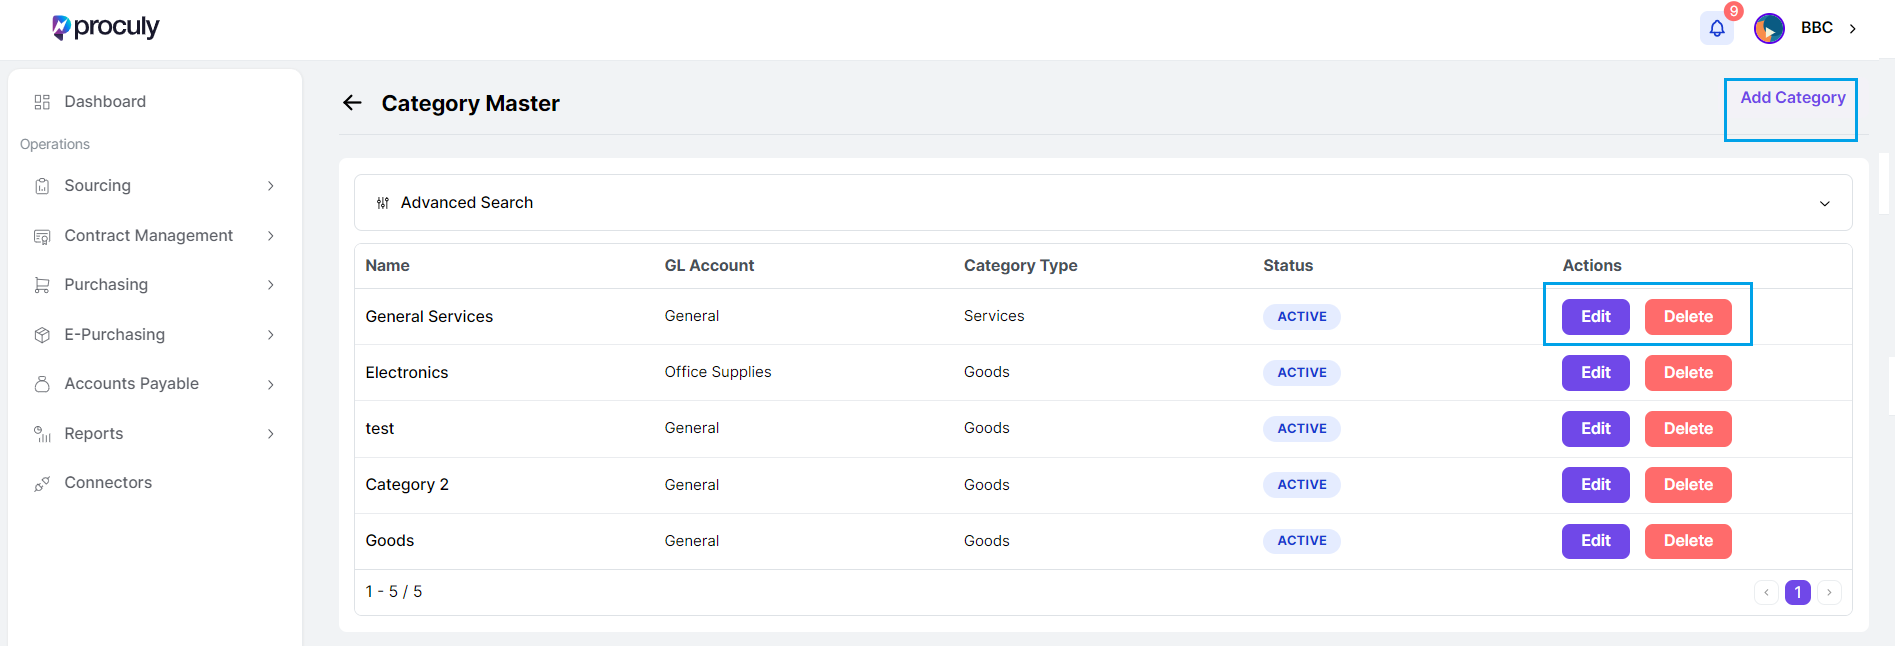 **Adding a New Category:** Click on the "Add Category" button to open a pop-up window. Enter the necessary details for the new category, and click on the **"Save"** button after filling in all mandatory data to add the category to the list. Categories can be created separately for goods and services.
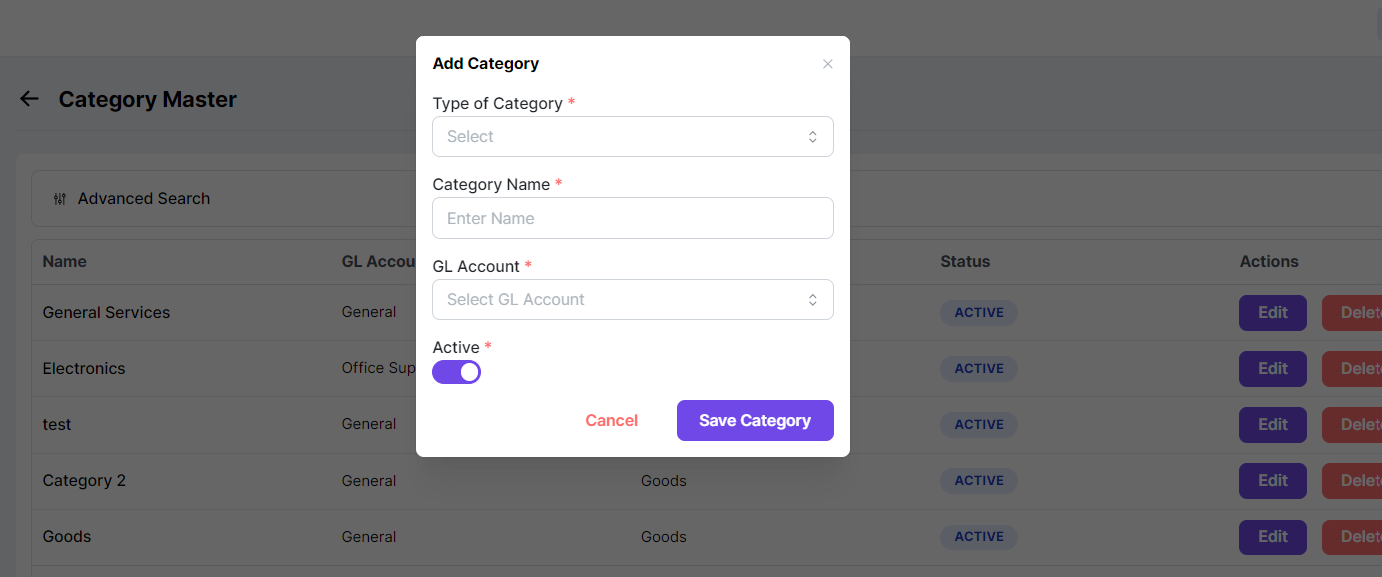 Use the Active/Inactive toggle button to define the status of the category. Only active categories will be
available in the Category dropdown options in procurement documents.
Use the **"Edit"** and **"Delete"** buttons in the actions column to modify or remove categories. Note that categories
already linked to items cannot be deleted.
By setting up categories in the Category Master, you ensure that your item catalog is well-organized and linked to the appropriate GL accounts, facilitating efficient procurement and inventory management.
***
## Creating and Managing Item Catalog
Maintaining an Item Catalog is crucial for efficient procurement management. It allows your organization to manage a comprehensive list of frequently purchased items, complete with detailed specifications. This simplifies the process of creating intakes or requisitions, as users can easily select items from the catalog without needing to know the supplier or the exact price. Additionally, the item catalog can link each item to one or more authorized vendors, making vendor selection straightforward during purchase order creation. This also facilitates the creation of requests for quotes to identify the best vendors, ensuring cost-effective and streamlined procurement.
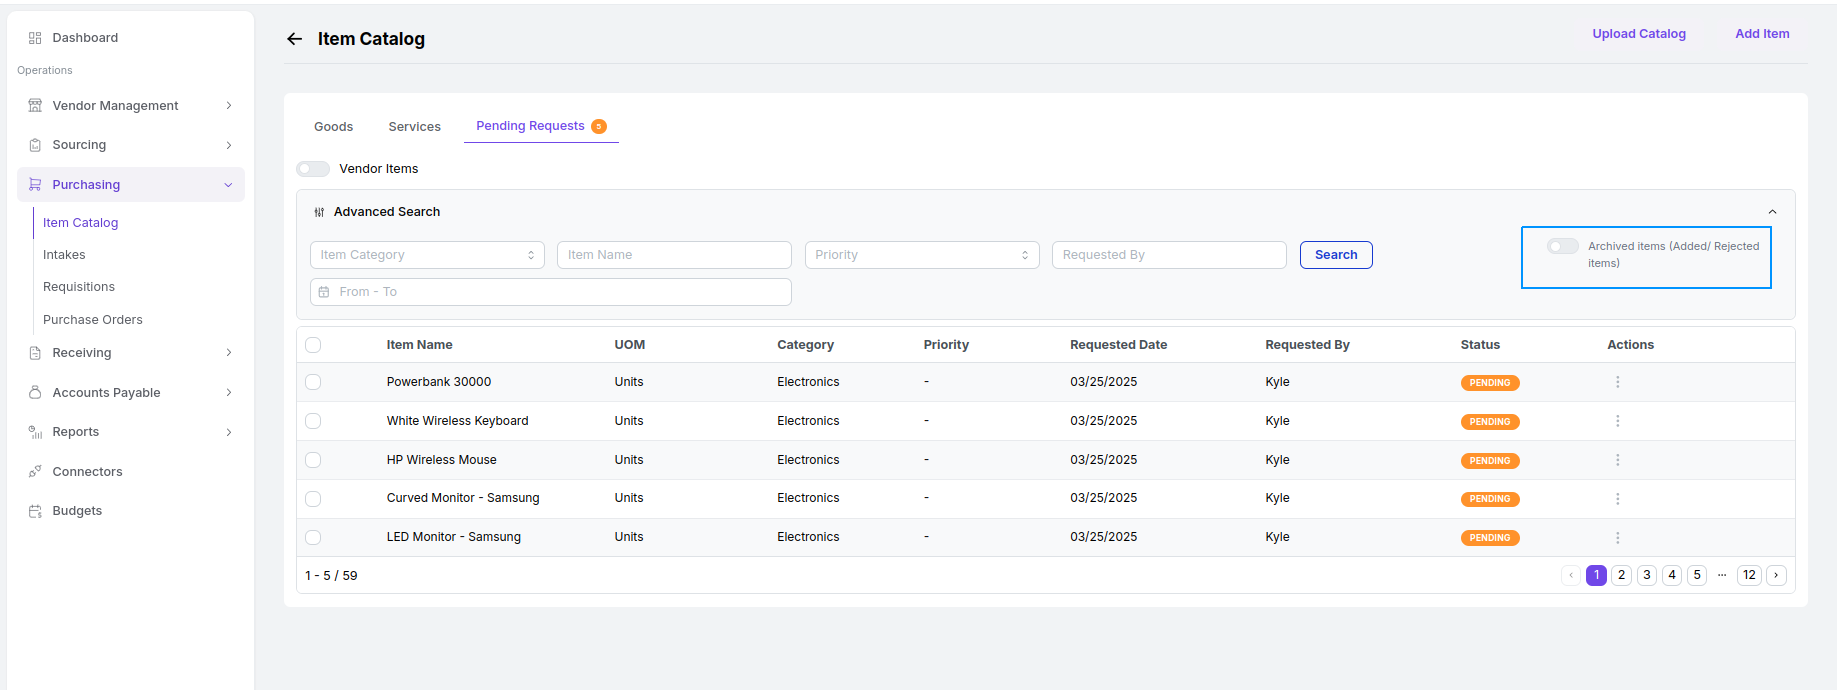
To add items to the item catalog, navigate through the usual path: `Menu > Purchasing > Item Catalog`. This directs you to the item catalog management page, where you can efficiently add and manage your inventory items. This process ensures that your catalog is up-to-date and comprehensive, facilitating smooth and streamlined procurement activities.
After clicking on that, the dashboard will show the item catalog table, presenting all the information.
Use the Active/Inactive toggle button to define the status of the category. Only active categories will be
available in the Category dropdown options in procurement documents.
Use the **"Edit"** and **"Delete"** buttons in the actions column to modify or remove categories. Note that categories
already linked to items cannot be deleted.
By setting up categories in the Category Master, you ensure that your item catalog is well-organized and linked to the appropriate GL accounts, facilitating efficient procurement and inventory management.
***
## Creating and Managing Item Catalog
Maintaining an Item Catalog is crucial for efficient procurement management. It allows your organization to manage a comprehensive list of frequently purchased items, complete with detailed specifications. This simplifies the process of creating intakes or requisitions, as users can easily select items from the catalog without needing to know the supplier or the exact price. Additionally, the item catalog can link each item to one or more authorized vendors, making vendor selection straightforward during purchase order creation. This also facilitates the creation of requests for quotes to identify the best vendors, ensuring cost-effective and streamlined procurement.
To add items to the item catalog, navigate through the usual path: `Menu > Purchasing > Item Catalog`. This directs you to the item catalog management page, where you can efficiently add and manage your inventory items. This process ensures that your catalog is up-to-date and comprehensive, facilitating smooth and streamlined procurement activities.
After clicking on that, the dashboard will show the item catalog table, presenting all the information.
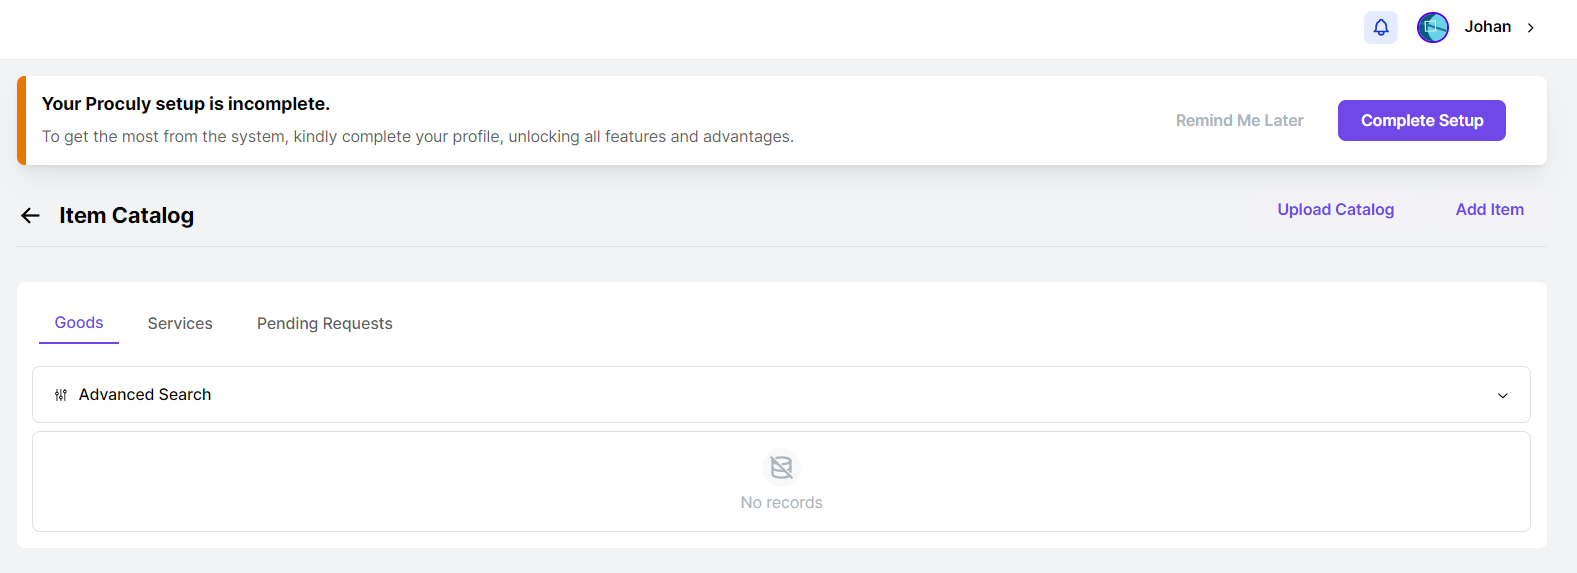 **Adding Items:**
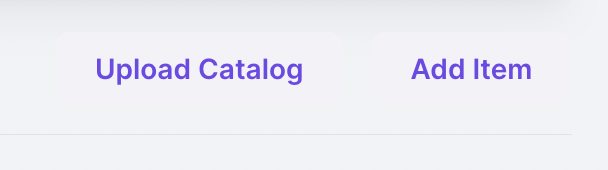
Select "Upload Catalog" to bulk upload items. Click on **“Download Template”** to download a CSV template, fill it out, and upload it to add multiple items at once. Alternatively, add items individually by clicking on “Add Item”.
**Adding Items:**
Select "Upload Catalog" to bulk upload items. Click on **“Download Template”** to download a CSV template, fill it out, and upload it to add multiple items at once. Alternatively, add items individually by clicking on “Add Item”.
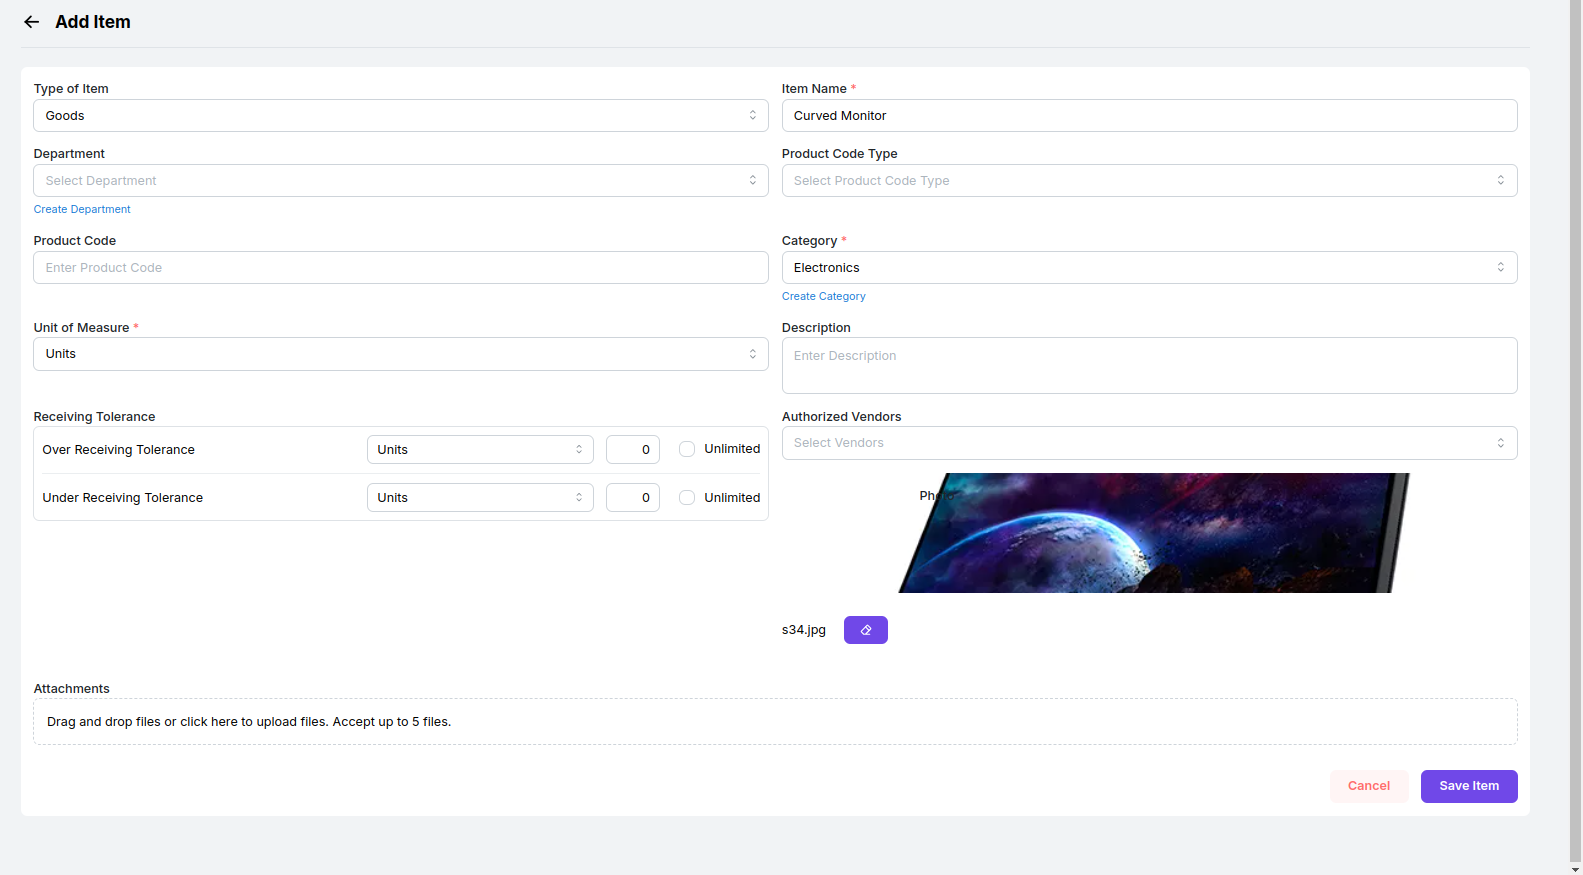
 After clicking on "Add Item” , complete all necessary fields with the item's relevant information. If the predefined dropdown values don't match your needs, utilize the links below the fields to establish new values.
 Click on **"Save Item"** to add the new item to the list. After saving, the item catalog table will be
displayed,
presenting all the relevant information.
Click on **"Save Item"** to add the new item to the list. After saving, the item catalog table will be
displayed,
presenting all the relevant information.
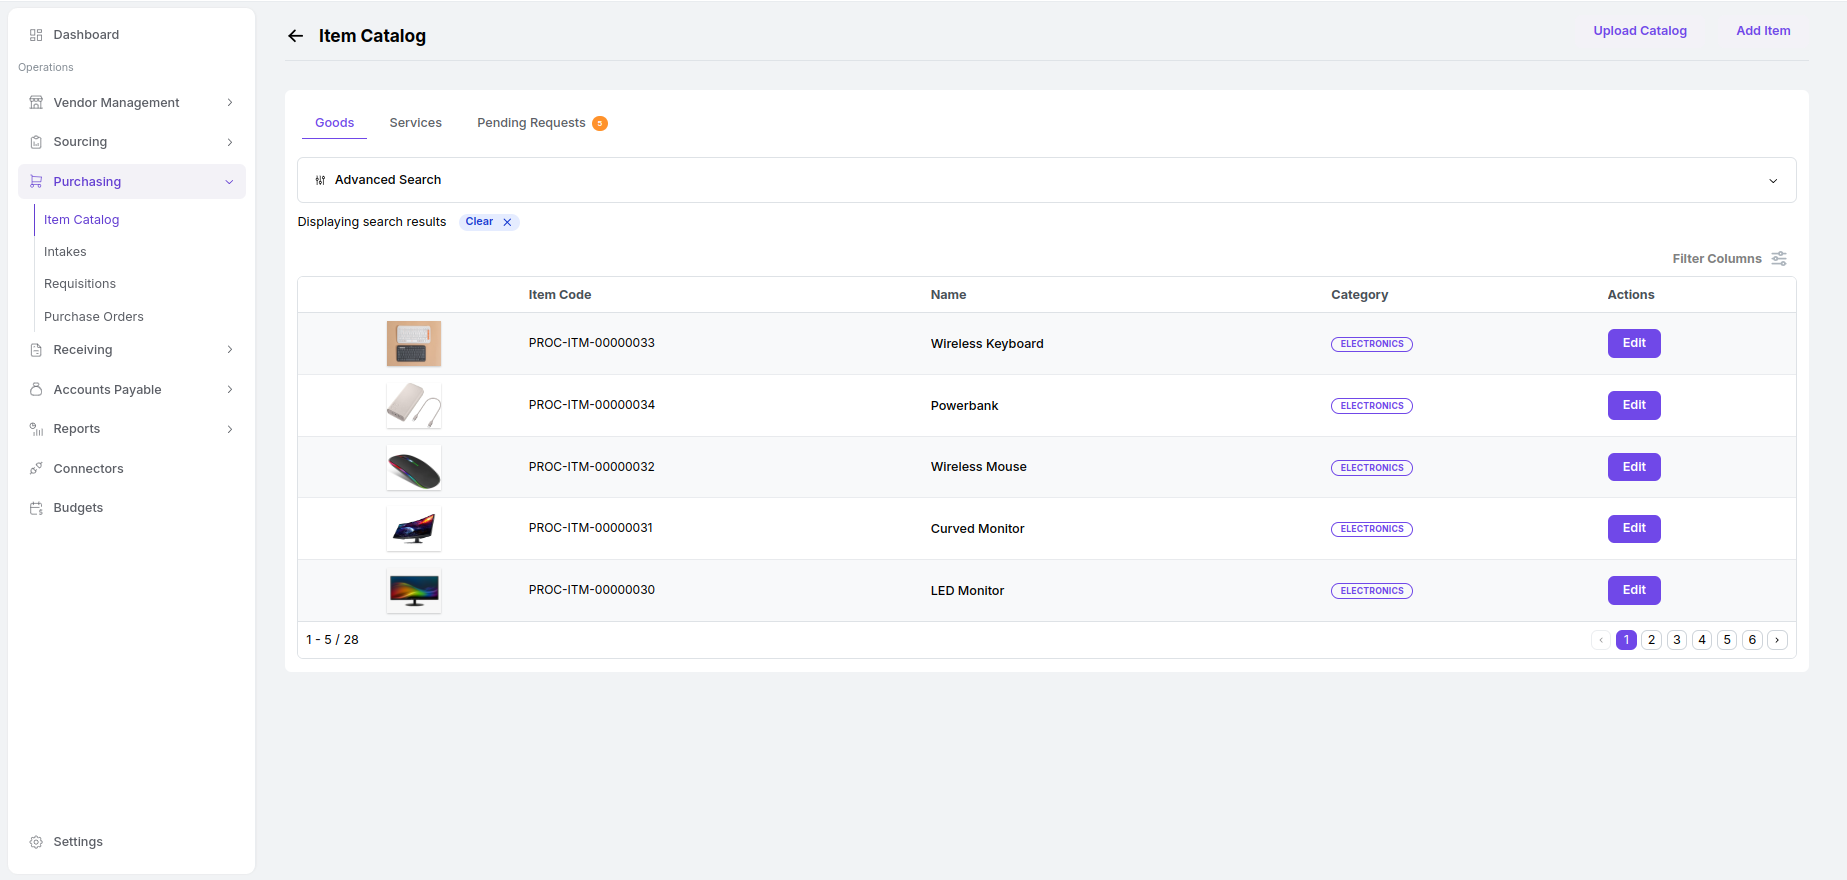 Use the **Edit** button to update any data of a saved item.
**Approving Items:**
Click on the Pending Requests tab to view a list of items requested by your company users to be added to the item catalog or submitted by vendors for approval to be included in your vendor catalog.
By default, the table displays the items requested by your company users. You can expand the rows to view more details about each requested item. Using the action buttons for each item, you can either add or reject items individually.
Use the **Edit** button to update any data of a saved item.
**Approving Items:**
Click on the Pending Requests tab to view a list of items requested by your company users to be added to the item catalog or submitted by vendors for approval to be included in your vendor catalog.
By default, the table displays the items requested by your company users. You can expand the rows to view more details about each requested item. Using the action buttons for each item, you can either add or reject items individually.
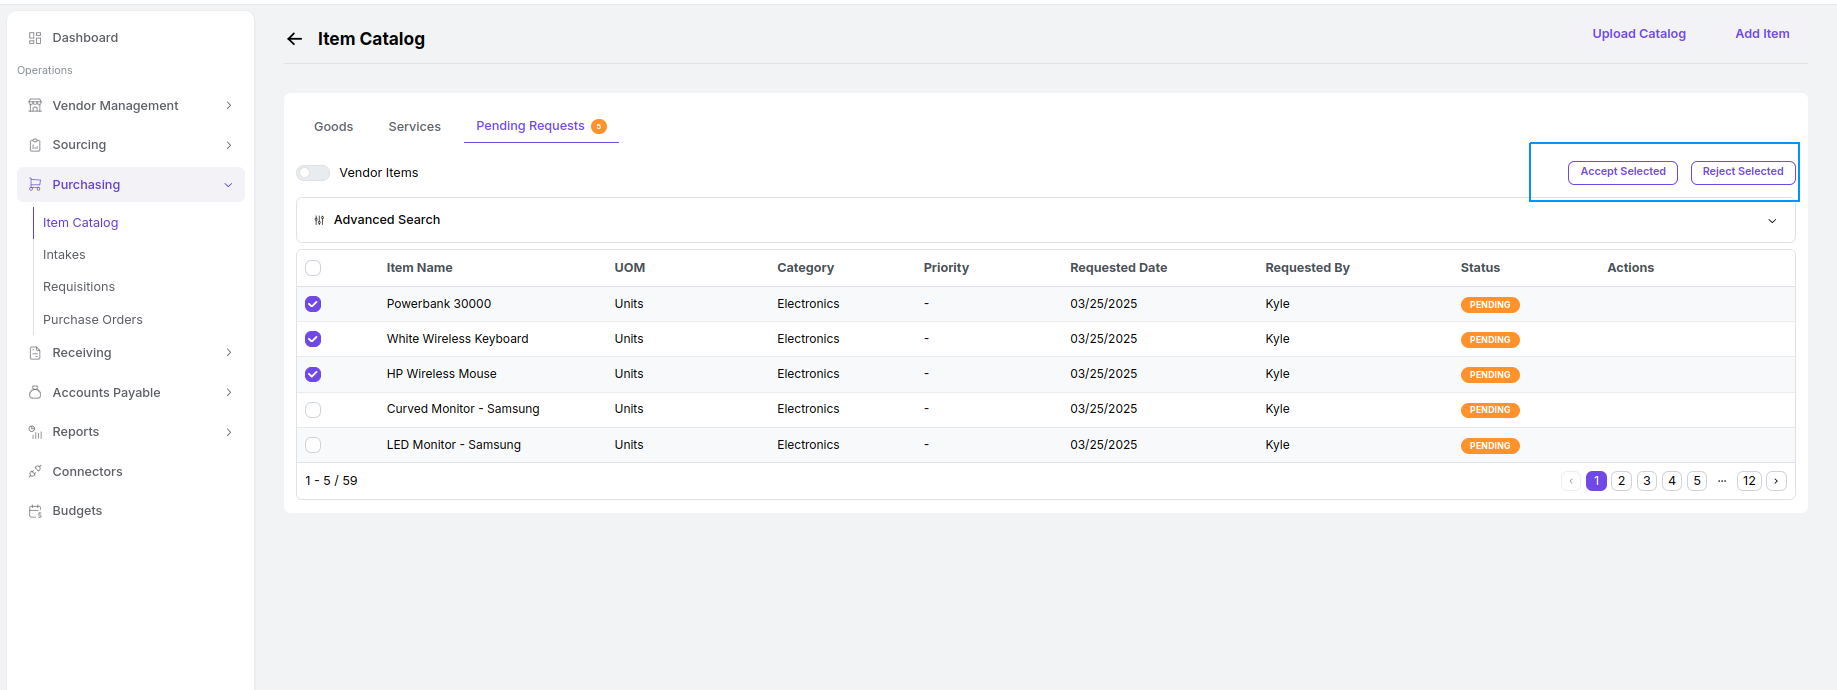
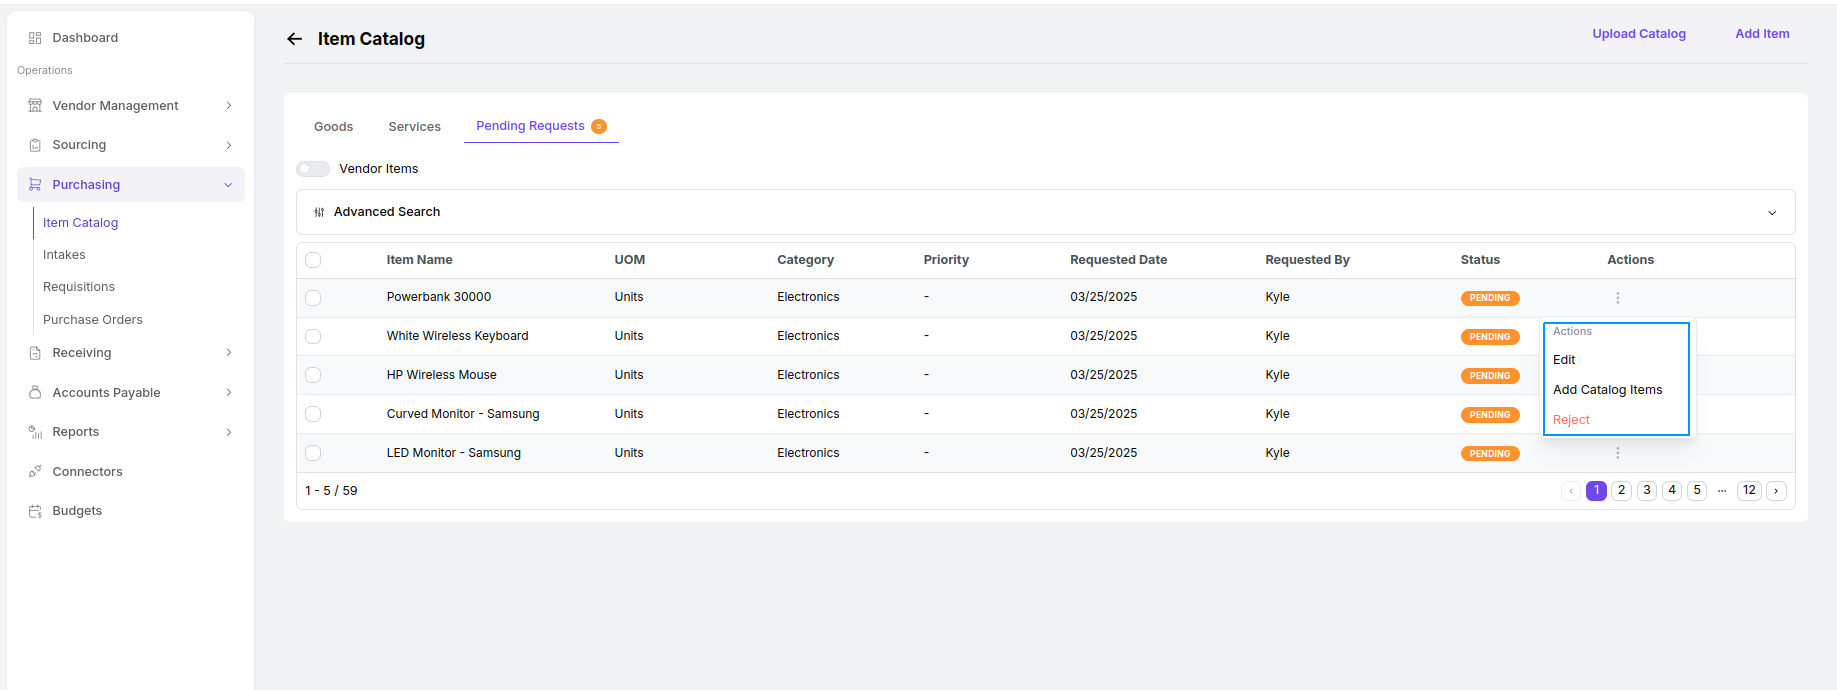 Alternatively, you can select multiple items with the checkboxes to **bulk add or bulk reject** them. Accepted
items will be added to your company’s Item Catalog.
Alternatively, you can select multiple items with the checkboxes to **bulk add or bulk reject** them. Accepted
items will be added to your company’s Item Catalog.
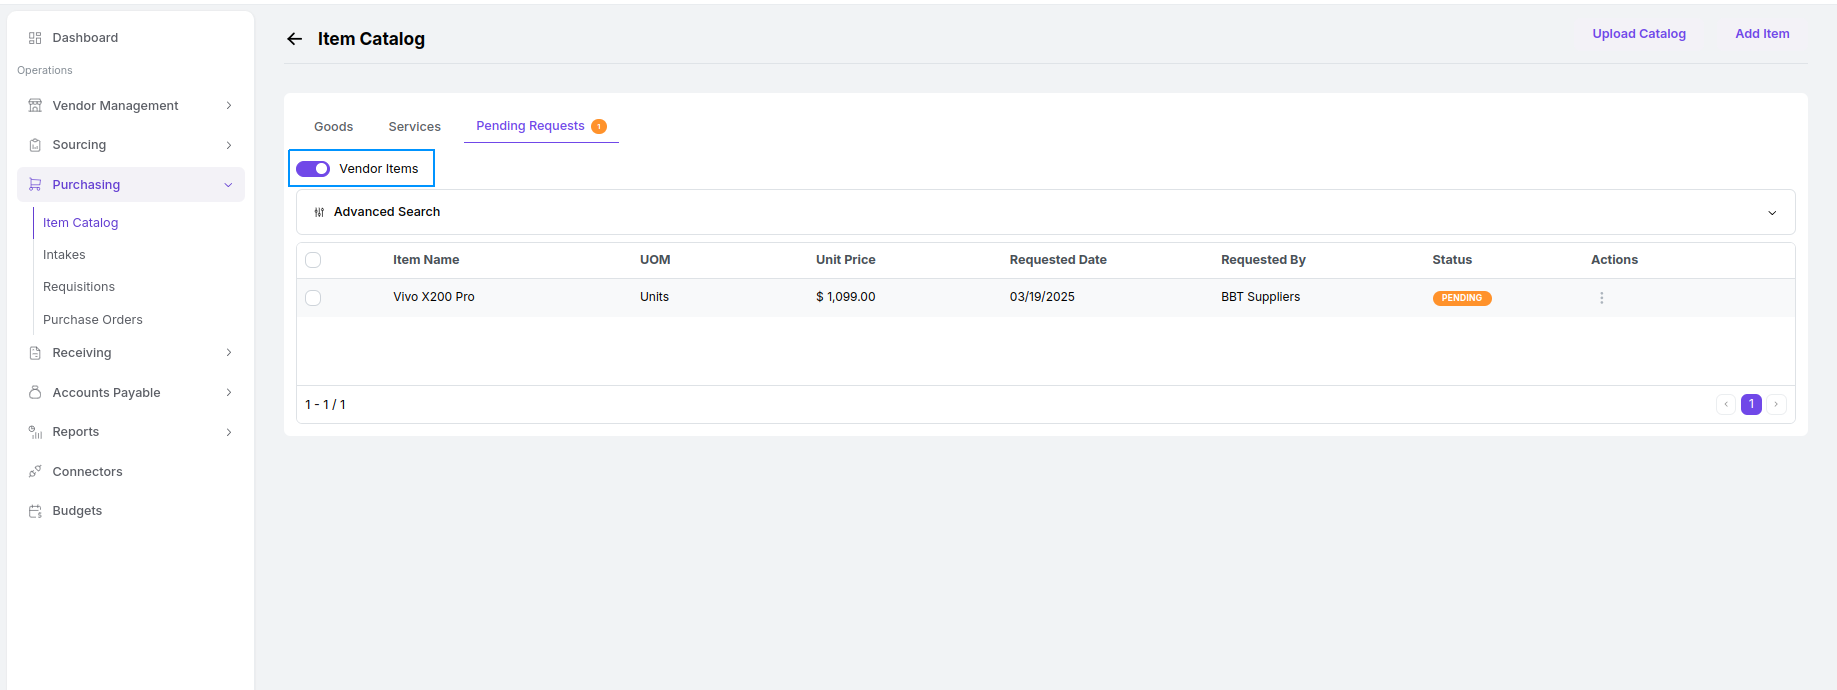
 Toggle the "Vendor Items" option to view the list of items submitted by vendors for approval. If a vendor updates the details of an item you previously accepted, it will reappear for your approval. You can approve or reject items individually or in bulk. Approved items will be added to the Vendor Catalog, allowing your company users to select them for intakes, requisitions, and purchase orders.
 Toggle **'Archived Items'** to view a list of previously approved or rejected items in the tables.
 ***
## Creating and Managing Vendors
In Proculy, you can access a list of vendors who have registered on the platform and also add your own vendors. To view the vendor list, navigate to the main menu on the left side, click on 'Vendor Management,' and select the "Vendors" submenu, where all registered vendors are displayed.
***
## Creating and Managing Vendors
In Proculy, you can access a list of vendors who have registered on the platform and also add your own vendors. To view the vendor list, navigate to the main menu on the left side, click on 'Vendor Management,' and select the "Vendors" submenu, where all registered vendors are displayed.
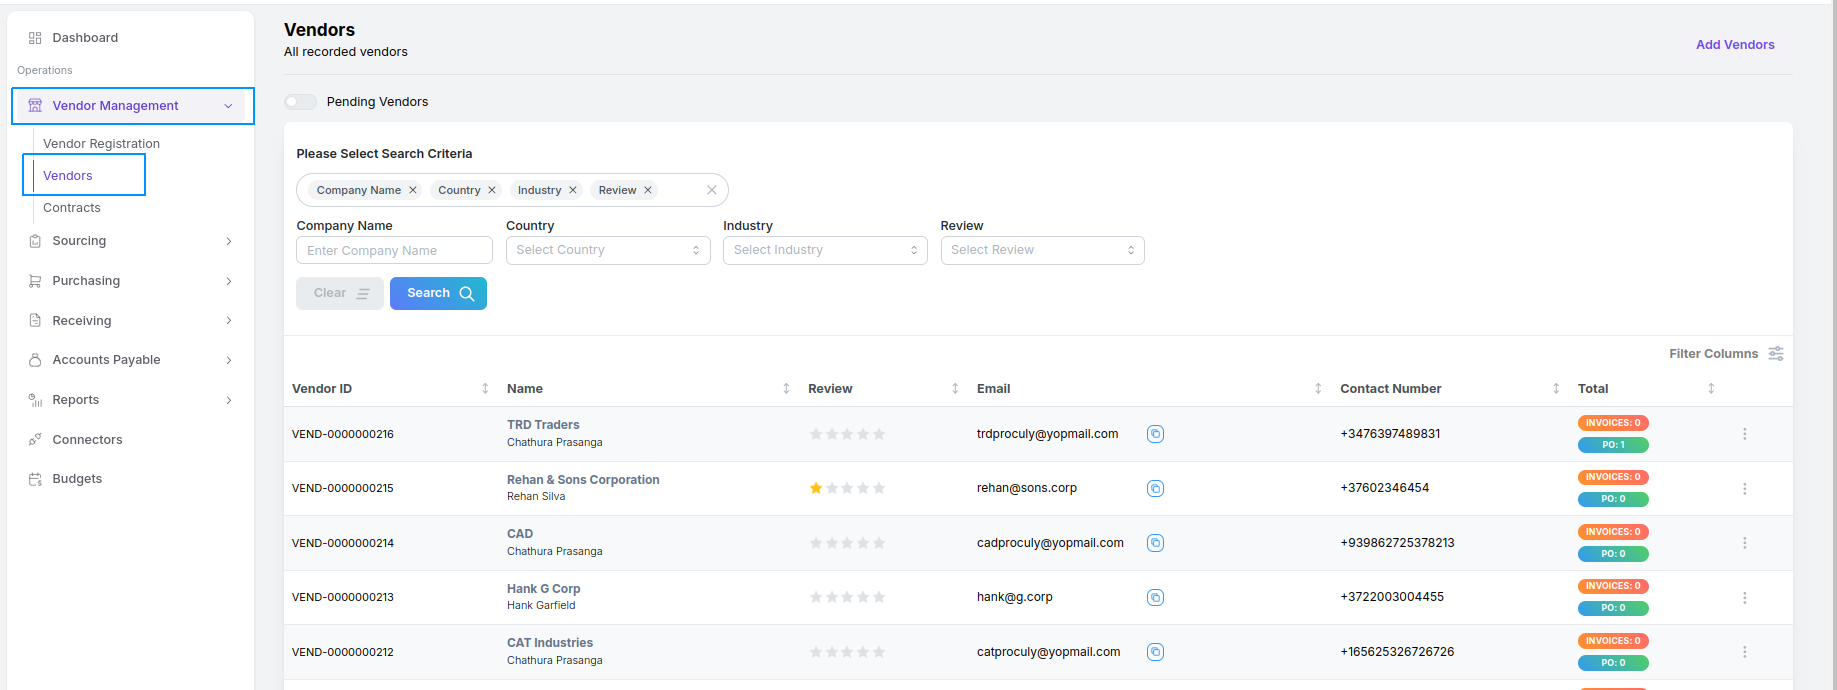 To add a new vendor, navigate to either `Vendor Management > Vendor Registration or Vendor Management > Vendors > Add Vendors`. A pop-up will appear, allowing you to enter the vendor’s business name and email.
 You can choose to save the vendor with just these details, which will send them an email invitation to the vendor portal with initial login credentials. Upon their first login, they will be prompted to complete their business details. Until they do, the vendor will appear as a Pending Vendor in the vendor list. Once they log in and provide the required information, their status will change to Active Vendor.
Alternatively, you can click on Advanced Form in the pop-up to access the full vendor registration page. Here, you can enter all required details before saving. This will immediately list the vendor as an Active Vendor, and they will still receive an email invitation with their initial login credentials for the vendor portal.
You can choose to save the vendor with just these details, which will send them an email invitation to the vendor portal with initial login credentials. Upon their first login, they will be prompted to complete their business details. Until they do, the vendor will appear as a Pending Vendor in the vendor list. Once they log in and provide the required information, their status will change to Active Vendor.
Alternatively, you can click on Advanced Form in the pop-up to access the full vendor registration page. Here, you can enter all required details before saving. This will immediately list the vendor as an Active Vendor, and they will still receive an email invitation with their initial login credentials for the vendor portal.
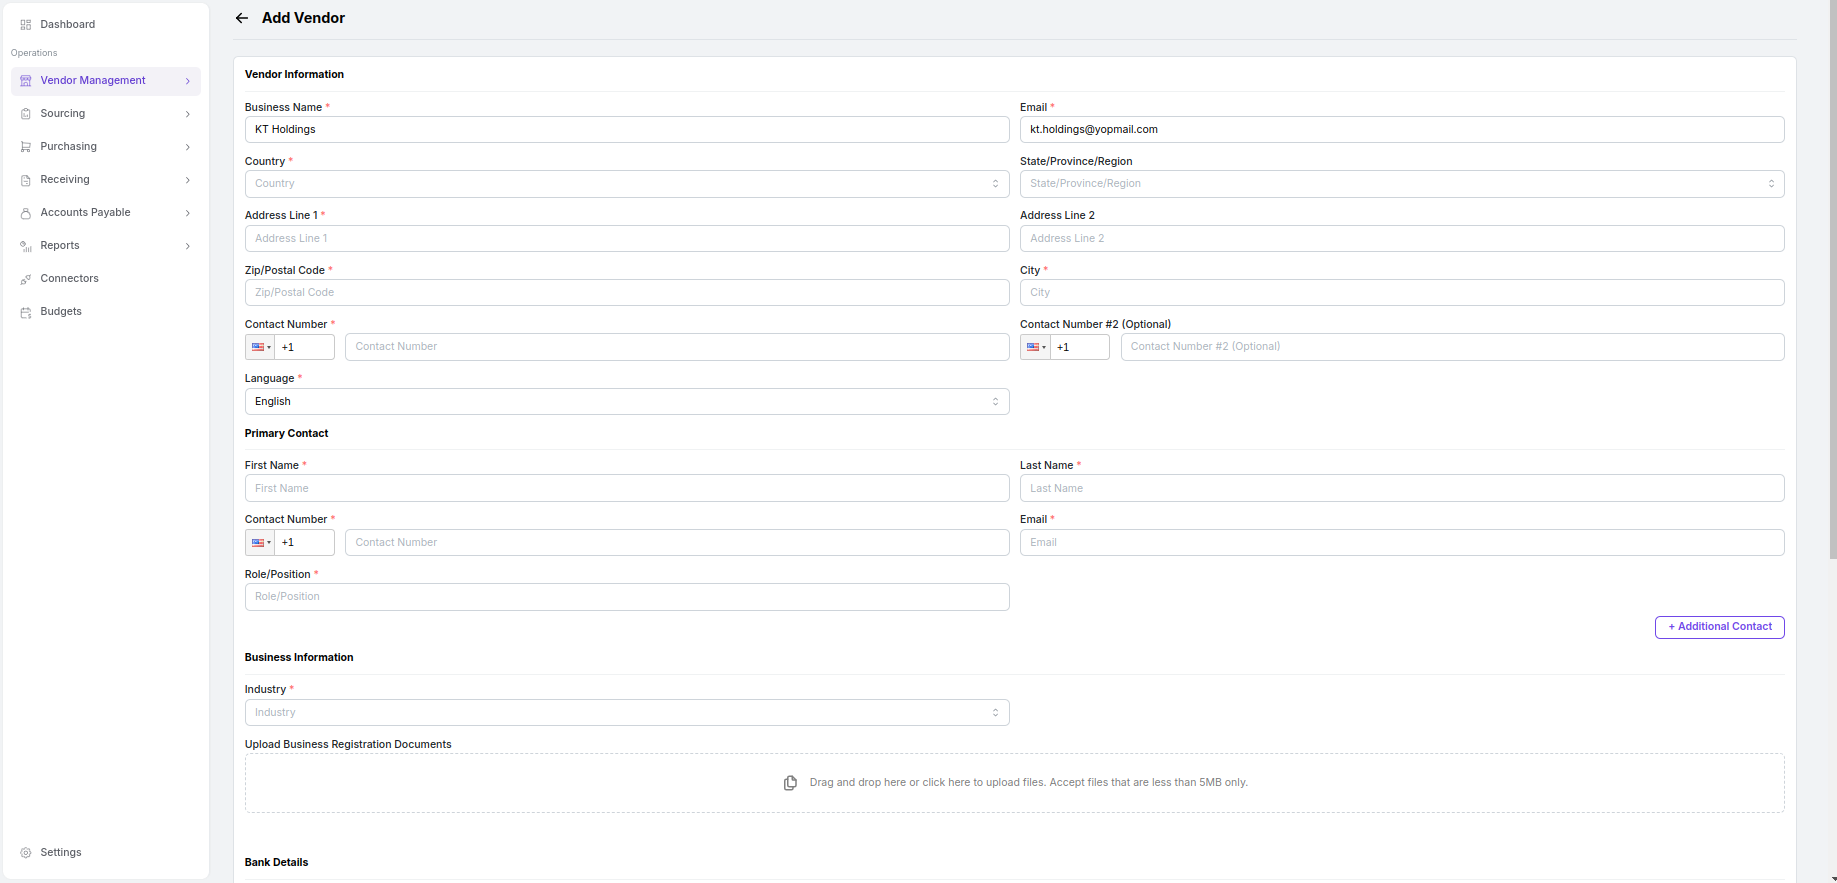 Information of any saved vendor can be edited using **“Edit”** in action options for a vendor in the Vendors
page.
Information of any saved vendor can be edited using **“Edit”** in action options for a vendor in the Vendors
page.
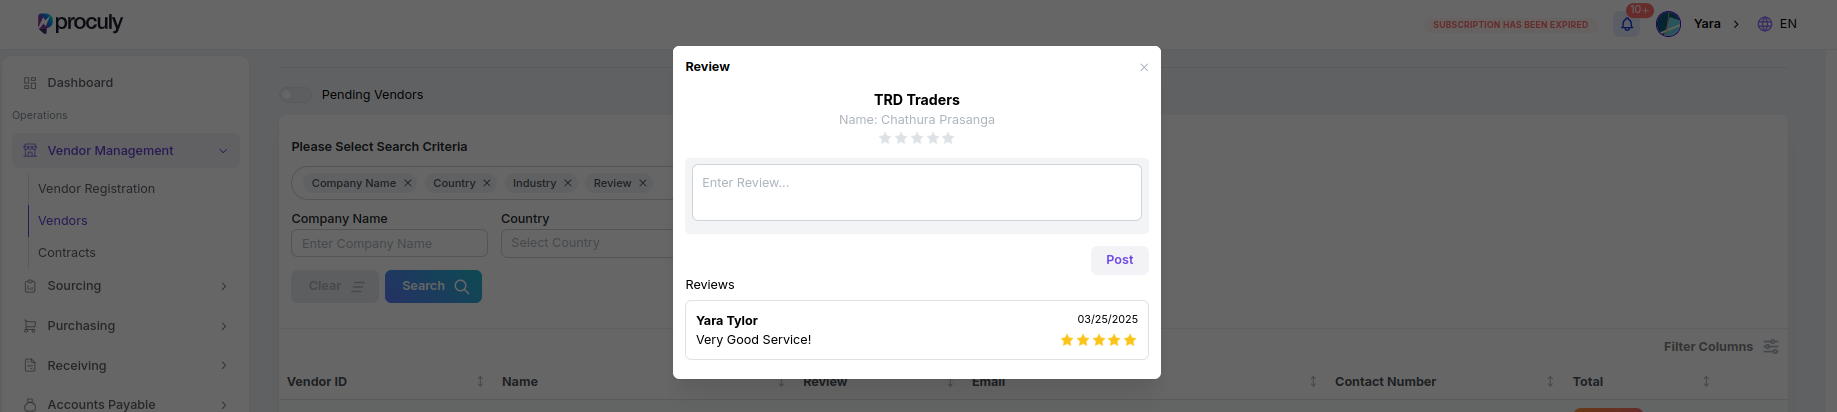
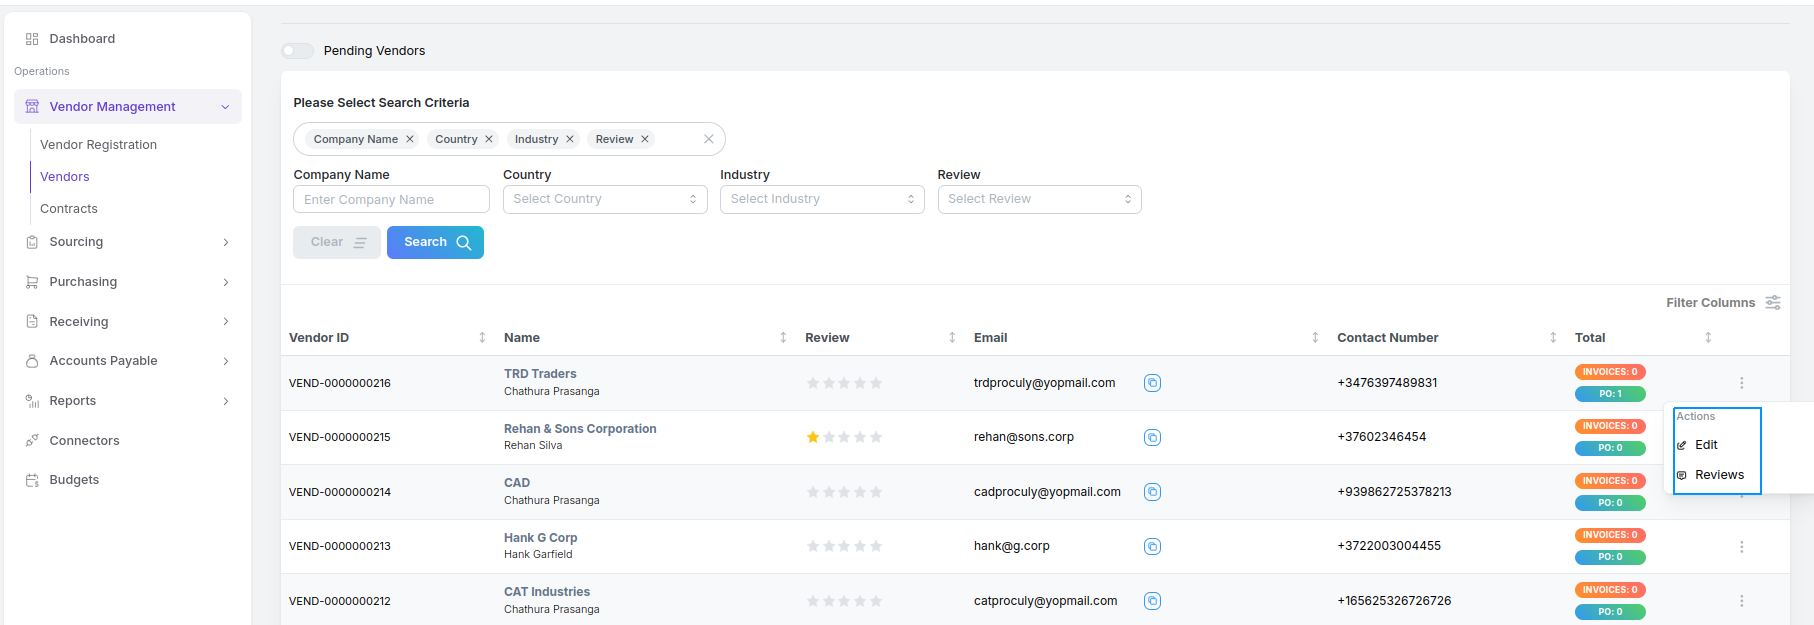 You can view and add reviews for a vendor by using **“Reviews”** in action options for a vendor.
 ***
## Setting up Finance Parameters
***
## Setting up Finance Parameters
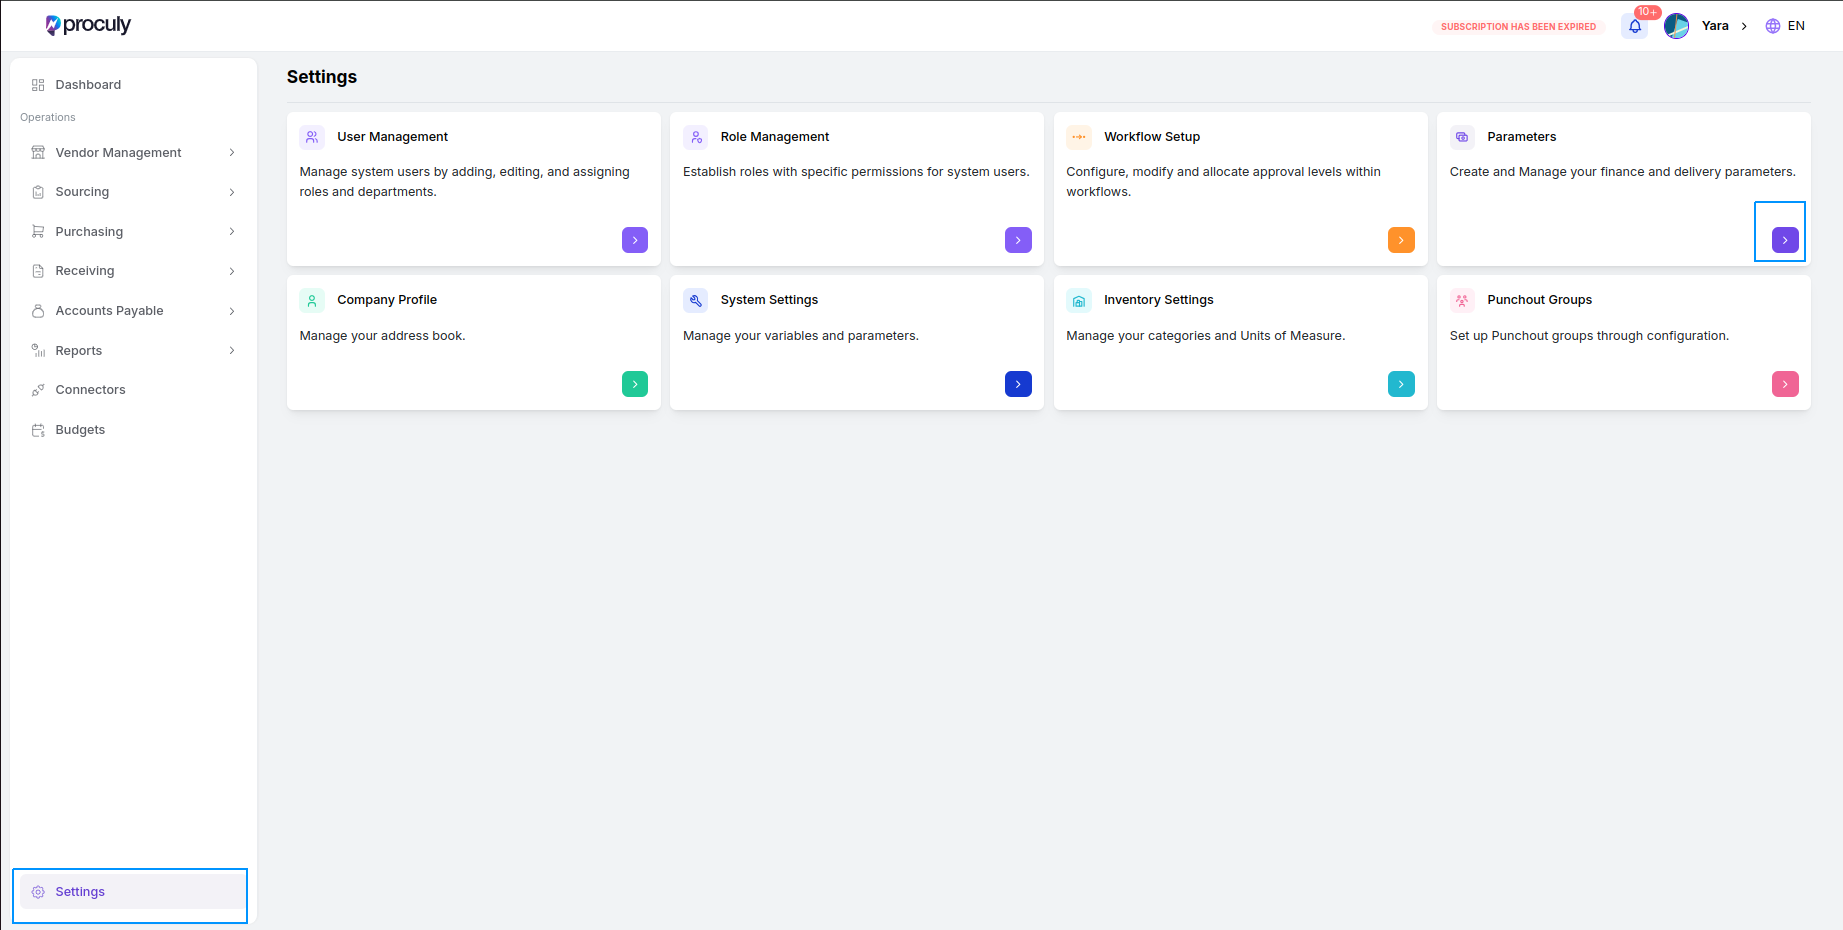 In Proculy, users can create and manage finance parameters to streamline financial operations within the organization. Finance parameters include net term information, financial master information, which encompasses all departments, locations, GL accounts, stores, projects, and subsidiaries of the organization, and invoice tolerance information.
**Finance Parameters - Net Terms**
To access the Net Terms page, navigate through the main menu: `Settings > Parameters > Finance Parameters > Net Terms`.
On this page, all defined net terms (payment terms) are displayed in a tabular view. Users can add, edit, or delete net terms as needed.
In Proculy, users can create and manage finance parameters to streamline financial operations within the organization. Finance parameters include net term information, financial master information, which encompasses all departments, locations, GL accounts, stores, projects, and subsidiaries of the organization, and invoice tolerance information.
**Finance Parameters - Net Terms**
To access the Net Terms page, navigate through the main menu: `Settings > Parameters > Finance Parameters > Net Terms`.
On this page, all defined net terms (payment terms) are displayed in a tabular view. Users can add, edit, or delete net terms as needed.
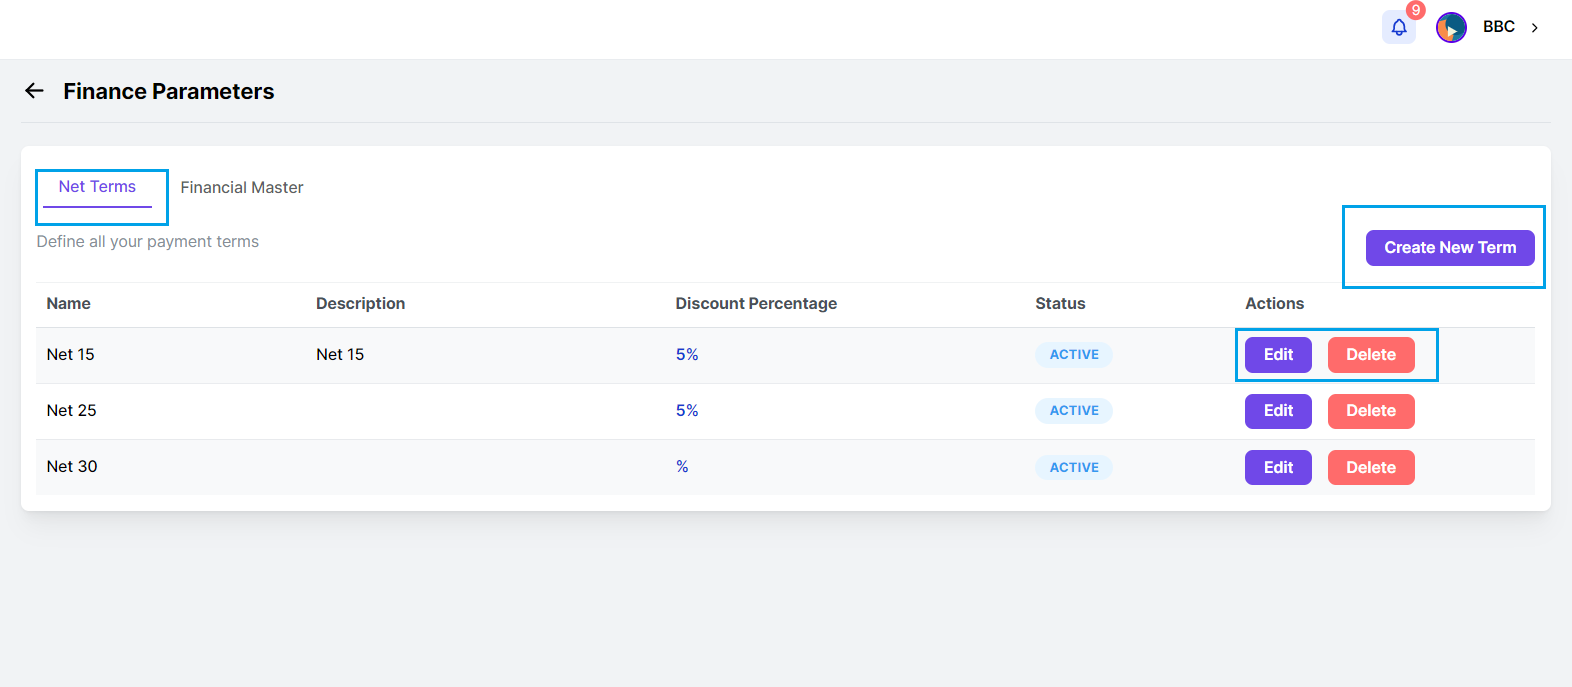 Adding a New Net Term: Click on the "Create Net Term" button to
open a pop-up window. Enter the required data and click on the "Save Term" button to save the new net term.
Adding a New Net Term: Click on the "Create Net Term" button to
open a pop-up window. Enter the required data and click on the "Save Term" button to save the new net term.
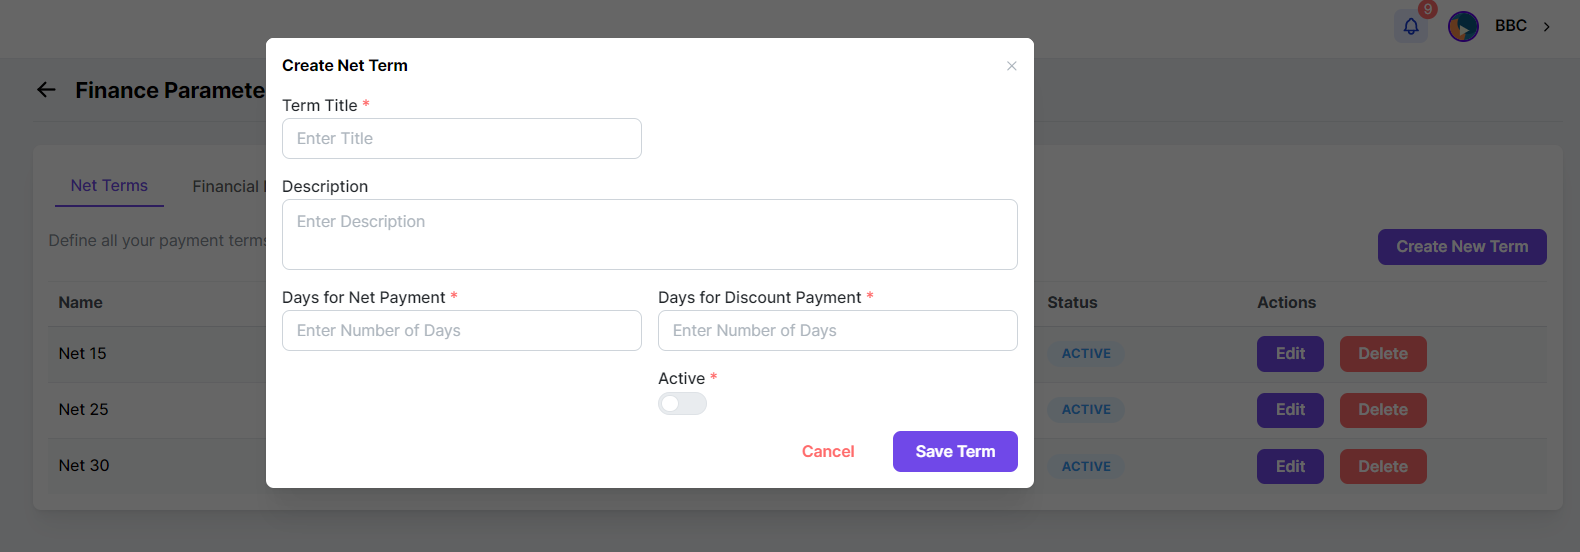 * **Days for Net Payment:** Specifies the number of days given to the buyer to make full payment for a PO.
* **Days for Discount Payment:** Specifies the number of days given to the buyer to make full payment for a PO and receive a discount on the bill. If this is greater than 0, an additional field for the discount percentage will be enabled.
* **Active/Inactive Toggle:** Determines the status of the net term. Only active net terms will appear in the Net Term dropdown options in procurement documents.
* **Editing and Deleting Net Terms:** Use the edit and delete buttons to modify or remove net terms. Note that net terms linked to a document cannot be deleted.
**Finance Parameters - Financial Master**
* **Days for Net Payment:** Specifies the number of days given to the buyer to make full payment for a PO.
* **Days for Discount Payment:** Specifies the number of days given to the buyer to make full payment for a PO and receive a discount on the bill. If this is greater than 0, an additional field for the discount percentage will be enabled.
* **Active/Inactive Toggle:** Determines the status of the net term. Only active net terms will appear in the Net Term dropdown options in procurement documents.
* **Editing and Deleting Net Terms:** Use the edit and delete buttons to modify or remove net terms. Note that net terms linked to a document cannot be deleted.
**Finance Parameters - Financial Master**
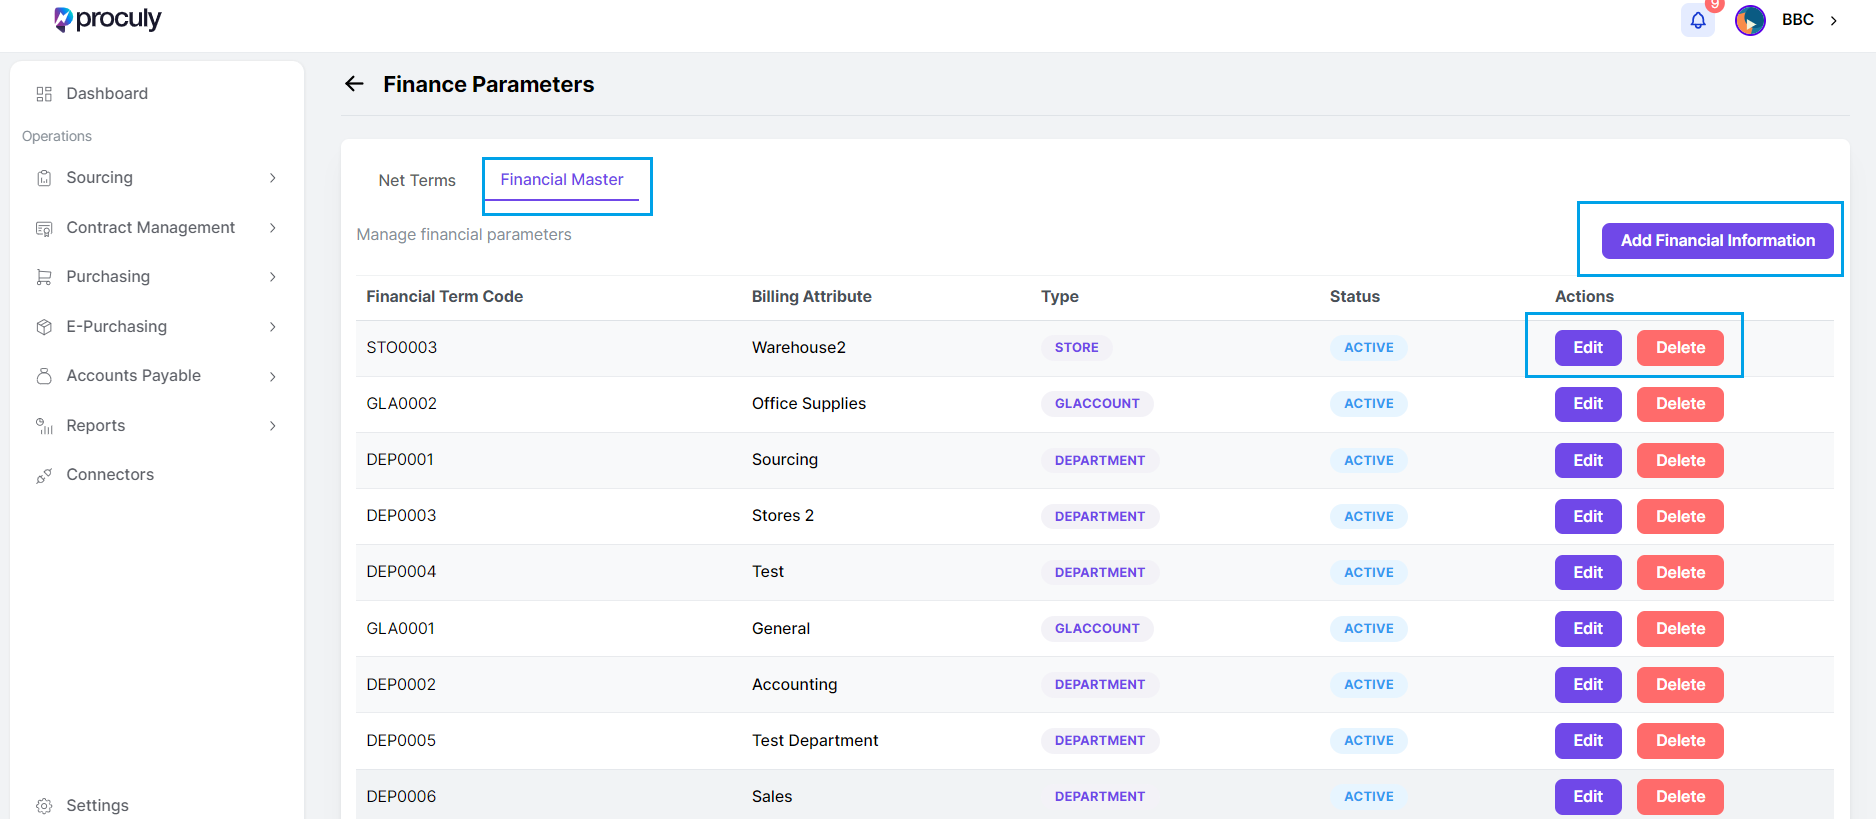 To access the Financial Master page, navigate through the main menu: `Settings > Parameters > Finance Parameters > Financial Master`.
On this page, all defined departments, locations, GL accounts, stores, projects, and subsidiaries are listed.
Adding New Financial Master Data: Click on the "Add Financial Information" button to open a pop-up window. Fill in the required fields and click on the "Save Information" button to add the new master data to the list.
To access the Financial Master page, navigate through the main menu: `Settings > Parameters > Finance Parameters > Financial Master`.
On this page, all defined departments, locations, GL accounts, stores, projects, and subsidiaries are listed.
Adding New Financial Master Data: Click on the "Add Financial Information" button to open a pop-up window. Fill in the required fields and click on the "Save Information" button to add the new master data to the list.
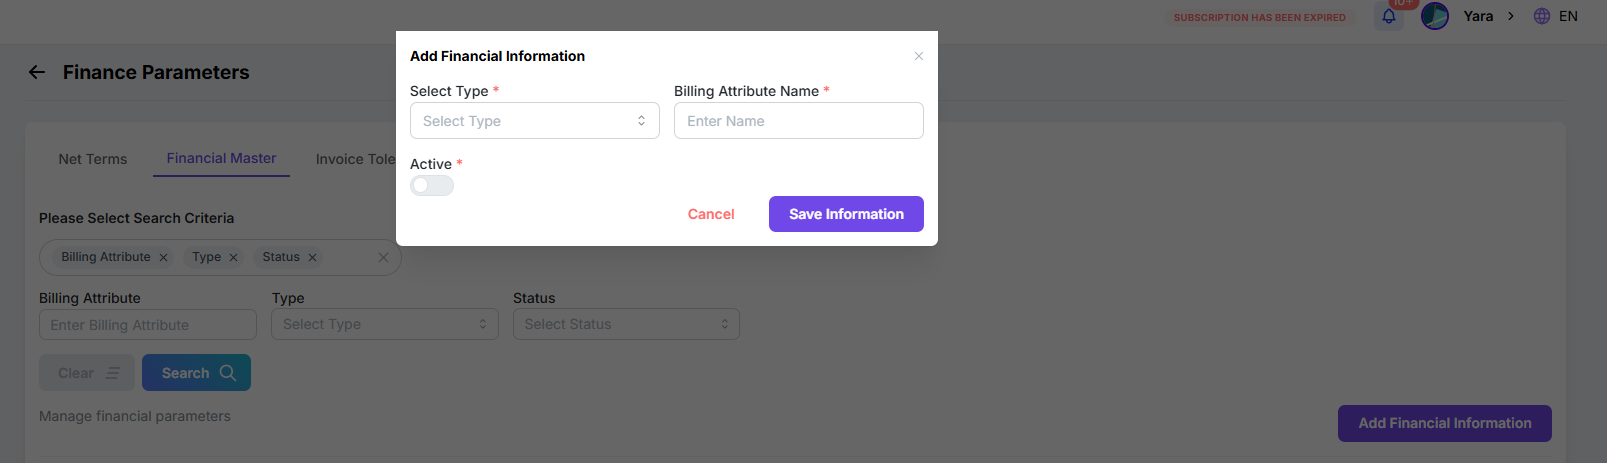 * **Departments:** Linked to users and all procurement documents.
* **Locations:** Currently linked to users only.
* **Projects:** Linked to users, requisitions, and purchase orders.
* **GL Accounts:** Can be linked to item categories and vendors if needed.
* **Stores:** Linked to Received Notes.
* **Active/Inactive Toggle:** Determines the status of the master information. Only active financial master information will appear in the related dropdown options in procurement documents.
Editing and Deleting Financial Master Data: Use the **"Edit"** and **"Delete"** buttons to modify or remove master data. Note that master information already linked to a document cannot be deleted.
**Finance Parameters - Invoice Tolerance**
To access the Financial Master page, navigate through the main menu: `Settings > Parameters > Finance Parameters > Invoice Tolerance`
* **Departments:** Linked to users and all procurement documents.
* **Locations:** Currently linked to users only.
* **Projects:** Linked to users, requisitions, and purchase orders.
* **GL Accounts:** Can be linked to item categories and vendors if needed.
* **Stores:** Linked to Received Notes.
* **Active/Inactive Toggle:** Determines the status of the master information. Only active financial master information will appear in the related dropdown options in procurement documents.
Editing and Deleting Financial Master Data: Use the **"Edit"** and **"Delete"** buttons to modify or remove master data. Note that master information already linked to a document cannot be deleted.
**Finance Parameters - Invoice Tolerance**
To access the Financial Master page, navigate through the main menu: `Settings > Parameters > Finance Parameters > Invoice Tolerance`
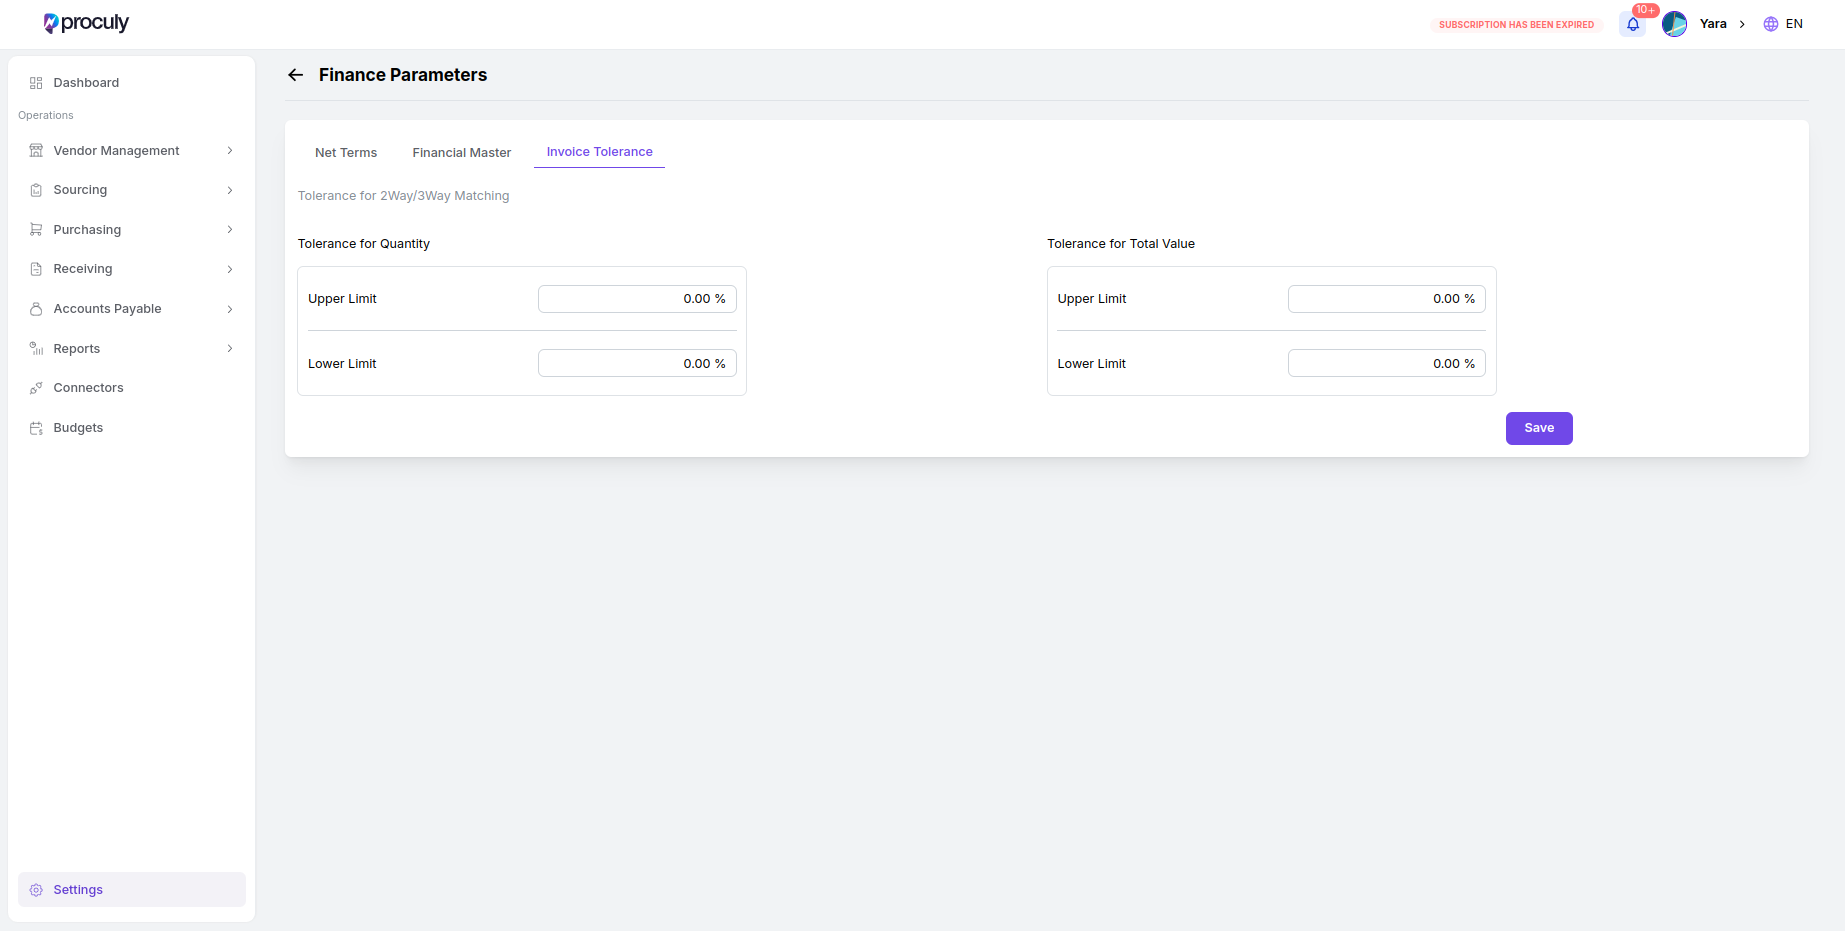 On this page, you can define percentage tolerance limits for 2-way and 3-way invoice matching. By default, these limits are set to 0%, meaning a successful match occurs only when the invoiced quantities and total value exactly match the corresponding purchase order values and received quantities.
You can adjust the tolerance limits separately for quantities and total value by entering percentage values. Be sure to click **“Save”** to apply your changes.
**Setting Up Delivery Parameters**
**Delivery Parameters Overview**
In Proculy, users can set up delivery parameters to manage the logistics of procurement efficiently. Delivery parameters include delivery modes and shipping terms, which help streamline the shipping and delivery processes within the organization.
**Delivery Parameters - Delivery Modes**
On this page, you can define percentage tolerance limits for 2-way and 3-way invoice matching. By default, these limits are set to 0%, meaning a successful match occurs only when the invoiced quantities and total value exactly match the corresponding purchase order values and received quantities.
You can adjust the tolerance limits separately for quantities and total value by entering percentage values. Be sure to click **“Save”** to apply your changes.
**Setting Up Delivery Parameters**
**Delivery Parameters Overview**
In Proculy, users can set up delivery parameters to manage the logistics of procurement efficiently. Delivery parameters include delivery modes and shipping terms, which help streamline the shipping and delivery processes within the organization.
**Delivery Parameters - Delivery Modes**
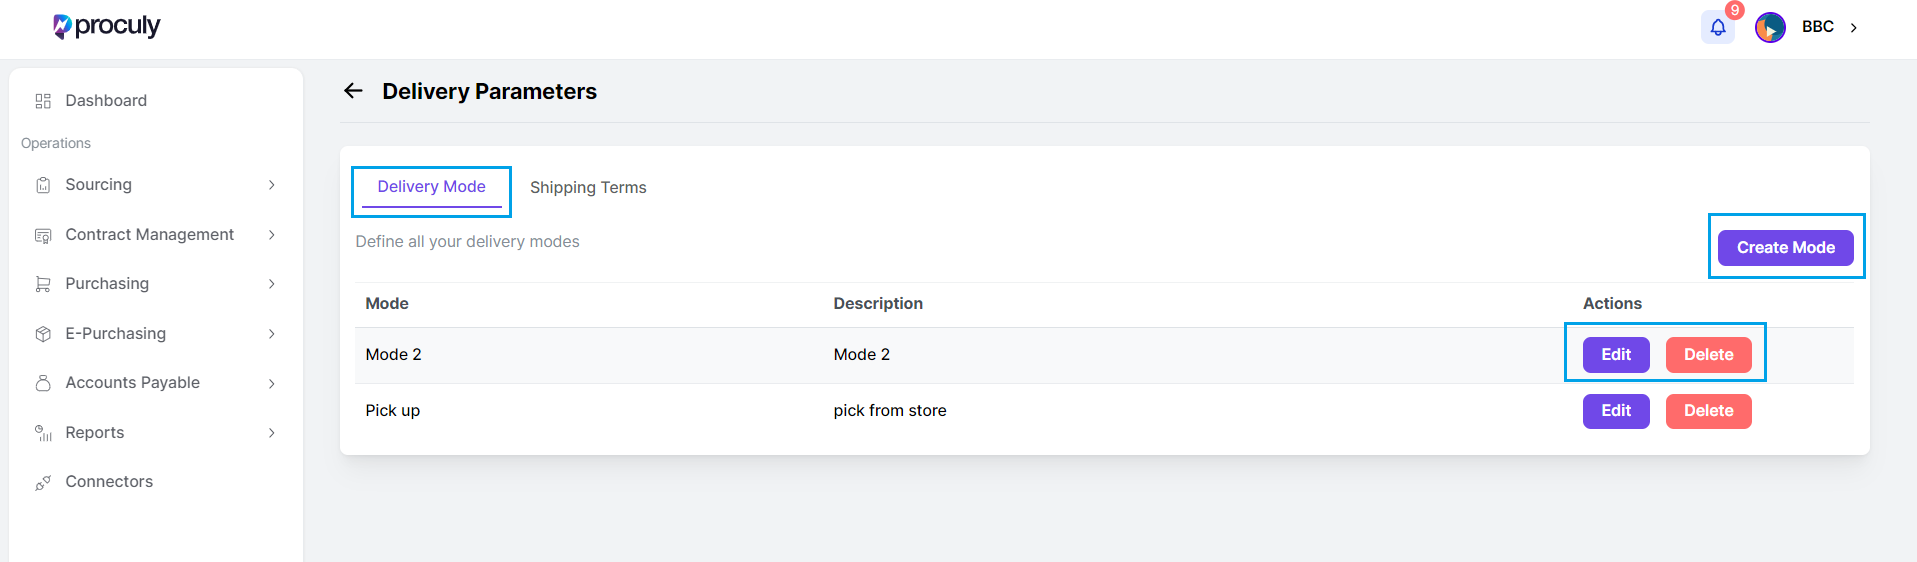 To access the Delivery Modes page, navigate through the main menu: `Settings > Parameters > Delivery Parameters > Delivery Modes`.
On this page, all defined delivery modes are displayed in a list.
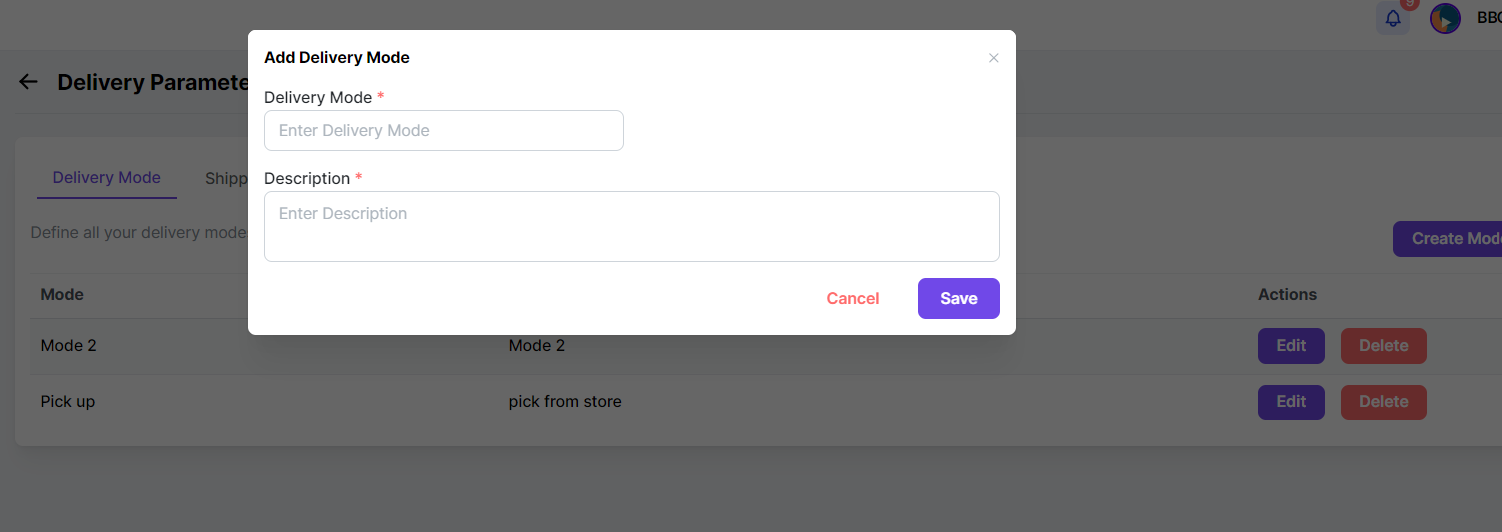
Adding a New Delivery Mode: Click on the "Create Mode" button to open a pop-up window. Enter a name and description for the new delivery mode and click on the **"Save"** button to add it to the list.
To access the Delivery Modes page, navigate through the main menu: `Settings > Parameters > Delivery Parameters > Delivery Modes`.
On this page, all defined delivery modes are displayed in a list.
Adding a New Delivery Mode: Click on the "Create Mode" button to open a pop-up window. Enter a name and description for the new delivery mode and click on the **"Save"** button to add it to the list.
 Editing and Deleting Delivery Modes: Use the **"Edit"** and **"Delete"** buttons in the actions column to modify or remove delivery modes as needed.
**Delivery Parameters - Shipping Terms**
Editing and Deleting Delivery Modes: Use the **"Edit"** and **"Delete"** buttons in the actions column to modify or remove delivery modes as needed.
**Delivery Parameters - Shipping Terms**
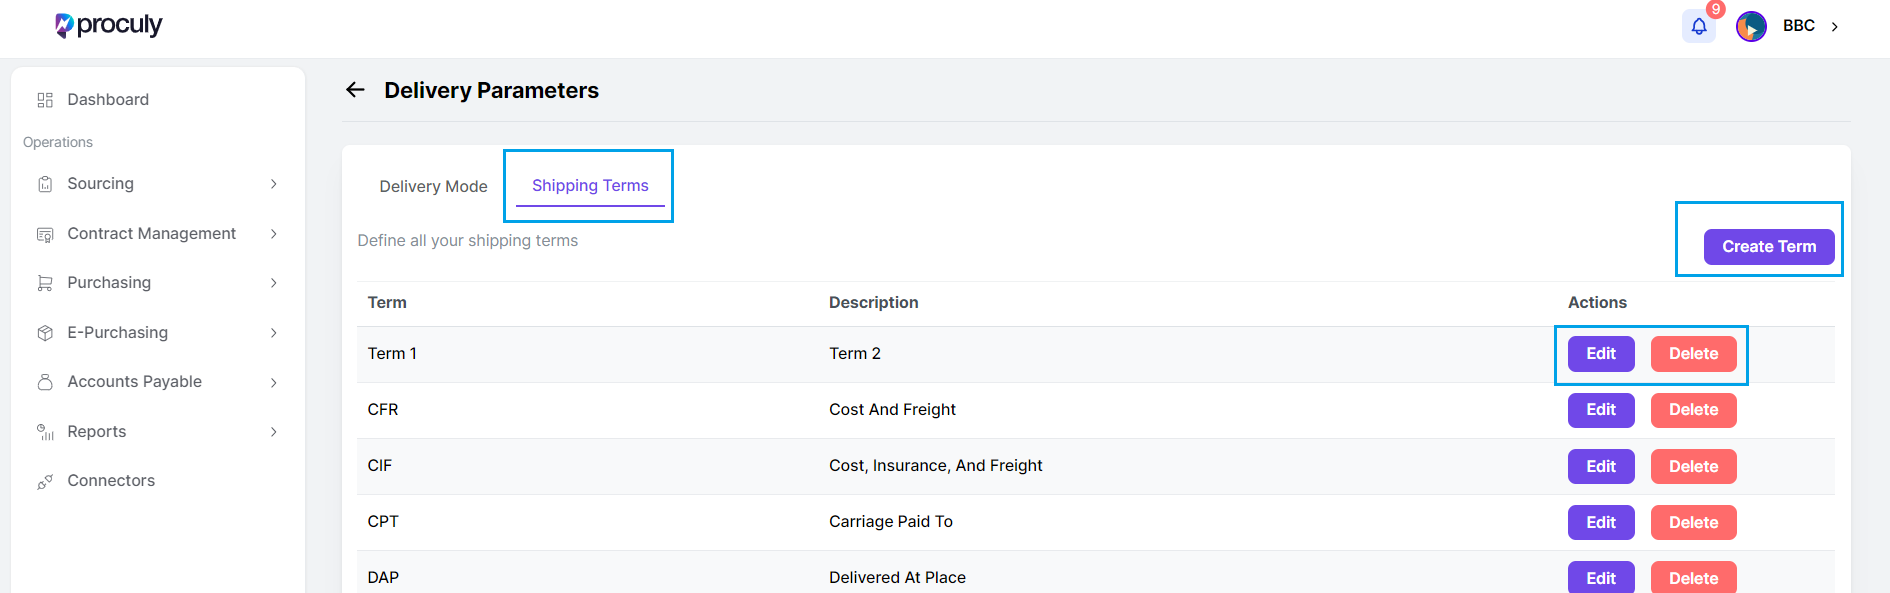 To access the Shipping Terms page, navigate through the main menu: `Settings > Parameters > Delivery Parameters > Shipping Terms`.
On this page, all defined shipping terms are listed, including a general list of pre-defined shipping terms.
To access the Shipping Terms page, navigate through the main menu: `Settings > Parameters > Delivery Parameters > Shipping Terms`.
On this page, all defined shipping terms are listed, including a general list of pre-defined shipping terms.
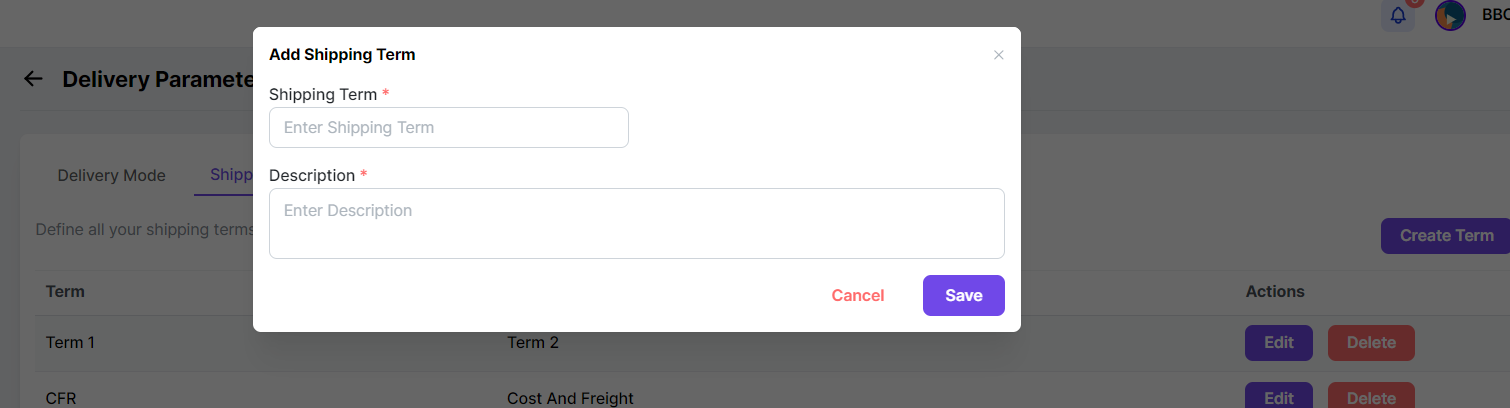 * **Adding a New Shipping Term:** Click on the "Create Term" button to open a pop-up window. Enter a name and description for the new shipping term and click on the **"Save"** button to add it to the list.
* **Editing and Deleting Shipping Terms:** Use the "Edit" and "Delete" buttons in the actions column to modify or remove shipping terms as needed.
By setting up these delivery parameters, you can ensure that your organization has a well-defined process for handling delivery modes and shipping terms, contributing to a more streamlined and efficient procurement process.
***
## How to set your Approval Workflow Automation
**Workflow Setup Overview**
Through workflow setup, users can configure, modify, and allocate approval levels within workflows to ensure efficient and structured approval processes.
**Accessing Workflow Setup**
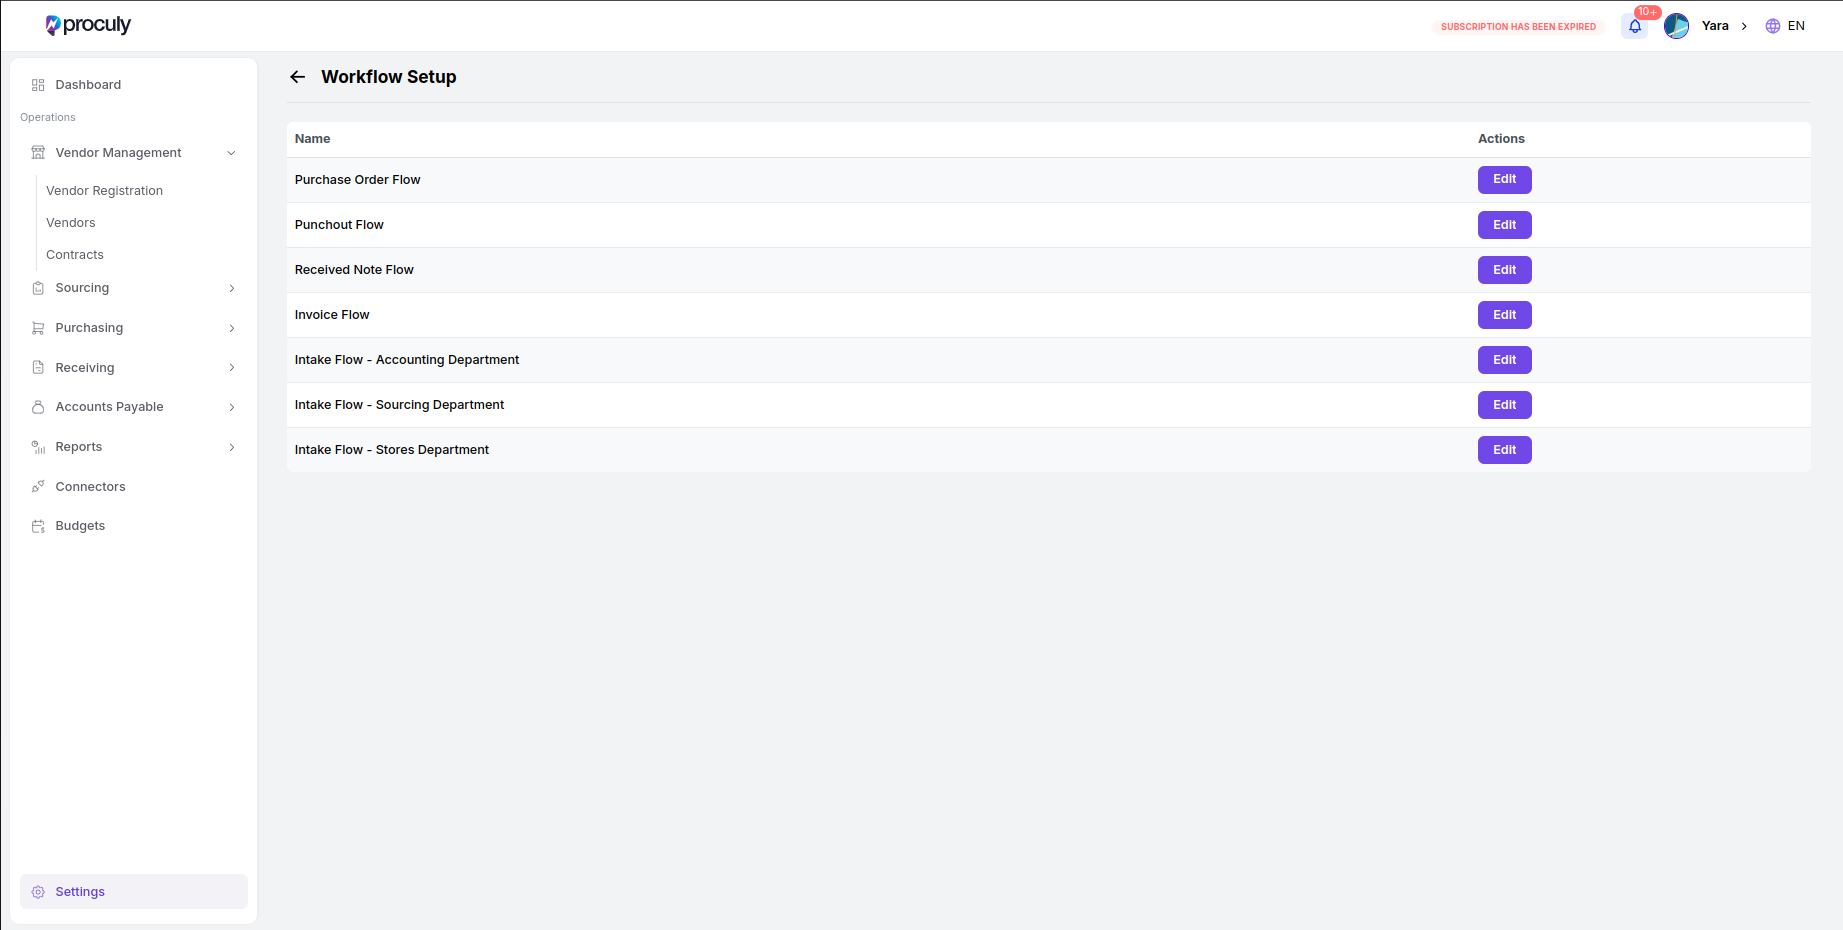
To access the Workflow Setup page, navigate through the main menu: `Settings > Workflow Setup`.
* **Adding a New Shipping Term:** Click on the "Create Term" button to open a pop-up window. Enter a name and description for the new shipping term and click on the **"Save"** button to add it to the list.
* **Editing and Deleting Shipping Terms:** Use the "Edit" and "Delete" buttons in the actions column to modify or remove shipping terms as needed.
By setting up these delivery parameters, you can ensure that your organization has a well-defined process for handling delivery modes and shipping terms, contributing to a more streamlined and efficient procurement process.
***
## How to set your Approval Workflow Automation
**Workflow Setup Overview**
Through workflow setup, users can configure, modify, and allocate approval levels within workflows to ensure efficient and structured approval processes.
**Accessing Workflow Setup**
To access the Workflow Setup page, navigate through the main menu: `Settings > Workflow Setup`.
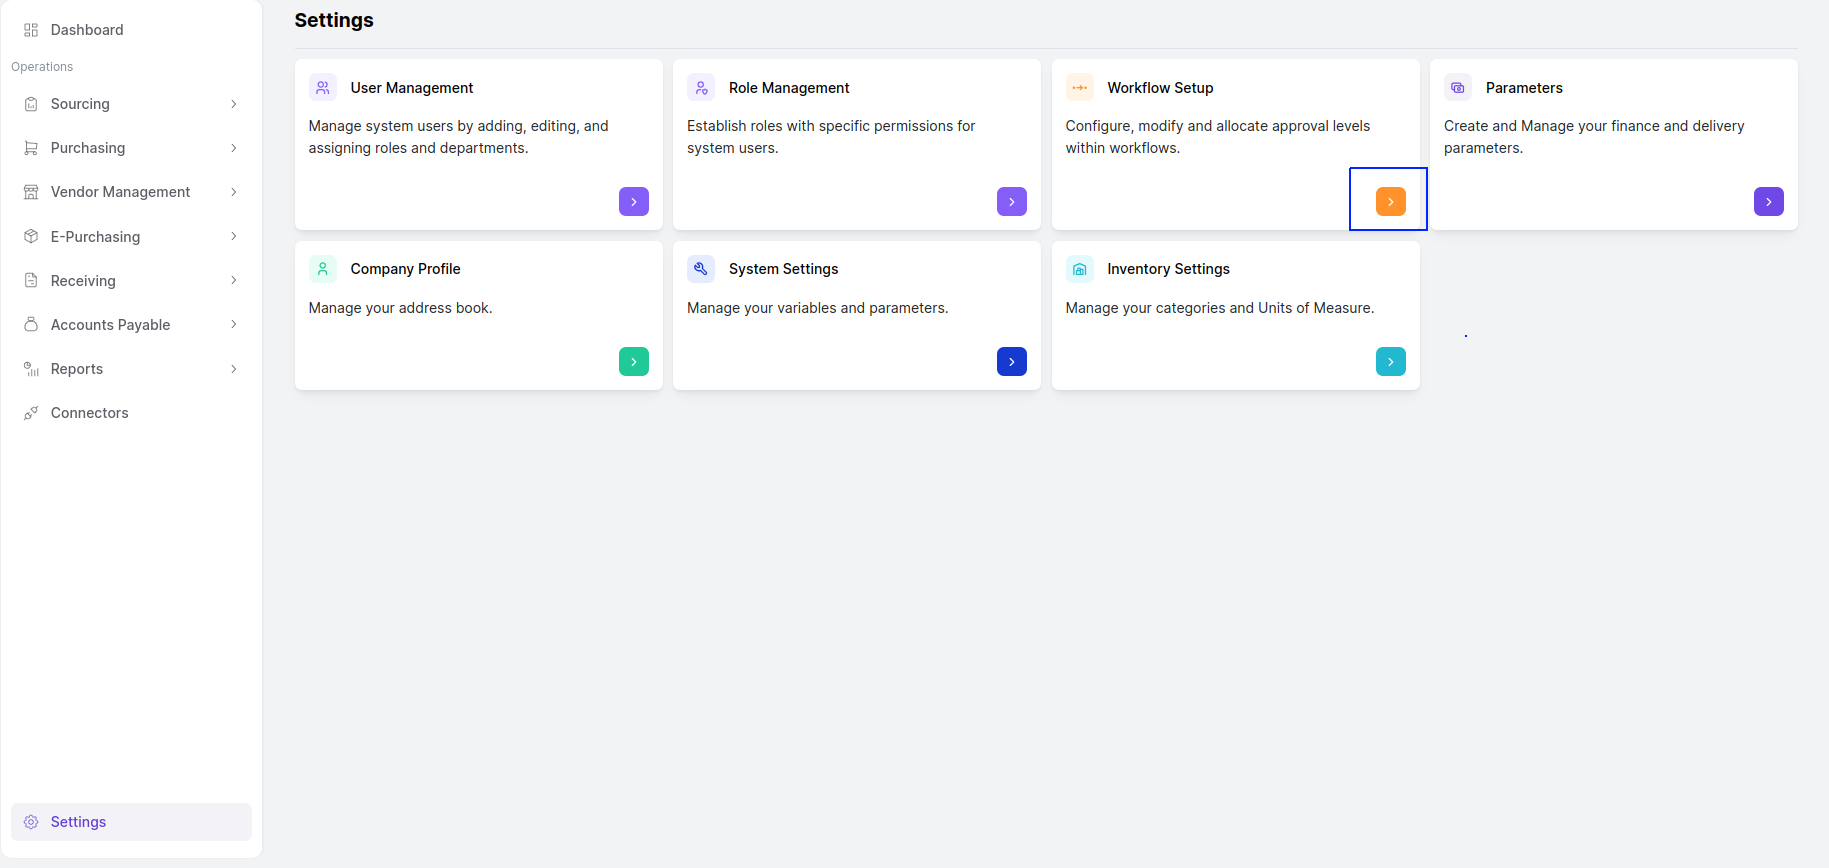 On this page, users can create and modify approval levels for various workflows, including Intakes, Purchase Orders, Received Notes, and Invoice approvals. Approval levels define the hierarchy and criteria for approvals, ensuring that requests and transactions are reviewed by the appropriate approvers before proceeding. For Intake Requests, department-specific approval flows must be set up to align with internal approval structures.
 **Adding an Approval Level**
**Editing Workflow:** Click on the edit icon in the workflow setup, then click on the **“Add Approval Level”** button available in the edit flow window.
You can add multiple approval levels to create the approval flow here.
**Adding an Approval Level**
**Editing Workflow:** Click on the edit icon in the workflow setup, then click on the **“Add Approval Level”** button available in the edit flow window.
You can add multiple approval levels to create the approval flow here.
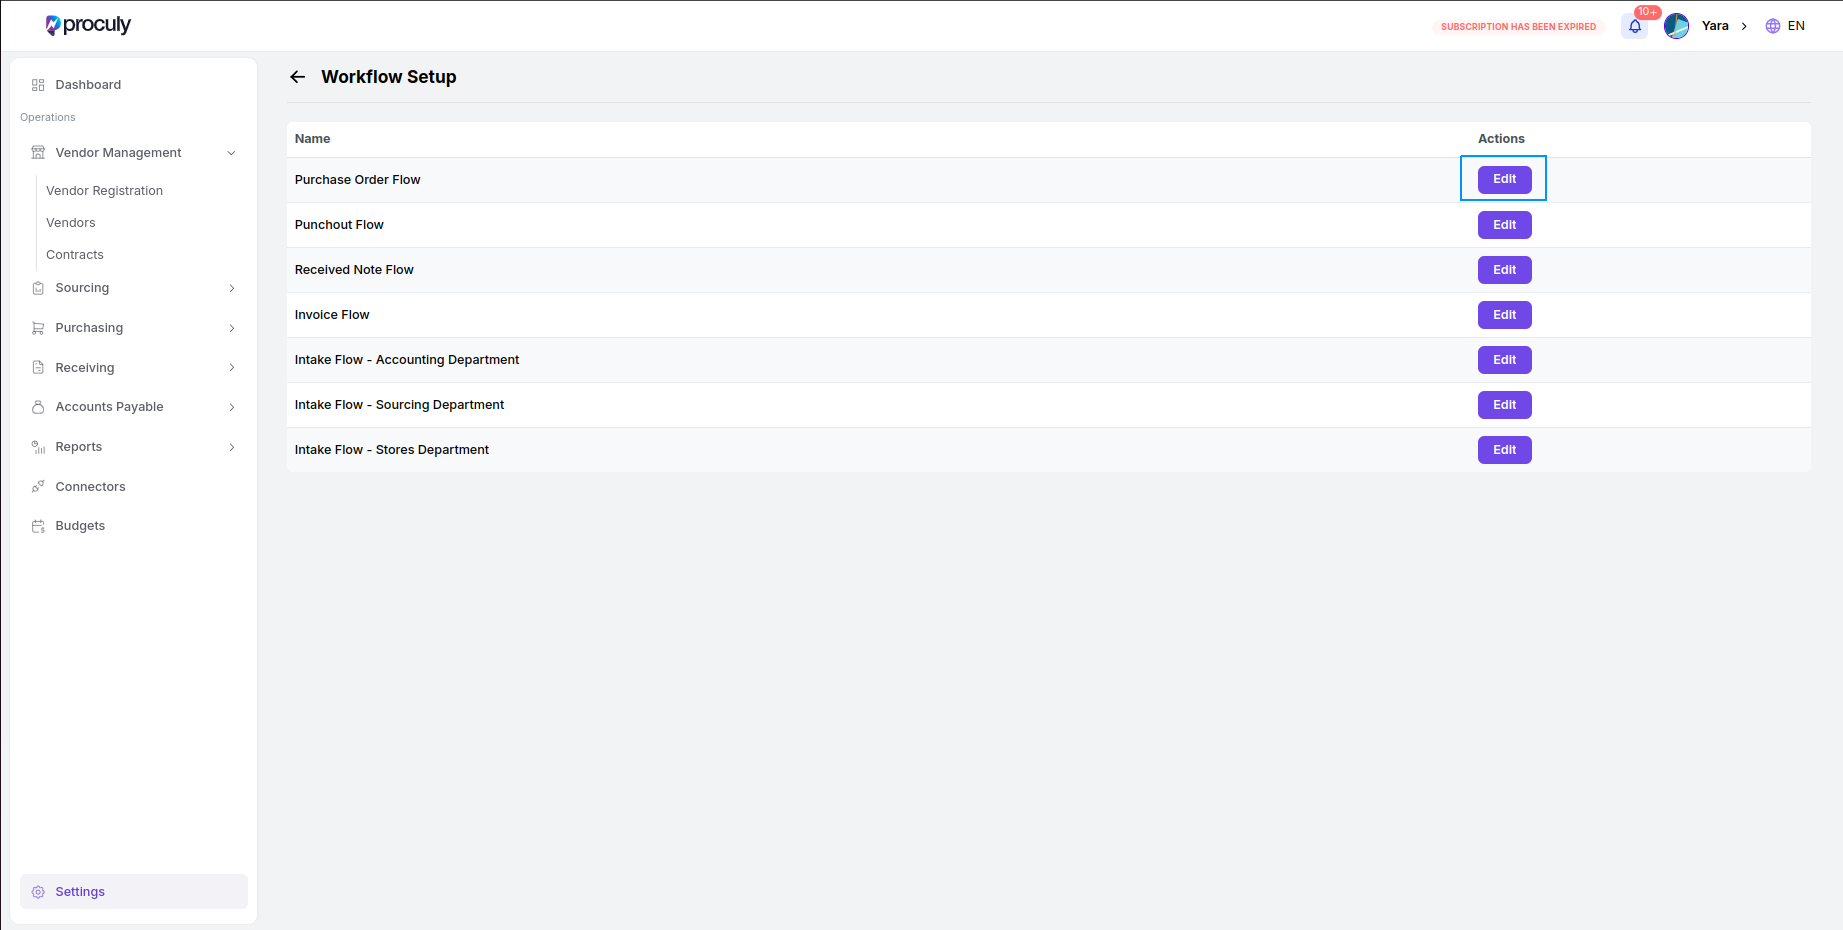
 **Add Approval Level Page:**
* **Level Title:** Give a name and type for the approval level. The title is a descriptive title for the approval level to be displayed in the approval levels table to help you identify the role or stage of approval within the workflow.
* **Minimum Threshold:** Define the minimum value of a document to apply this approval level. Documents exceeding this value will go through this approval level, while those below it will bypass it.
* **Specific Criteria:** Select product categories, departments or projects, vendors, and GL accounts to specify which documents should undergo this approval level.
**Add Approval Level Page:**
* **Level Title:** Give a name and type for the approval level. The title is a descriptive title for the approval level to be displayed in the approval levels table to help you identify the role or stage of approval within the workflow.
* **Minimum Threshold:** Define the minimum value of a document to apply this approval level. Documents exceeding this value will go through this approval level, while those below it will bypass it.
* **Specific Criteria:** Select product categories, departments or projects, vendors, and GL accounts to specify which documents should undergo this approval level.
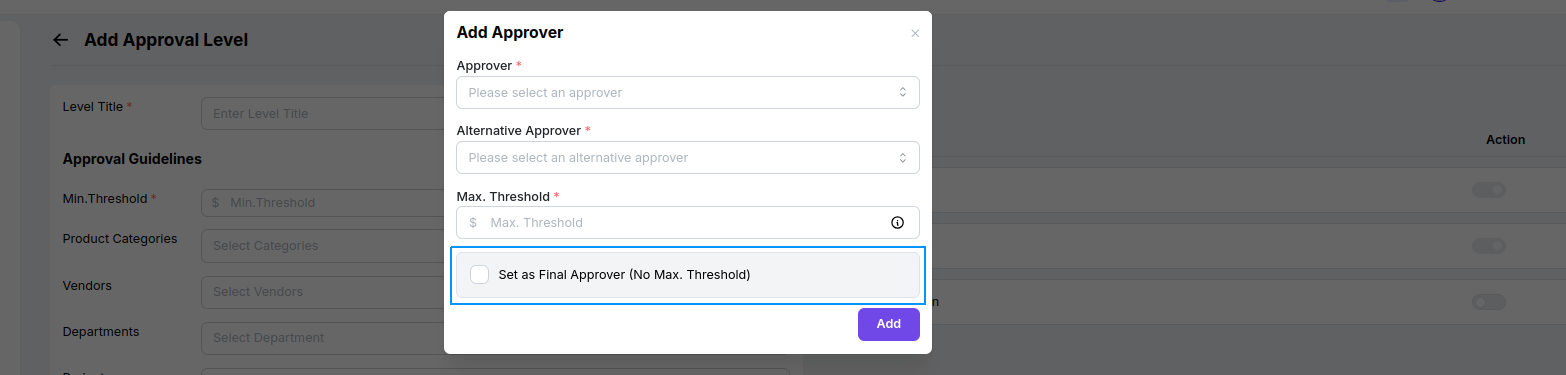
 **Add Approver:** Add an approver with assigned maximum threshold value.
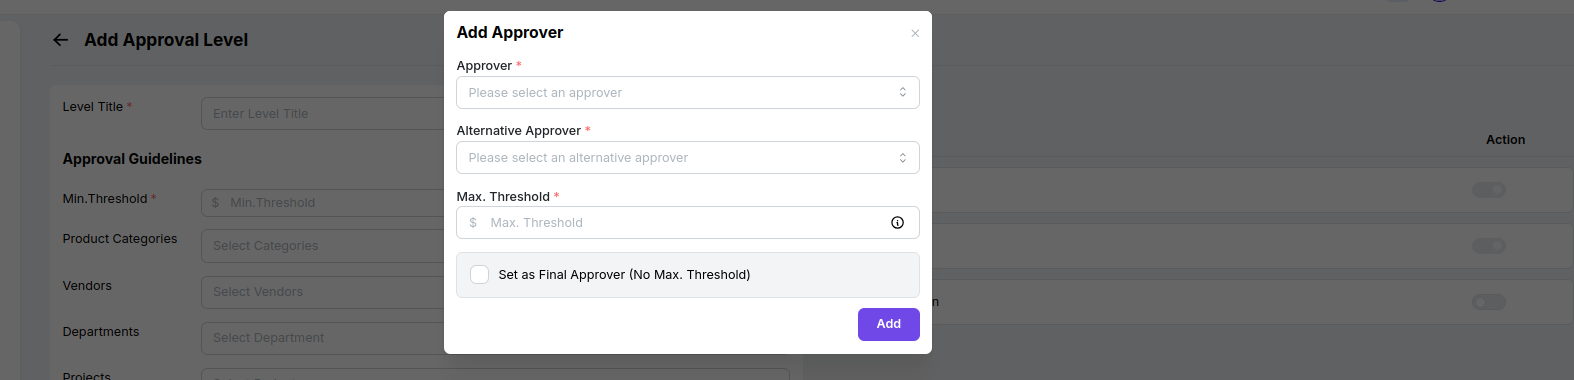 **Add Next Approver:** You can add multiple approvers for an approval level with assigned maximum threshold
values for them. Approvers will be assigned based on their threshold values when a document is submitted for
that approval level.
**Final Approver:** One of the approvers need to be set as the final approver who will be authorised to approve
the corresponding procurement documents with no maximum threshold limit. You will not be able to save the
approval level without setting a final approver.
**Add Next Approver:** You can add multiple approvers for an approval level with assigned maximum threshold
values for them. Approvers will be assigned based on their threshold values when a document is submitted for
that approval level.
**Final Approver:** One of the approvers need to be set as the final approver who will be authorised to approve
the corresponding procurement documents with no maximum threshold limit. You will not be able to save the
approval level without setting a final approver.
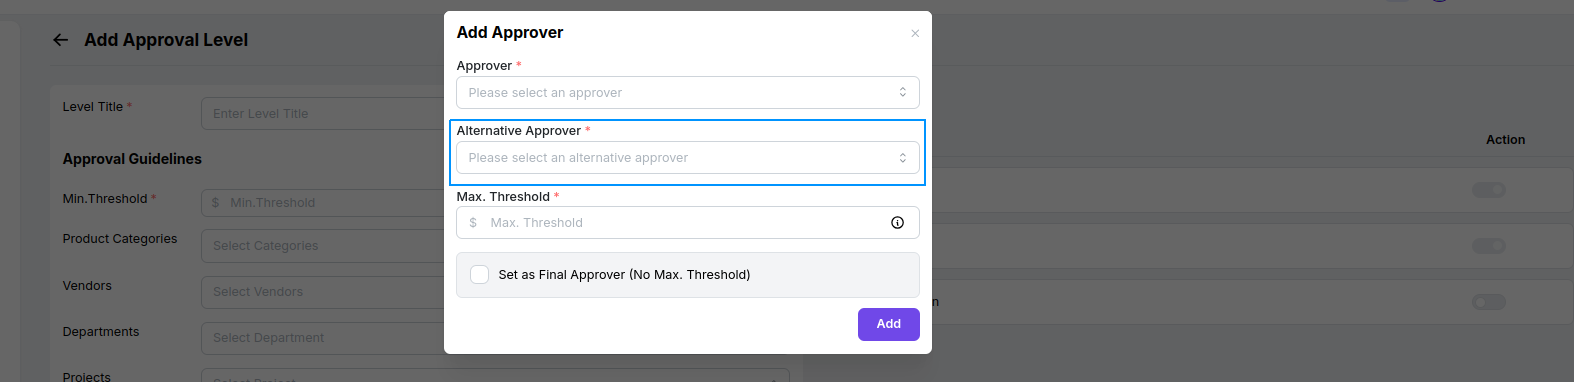
 **Alternate Approver:** When an approver marks themselves as **"On Leave"** in the system, any approval requests
assigned to them during their leave will be automatically redirected to their designated alternate approver.
Once the leave period ends, all pending approvals will be reassigned back to the original approver.
**Alternate Approver:** When an approver marks themselves as **"On Leave"** in the system, any approval requests
assigned to them during their leave will be automatically redirected to their designated alternate approver.
Once the leave period ends, all pending approvals will be reassigned back to the original approver.
 When an approval level is applied to a document (intake, purchase order, received note, invoice), the system checks its total value. The document will be assigned sequentially from the first approver to the next within the approval level until it reaches an approver whose maximum threshold exceeds the document’s total value or the final approver.
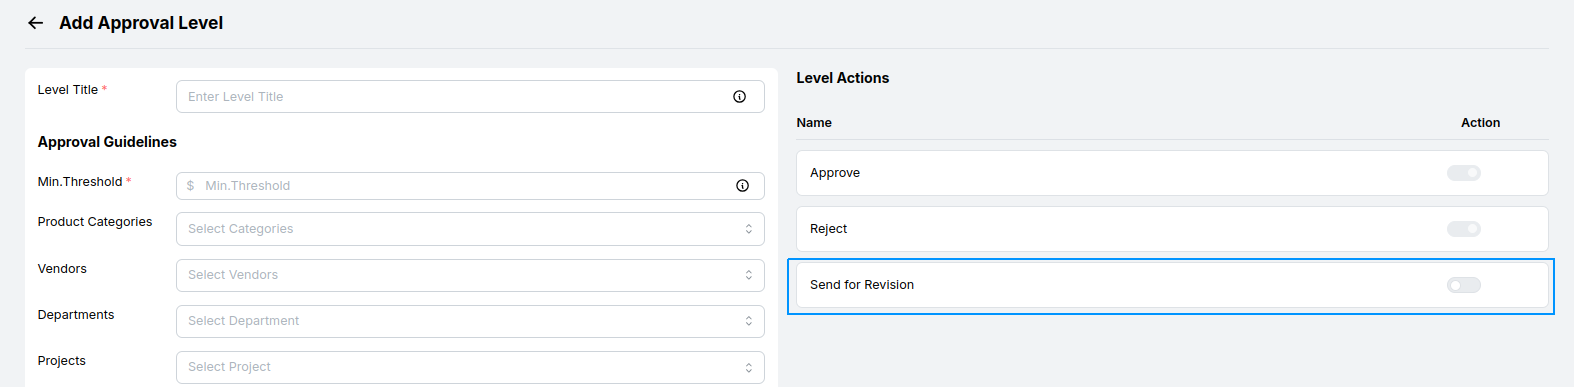
**Level Actions:** Besides Approve and Reject, activate the **“Send for Revision”** option. This allows the approver
to send the document back for edits before resubmission.
When an approval level is applied to a document (intake, purchase order, received note, invoice), the system checks its total value. The document will be assigned sequentially from the first approver to the next within the approval level until it reaches an approver whose maximum threshold exceeds the document’s total value or the final approver.
**Level Actions:** Besides Approve and Reject, activate the **“Send for Revision”** option. This allows the approver
to send the document back for edits before resubmission.
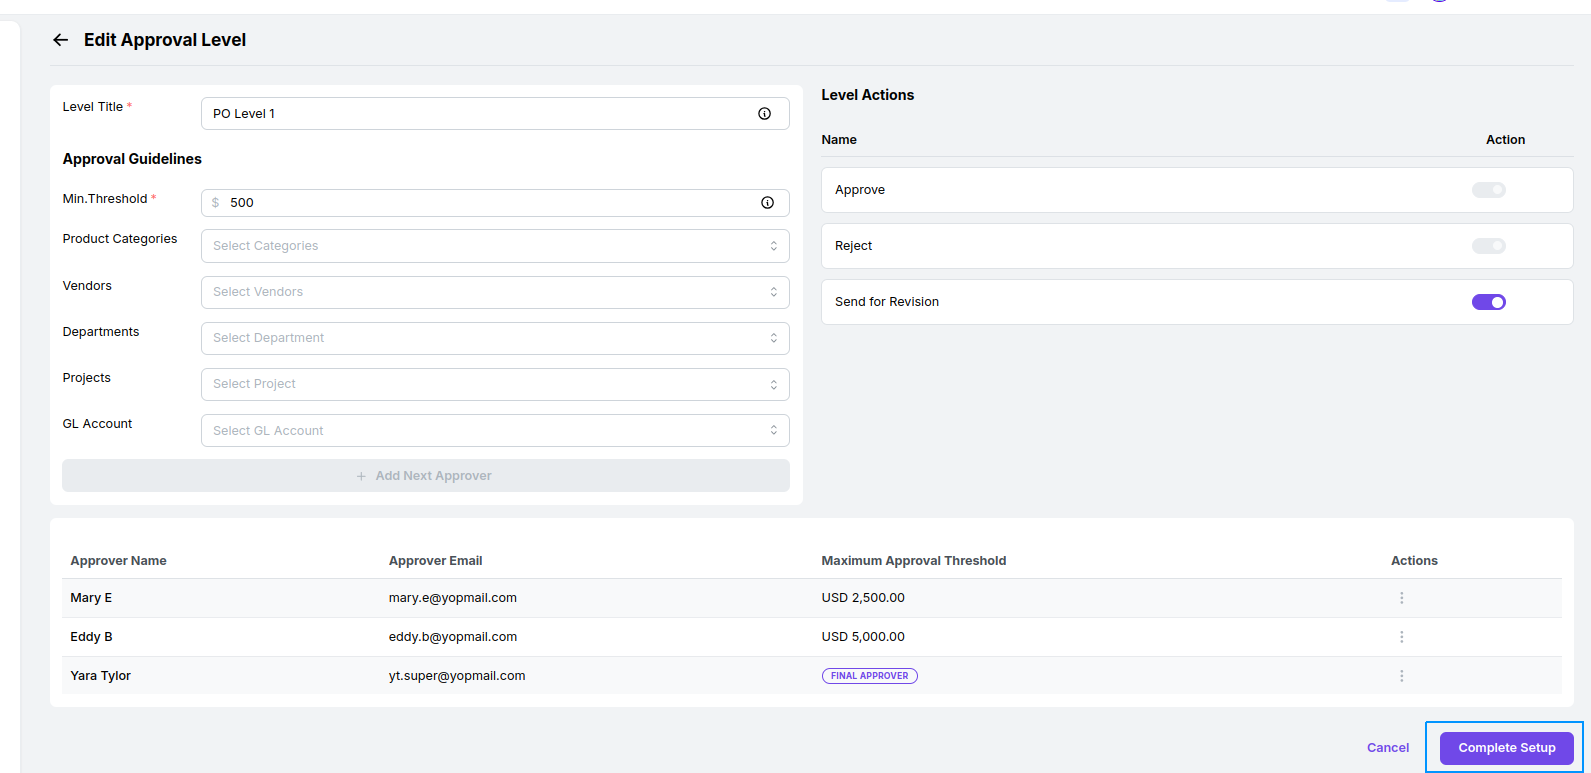
 **Completing Setup:** After filling in all mandatory data, click on the **“Complete Setup”** button to add the
approval
level to the workflow.
**Completing Setup:** After filling in all mandatory data, click on the **“Complete Setup”** button to add the
approval
level to the workflow.
 **Managing Approval Levels**
Added approval levels appear in the Edit Flow view and can be modified or removed, provided there are no pending
approvals linked to them.
Reorganize the order of approval levels by dragging and dropping them. Documents will be assigned for applicable
approval levels according to this order.
**Special Cases**
**Managing Approval Levels**
Added approval levels appear in the Edit Flow view and can be modified or removed, provided there are no pending
approvals linked to them.
Reorganize the order of approval levels by dragging and dropping them. Documents will be assigned for applicable
approval levels according to this order.
**Special Cases**
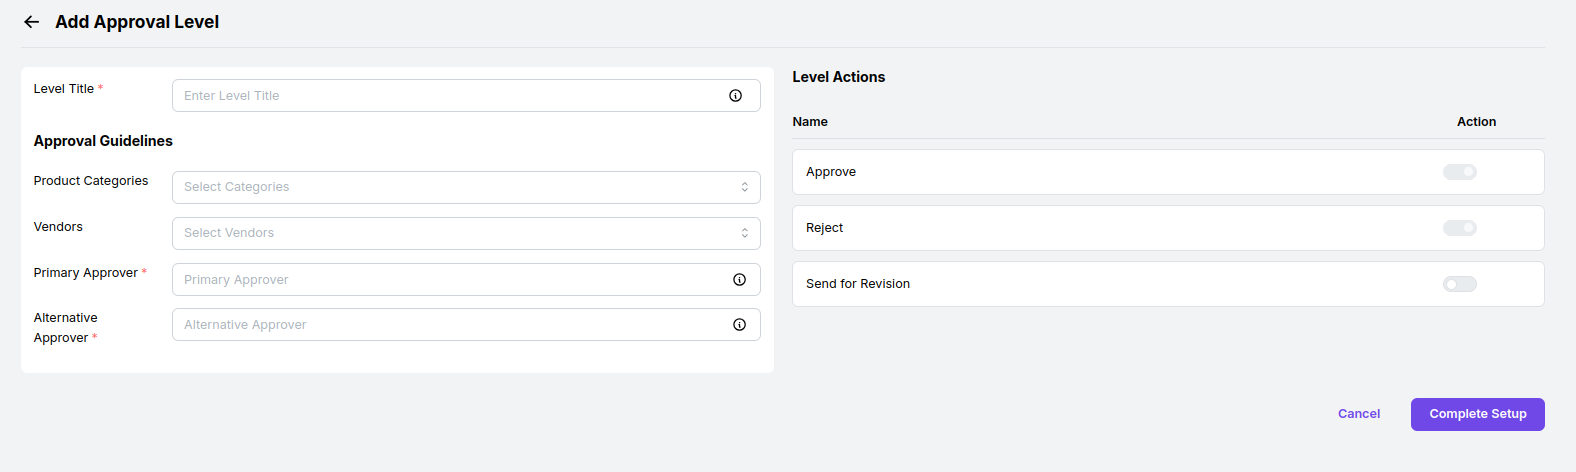 For documents that do not have a **“Total”** value to apply thresholds, such as Intake Requests and Received Notes Flow:
* The approval level creation page does not include a **“Minimum Threshold”** field or a list of multiple approvers.
* Assign a primary approver for all submitted documents for that approval level.
* Multiple approval levels can still be set up within the flow.
* By setting up and managing workflows in Proculy, you ensure that approval processes are tailored to your organization’s needs, providing a clear and efficient path for document approvals.
* Added approval levels can be reorganized to create the exact workflow order.
You can create department-specific approval levels for intakes. Ensure that the approval levels are correctly ordered in the approval levels table. When a document is sent for approval, only the relevant approval levels for that specific document will be assigned, following the order you have set in the table.
***
## Setting up Your Company Profile
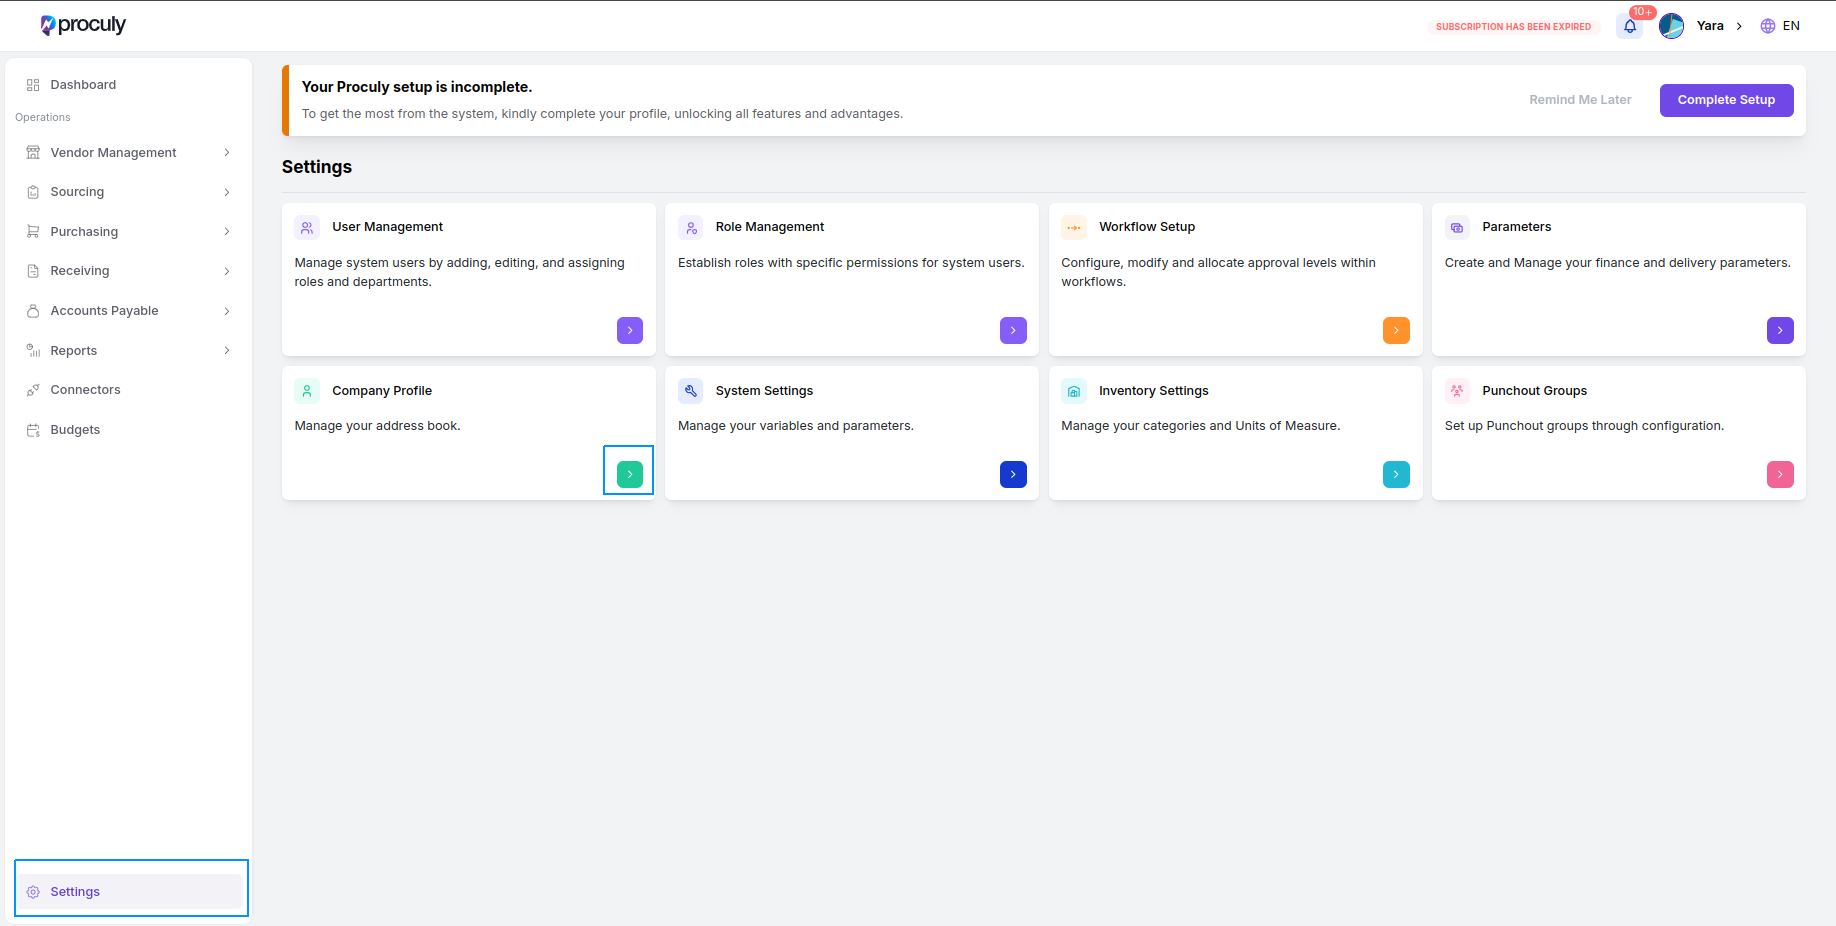
`Go to Settings >
Company
Profile`. The first tab is your company’s address book. The address book contains the set of addresses that you can use as your shipping addresses in purchasing.
For documents that do not have a **“Total”** value to apply thresholds, such as Intake Requests and Received Notes Flow:
* The approval level creation page does not include a **“Minimum Threshold”** field or a list of multiple approvers.
* Assign a primary approver for all submitted documents for that approval level.
* Multiple approval levels can still be set up within the flow.
* By setting up and managing workflows in Proculy, you ensure that approval processes are tailored to your organization’s needs, providing a clear and efficient path for document approvals.
* Added approval levels can be reorganized to create the exact workflow order.
You can create department-specific approval levels for intakes. Ensure that the approval levels are correctly ordered in the approval levels table. When a document is sent for approval, only the relevant approval levels for that specific document will be assigned, following the order you have set in the table.
***
## Setting up Your Company Profile
`Go to Settings >
Company
Profile`. The first tab is your company’s address book. The address book contains the set of addresses that you can use as your shipping addresses in purchasing.
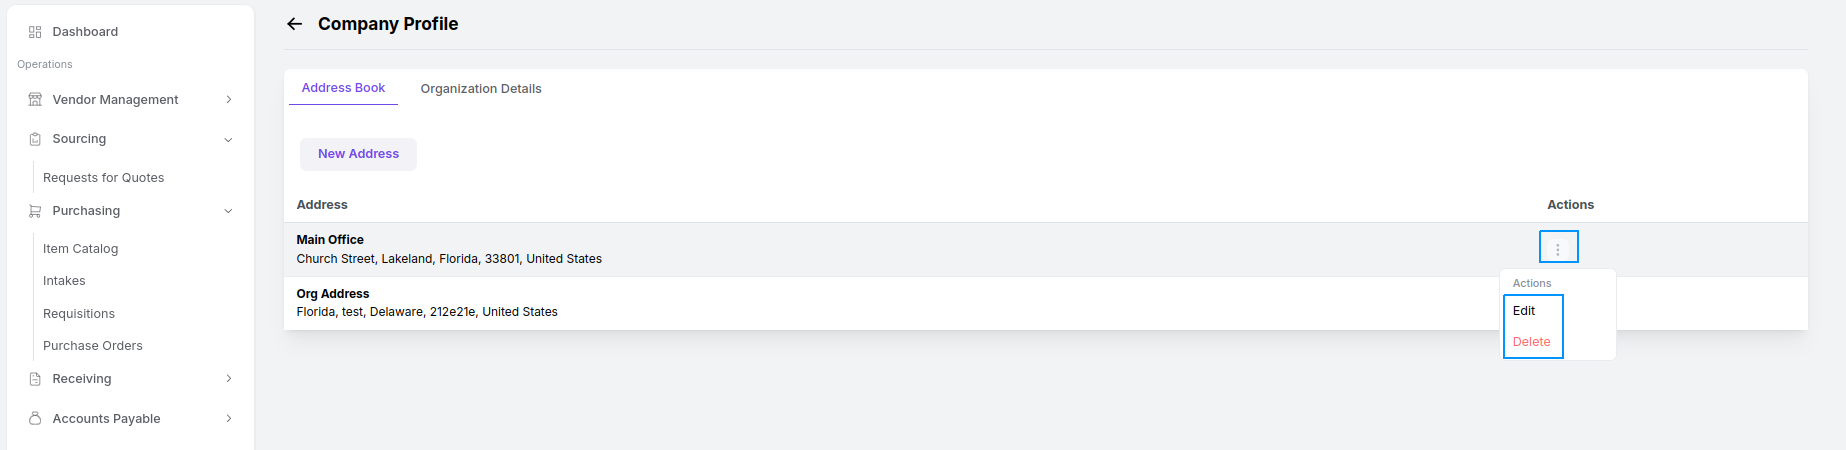
 Click on New
Address, fill the information, and click Save to add new addresses to the address book.
Click on New
Address, fill the information, and click Save to add new addresses to the address book.
 You can **edit** or **delete** an added address by clicking on the actions option.
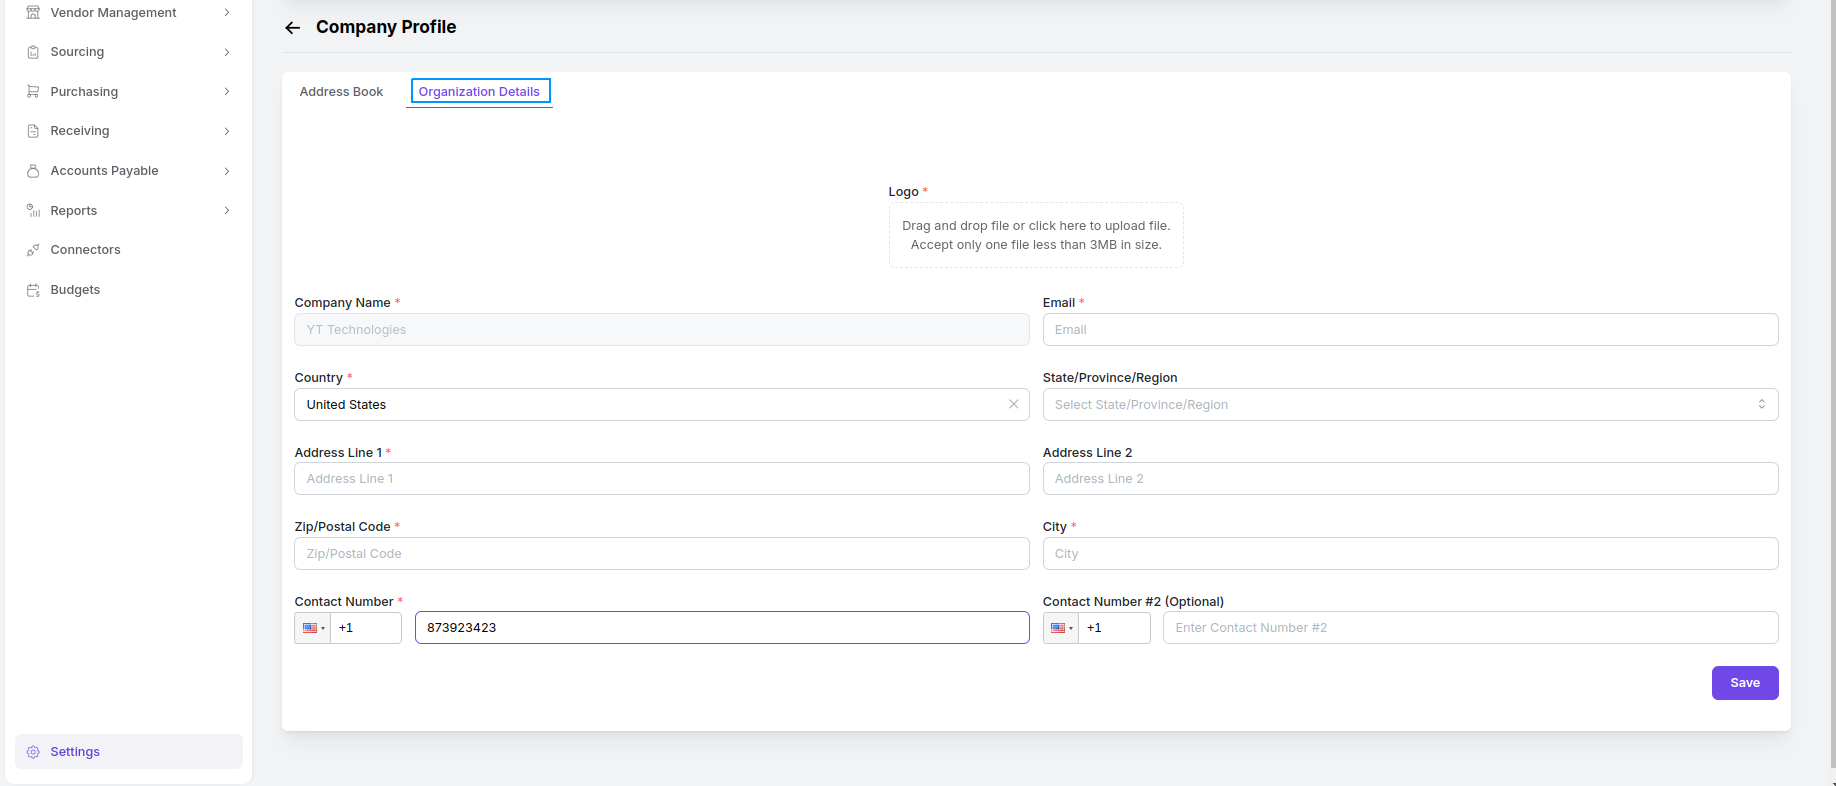
 In the Organization
Details tab on this page, you can add the contact details of your company and upload your company logo.
Enter
information and click save.
In the Organization
Details tab on this page, you can add the contact details of your company and upload your company logo.
Enter
information and click save.
 ***
## Manage your Currency Information
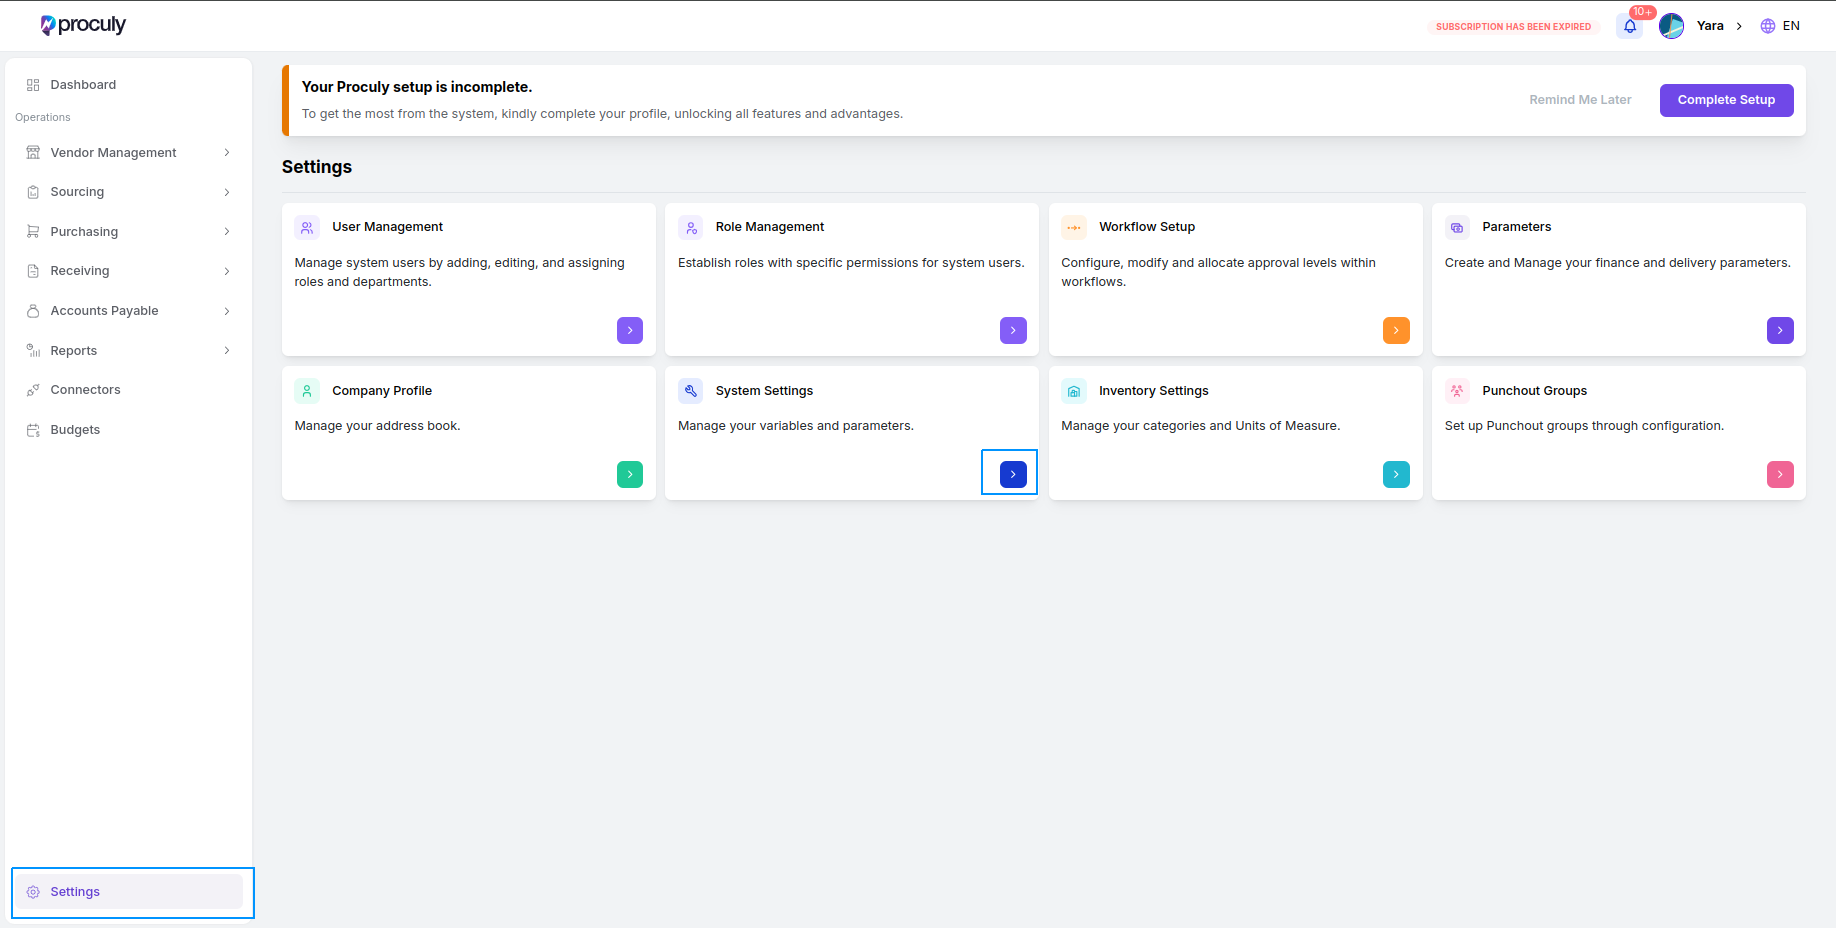
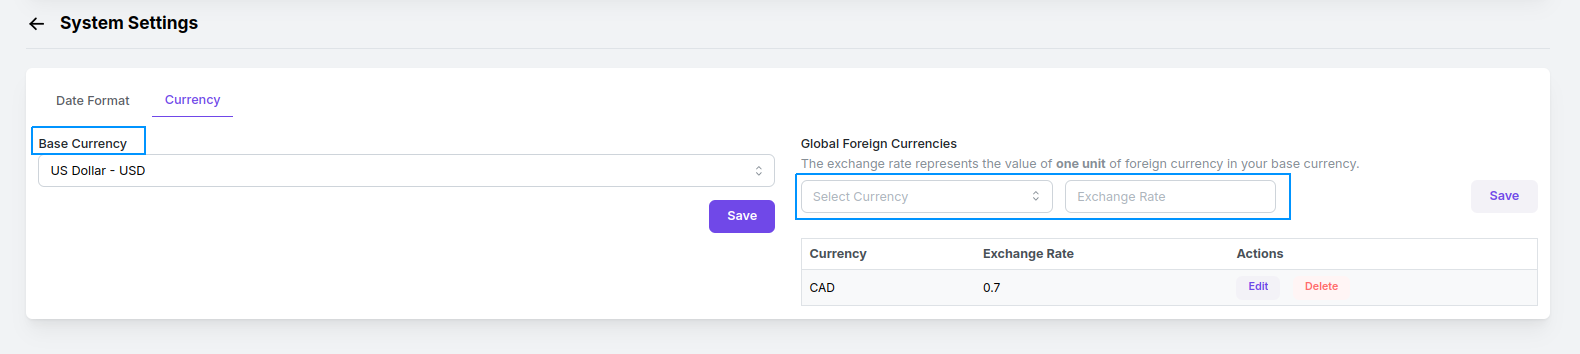
You can have a list of foreign currencies to use in purchasing in the Settings page. Go to System Settings and select Currency. First you should select and save your base currency. Then you can select foreign currencies and save them with exchange rates.
***
## Manage your Currency Information
You can have a list of foreign currencies to use in purchasing in the Settings page. Go to System Settings and select Currency. First you should select and save your base currency. Then you can select foreign currencies and save them with exchange rates.
 Click the **Edit** button for a foreign currency to update its exchange rate and save the changes.
You can delete a saved foreign currency by clicking Delete. However, please note that a foreign currency already linked to a procurement document cannot be deleted.
Click the **Edit** button for a foreign currency to update its exchange rate and save the changes.
You can delete a saved foreign currency by clicking Delete. However, please note that a foreign currency already linked to a procurement document cannot be deleted.